JUC并发编程
1、什么是JUC
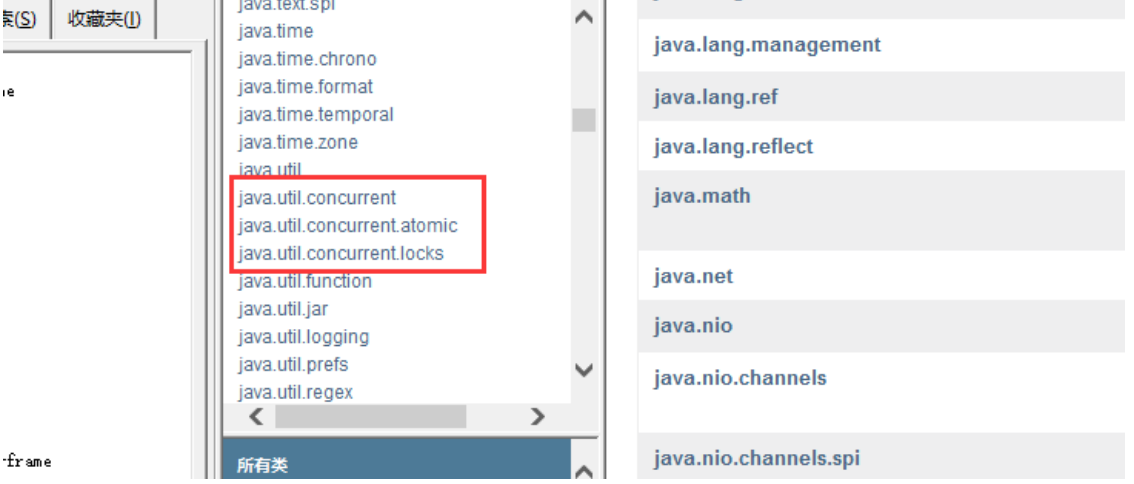
java.util.Concurrent(并发) 工具包、包、分类
业务:普通的线程代码 Thread
Runnable 没有返回值、效率相比入 Callable 相对较低!
2、线程和进程
概念
进程:一个程序,QQ.exe Music.exe 程序的集合;一个进程往往可以包含多个线程,至少包含一个!
线程:例如开了一个进程 Typora,写字,自动保存(线程负责的)
Java默认有2个线程:mian(主线程)、GC(垃圾回收站)
对于Java而言:Thread、Runnable、Callable
java无法自己开启线程
Java 真的可以开启线程吗? 开不了,因为使用的是本地方法,底层的C++ ,Java 无法直接操作硬件
// 对应源码
public synchronized void start() {
    /*** This method is not invoked for the main method thread or "system"
    * group threads created/set up by the VM. Any new functionality added
    * to this method in the future may have to also be added to the VM.
    *
    * A zero status value corresponds to state "NEW".
    */
    if (threadStatus != 0) throw new IllegalThreadStateException();
    /* Notify the group that this thread is about to be started
    * so that it can be added to the group's list of threads
    * and the group's unstarted count can be decremented.
    */
    group.add(this);

    boolean started = false;
    try {
        // 调用下方的本地方法
        start0();
        started = true;
    }  finally {
        try {
            if (!started) {
                group.threadStartFailed(this);
             }
        }  catch (Throwable ignore) {
            /* do nothing. If start0 threw a Throwable then
                it will be passed up the call stack */
        }
    }
}

// 本地方法,底层的C++ ,Java 无法直接操作硬件
private native void start0();
并发、并行
并发编程:并发、并行
并发(多线程操作同一个资源)
- CPU 一核 ,模拟出来多条线程,天下武功,唯快不破,快速交替
并行(多个线程同时执行)
- CPU 多核 ,多个线程可以同时执行; 线程池
package com.xj.demo01;
public class Test1 {
    public static void main(String[] args) {
        // 获取cpu的核数
        // CPU 密集型,IO密集型
        System.out.println(Runtime.getRuntime().availableProcessors());
    }
} 并发编程的本质:充分利用CPU的资源
线程有6个状态
public enum State {

    // 新创建
    NEW,

    // 运行
    RUNNABLE,

    // 阻塞
    BLOCKED,

    // 等待
    WAITING,

    // 超时等待
    TIMED_WAITING,

    // 终止
    TERMINATED;
}
wait/sleep 区别
来自不同的类:
wait => Object
sleep => Thread
关于锁的释放:
wait:会释放锁
sleep:抱着锁睡觉,不会释放
使用的范围是不同的:
wait:必须在同步代码块中使用
sleep:可以在任何地方使用
是否需要捕获异常:
wait:不需要捕获异常
sleep:必须捕获异常
3、Lock锁
传统的Synchronizad
以卖票为例子
package com.xj.demo;

public class SaleTicketDemo1 {
    public static void main(String[] args) {
        // 并发:多线程操作同一个资源类,把资源丢进线程中
        Ticket ticket = new Ticket();

        // 这里使用 jdk1.8 lambda表达式 (参数)->{  代码 }
        new Thread(()->{
            for (int i = 1; i < 40 ; i++) {
                ticket.sale();
            }
        } , "A").start();

        new Thread(()->{
            for (int i = 1; i < 40 ; i++) {
                ticket.sale();
            }
        } , "B").start();

        new Thread(()->{
            for (int i = 1; i < 40 ; i++) {
                ticket.sale();
            }
        } , "C").start();
    }
}

// 资源类
class Ticket{
    // 属性,方法
    private int number = 50;

    // 卖票的方式
    public synchronized void sale(){
        if(number > 0){
            System.out.println(Thread.currentThread().getName() + "卖出了"
                    + (50 - number) + "张票,剩余" + (--number) + "张票");
        }
    }
} 运行结果:所有线程依次执行卖票操作,直到票被卖完,如果不加锁的话,数据将会产生错误!
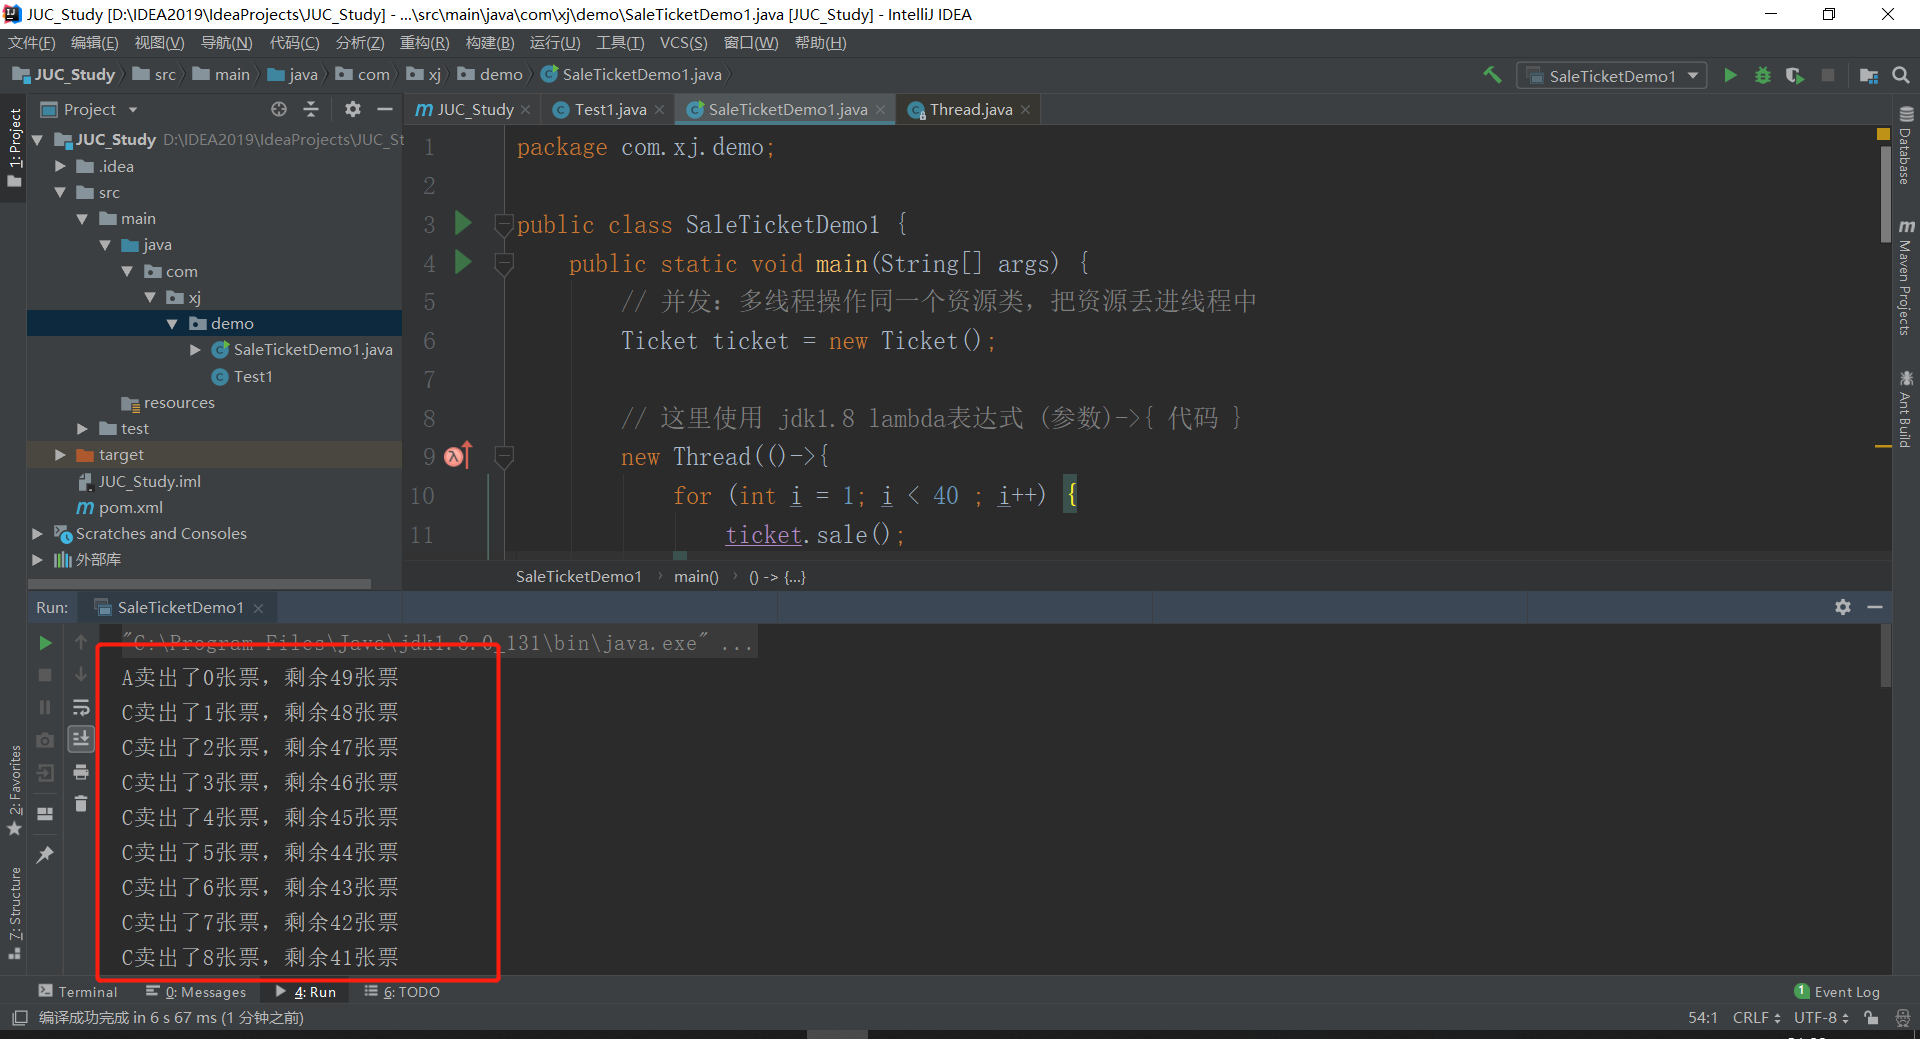
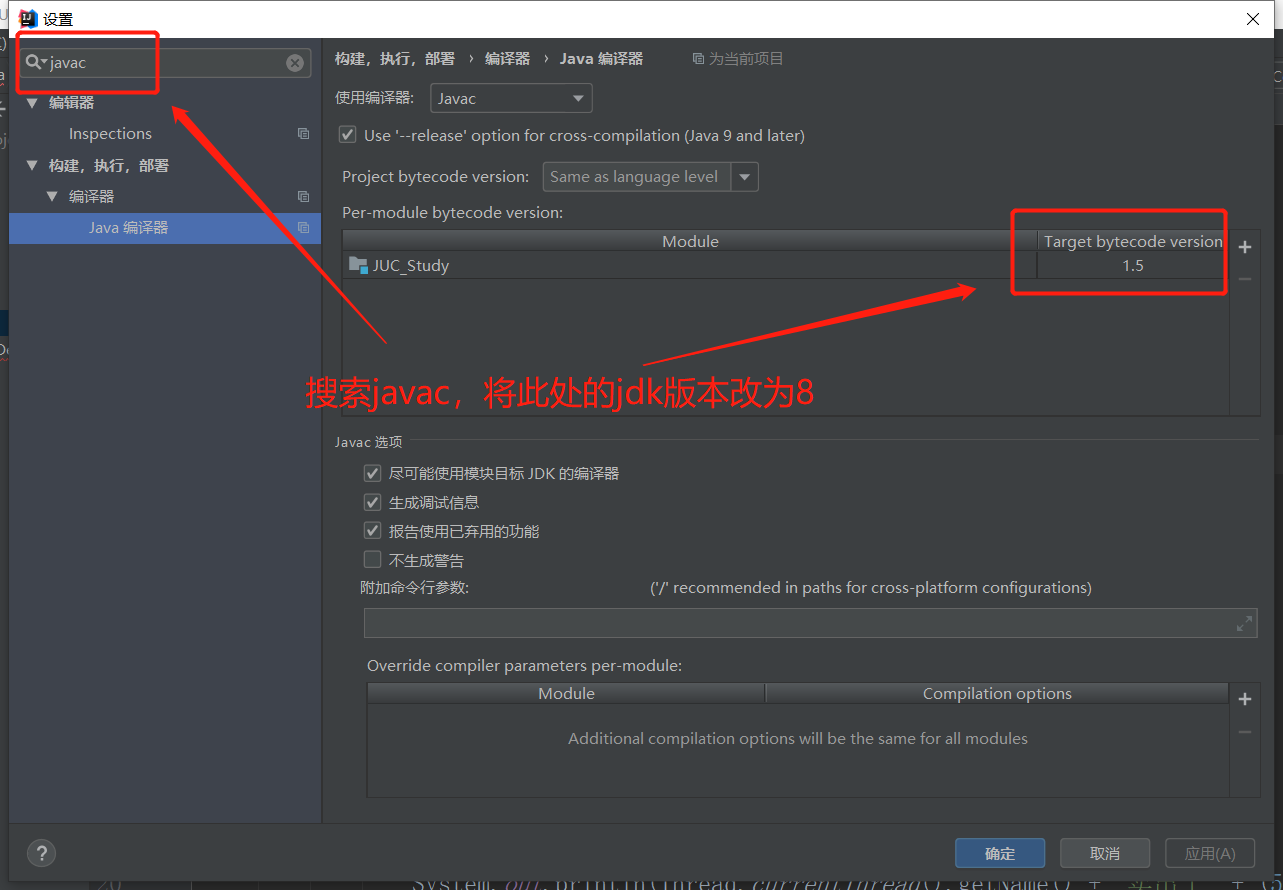
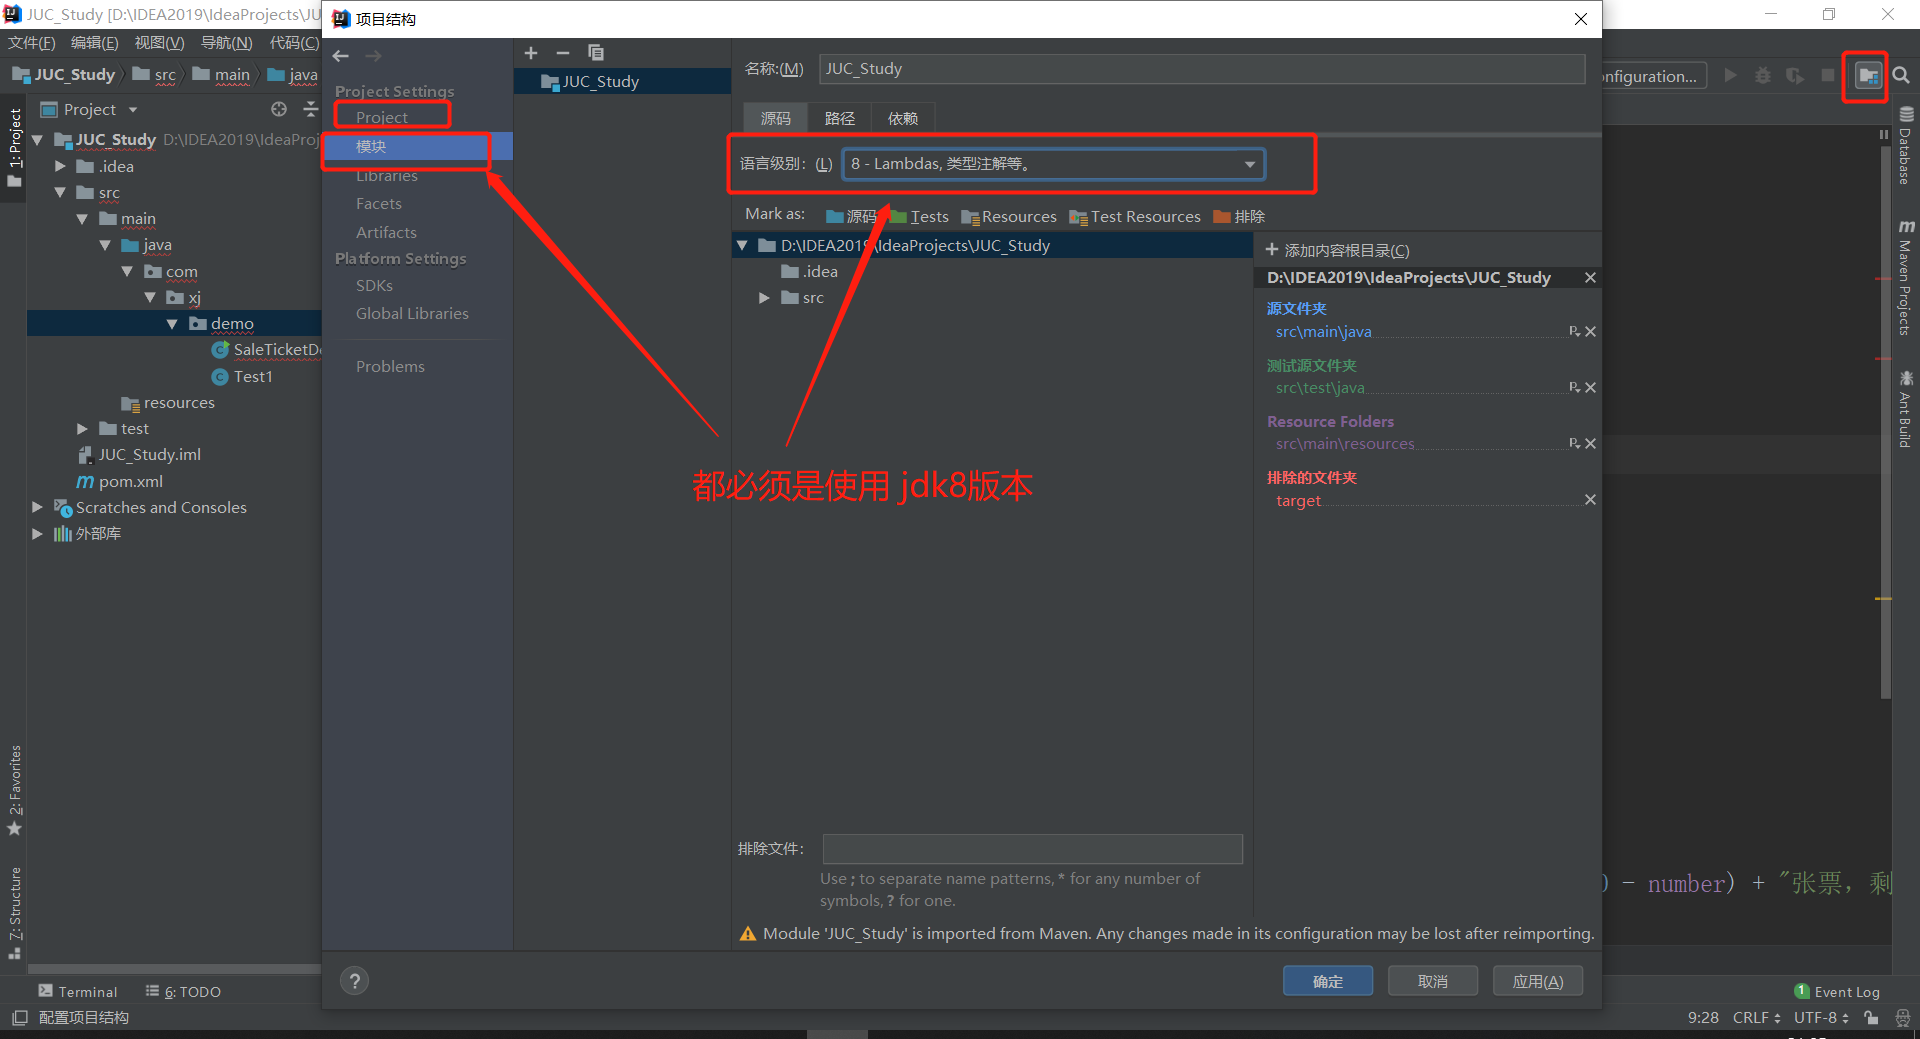
注意:这里使用 jdk1.8 lambda表达式 (参数)->{ 代码 },需要配置好jdk版本,不然设别不了
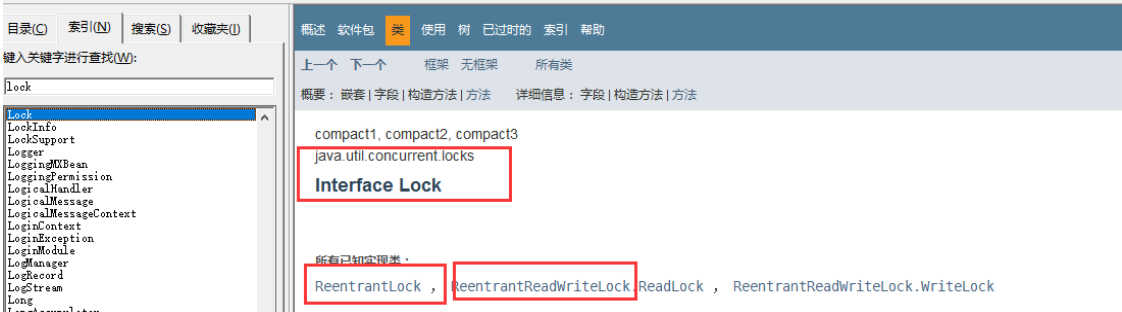
Lock 接口
查看jdk文档的基本介绍
实现类如下,一般直接使用ReentrantLock

源码部分
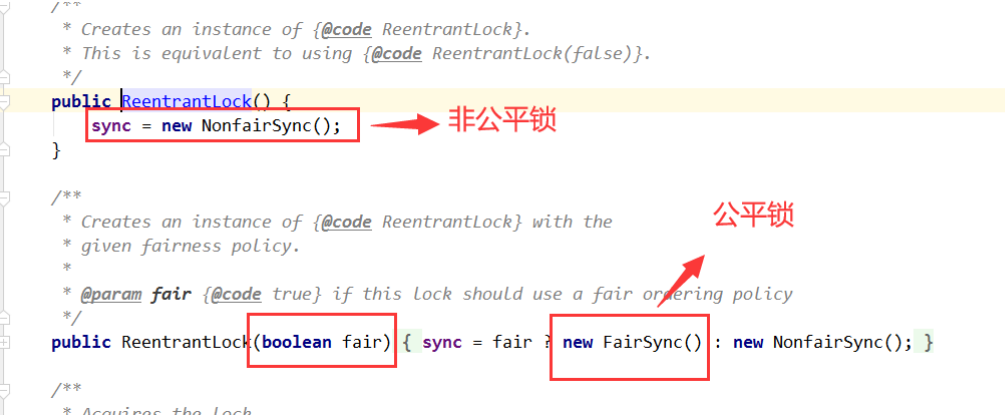
- 公平锁:十分公平:可以先来后到
- 非公平锁:十分不公平:可以插队 (默认)
同样以卖票为例子
package com.xj.demo;
import java.util.concurrent.locks.Lock;
import java.util.concurrent.locks.ReentrantLock;
public class SaleTicketDemo2 {
public static void main(String[] args) {
// 并发:多线程操作同一个资源类,把资源丢进线程中
Ticket ticket = new Ticket();
// 这里使用 jdk1.8 lambda表达式 (参数)->{ 代码 }
new Thread(()->{ for (int i = 1; i < 40 ; i++)ticket.sale();} , "A").start();
new Thread(()->{ for (int i = 1; i < 40 ; i++)ticket.sale();} , "B").start();
new Thread(()->{ for (int i = 1; i < 40 ; i++)ticket.sale();} , "C").start();
}
}
// 资源类
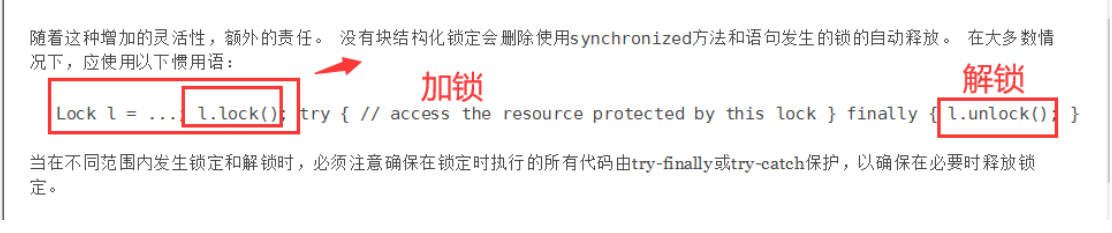
// Lock三部曲
// 1、 new ReentrantLock();
// 2、 lock.lock(); // 加锁
// 3、 finally=> lock.unlock(); // 解锁
class Ticket2{
// 属性,方法
private int number = 50;
Lock lock = new ReentrantLock();
// 卖票的方式
public void sale(){
// 加锁
lock.lock();
// 业务代码
try {
if(number > 0){
System.out.println(Thread.currentThread().getName() + "卖出了"
+ (50 - number) + "张票,剩余" + (--number) + "张票");
}
} catch (Exception e){
e.printStackTrace();
} finally {
// 解锁
lock.unlock();
}
}
} 运行效果还是一样!
Synchronized 和 Lock 区别
Synchronized 是内置的Java关键字
Lock 是一个Java类
Synchronized 无法判断获取锁的状态
Lock 可以判断是否获取到了锁
Synchronized 会自动释放锁
lock 必须要手动释放锁!如果不释放锁,死锁
Synchronized 线程1(获得锁,阻塞)、线程2(等待,傻傻的等)
Lock锁就不一定会等待下去;
Synchronized 可重入锁,不可以中断的,非公平
Lock ,可重入锁,可以 判断锁,默认非公平(可以自己设置);
Synchronized 适合锁少量的代码同步问题
Lock 适合锁大量的同步代码!
4、生产者和消费者问题
面试常问:单例模式、排序算法、生产者和消费者、死锁
1、Synchronized 版
示例代码(两个线程模式)
package com.xj.pc;

/***
 * 线程之间的通信问题:生产者和消费者问题! 等待唤醒,通知唤醒
 * 线程交替执行 A B 操作同一个变量 num = 0
 * A num+1
 * B num-1
 */
public class A {
    public static void main(String[] args) {
        Data data = new Data();

        // 开启两个线程
        new Thread(()->{
            for (int i = 0; i < 10; i++) {
                try {
                    data.increment();
                }  catch (InterruptedException e) {
                    e.printStackTrace();
                }
            }
        } , "A").start();
        new Thread(()->{
            for (int i = 0; i < 10; i++) {
                try {
                    data.decrement();
                }  catch (InterruptedException e) {
                    e.printStackTrace();
                }
            }
        } , "B").start();
    }
}

// 资源类
class Data{
    private int number = 0;

    // +1
    public synchronized void increment() throws InterruptedException {
        if(number != 0){
            // 等待
            this.wait();
        }
        number++;
        System.out.println(Thread.currentThread().getName() + "-->" + number);
        // 通知其他线程,这里加一完毕
        this.notifyAll();
    }

    // -1
    public synchronized void decrement() throws InterruptedException {
        if(number == 0){
            // 等待
            wait();
        }
        number--;
        System.out.println(Thread.currentThread().getName() + "-->" + number);
        // 通知其他线程,这里加一完毕
        notifyAll();
    }
}
如果是处理A B C D 4 个线程的情况!
直接使用上面代码测试,增加两个线程
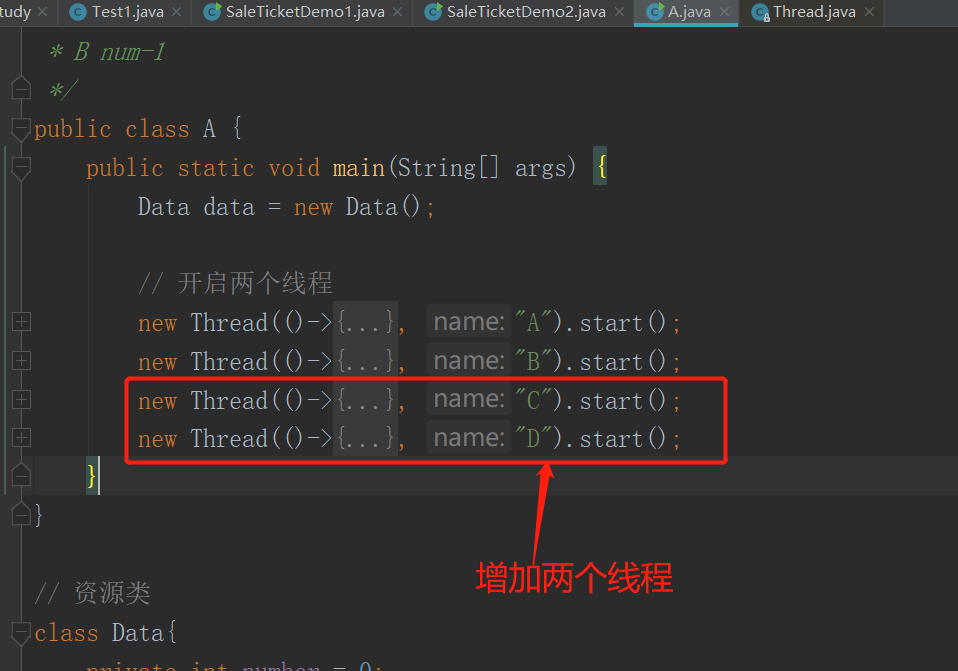
则会发现运行结果是错误的!
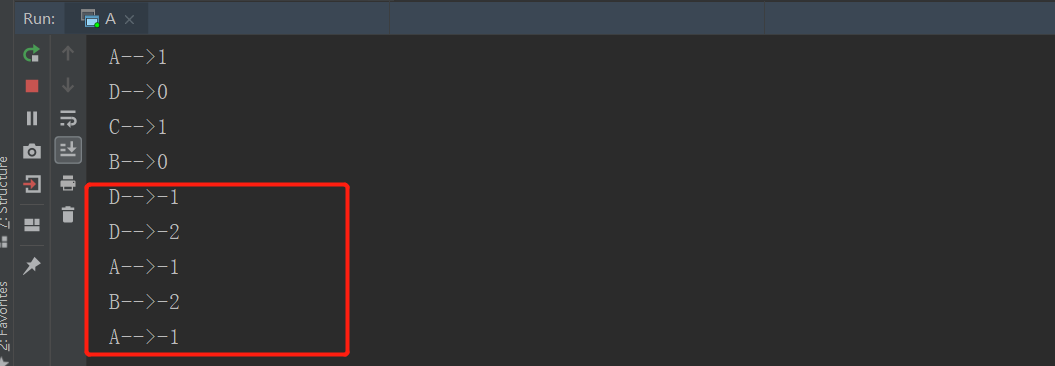
错误原因
使用if只进行一次判断,所以会存在虚假唤醒的情况!
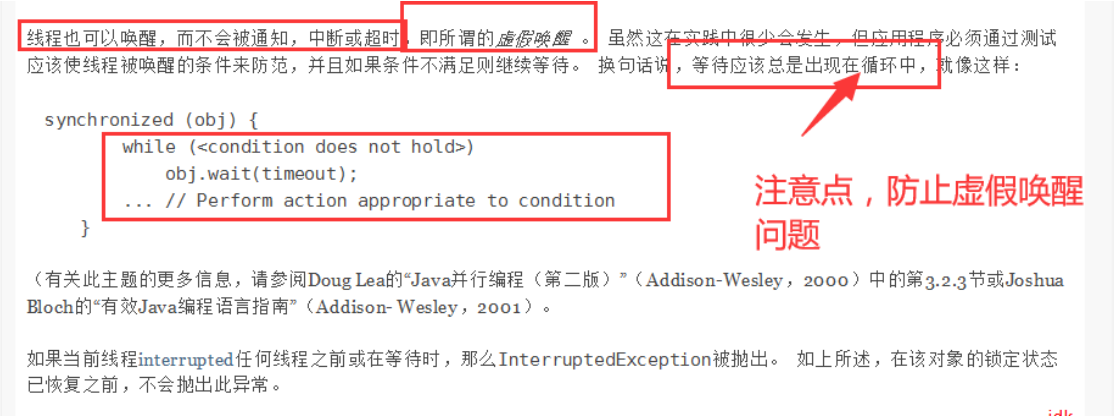
解决方法
if 改为 while 判断
package com.xj.pc;

/***
 * 线程之间的通信问题:生产者和消费者问题! 等待唤醒,通知唤醒
 * 线程交替执行 A B 操作同一个变量 num = 0
 * A num+1
 * B num-1
 */
public class A {
    public static void main(String[] args) {
        Data data = new Data();

        // 开启两个线程
        new Thread(()->{
            for (int i = 0; i < 10; i++) {
                try {
                    data.increment();
                }  catch (InterruptedException e) {
                    e.printStackTrace();
                }
            }
        } , "A").start();
        new Thread(()->{
            for (int i = 0; i < 10; i++) {
                try {
                    data.decrement();
                }  catch (InterruptedException e) {
                    e.printStackTrace();
                }
            }
        } , "B").start();
        new Thread(()->{
            for (int i = 0; i < 10; i++) {
                try {
                    data.increment();
                }  catch (InterruptedException e) {
                    e.printStackTrace();
                }
            }
        } , "C").start();
        new Thread(()->{
            for (int i = 0; i < 10; i++) {
                try {
                    data.decrement();
                }  catch (InterruptedException e) {
                    e.printStackTrace();
                }
            }
        } , "D").start();
    }
}

// 资源类
class Data{
    private int number = 0;

    // +1
    public synchronized void increment() throws InterruptedException {
        while(number != 0){
            // 等待
            this.wait();
        }
        number++;
        System.out.println(Thread.currentThread().getName() + "-->" + number);
        // 通知其他线程,这里加一完毕
        this.notifyAll();
    }

    // -1
    public synchronized void decrement() throws InterruptedException {
        while(number == 0){
            // 等待
            wait();
        }
        number--;
        System.out.println(Thread.currentThread().getName() + "-->" + number);
        // 通知其他线程,这里加一完毕
        notifyAll();
    }
}
此时运行的结果正确了!
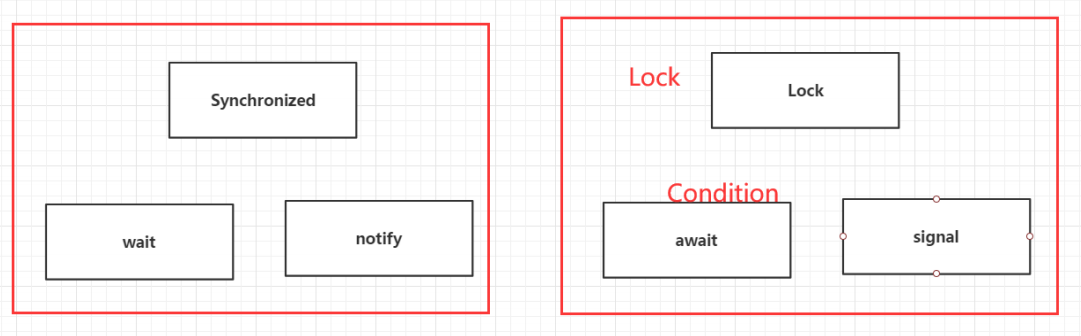
2、JUC版
JUC没有wait()和notify(),而是使用了Condition的await()和signal()进行代替
对应官方文档源码
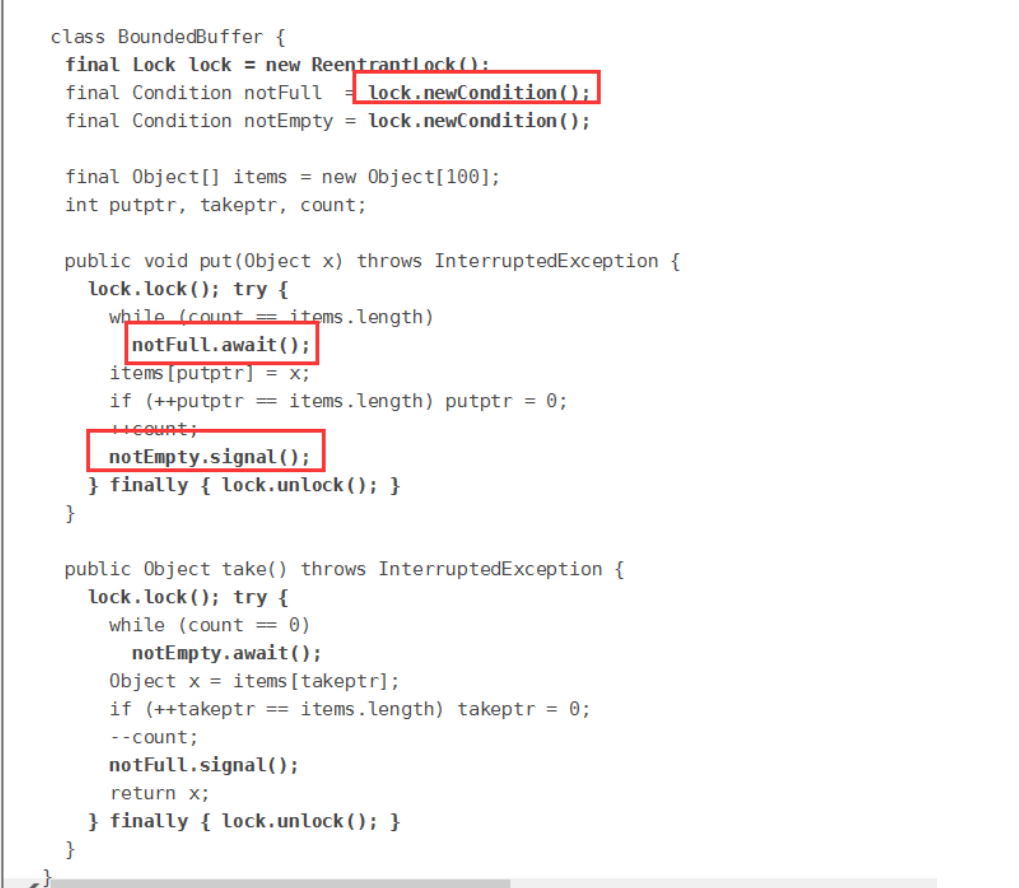
代码实现
package com.xj.pc;
import java.util.concurrent.locks.Condition;
import java.util.concurrent.locks.Lock;
import java.util.concurrent.locks.ReentrantLock;
public class B {
public static void main(String[] args) {
Data2 data = new Data2();
new Thread(()->{
for (int i = 0; i < 10; i++) {
data.increment();
}
} , "A").start();
new Thread(()->{
for (int i = 0; i < 10; i++) {
data.decrement();
}
} , "B").start();
new Thread(()->{
for (int i = 0; i < 10; i++) {
data.increment();
}
} , "C").start();
new Thread(()->{
for (int i = 0; i < 10; i++) {
data.decrement();
}
} , "D").start();
}
}
// 资源类
class Data2{
private int number = 0;
Lock lock = new ReentrantLock();
Condition condition = lock.newCondition();
//condition.await(); // 等待
// condition.signalAll(); // 唤醒全部
// +1
public void increment(){
lock.lock();
try {
// 业务代码
while(number != 0){
// 等待
condition.await();
}
number++;
System.out.println(Thread.currentThread().getName() + "-->" + number);
// 通知其他线程,这里加一完毕
condition.signalAll();
} catch (InterruptedException e) {
e.printStackTrace();
} finally {
lock.unlock();
}
}
// -1
public void decrement(){
lock.lock();
try {
while(number == 0){
// 等待
condition.await();
}
number--;
System.out.println(Thread.currentThread().getName() + "-->" + number);
// 通知其他线程,这里加一完毕
condition.signalAll();
} catch (InterruptedException e) {
e.printStackTrace();
} finally {
lock.unlock();
}
}
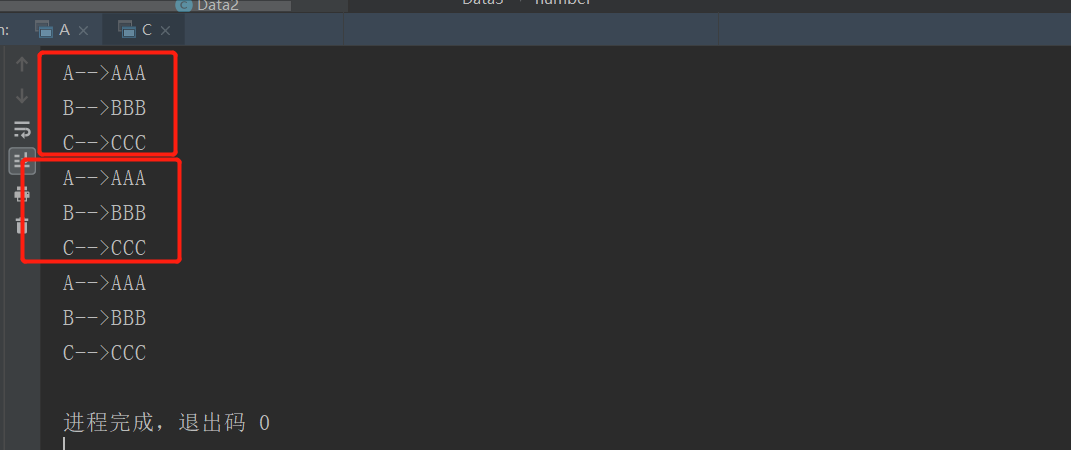
} 运行结果一致!除此之外,condition还可以指定线程运行,让ABCD依次运行
Condition 精准的通知和唤醒线程
package com.xj.pc;

import java.util.concurrent.locks.Condition;
import java.util.concurrent.locks.Lock;
import java.util.concurrent.locks.ReentrantLock;

public class C {
    public static void main(String[] args) {
        Data3 data = new Data3();
        new Thread(()->{
            for (int i = 0; i < 10; i++) {
                data.printA();
            }
        } , "A").start();

        new Thread(()->{
            for (int i = 0; i < 10; i++) {
                data.printB();
            }
        } , "B").start();

        new Thread(()->{
            for (int i = 0; i < 10; i++) {
                data.printC();
            }
        } , "C").start();
    }
}

// 资源类
class Data3{
    private int number = 1; // 1A 2B 3C
    Lock lock = new ReentrantLock();
    Condition condition1 = lock.newCondition();
    Condition condition2 = lock.newCondition();
    Condition condition3 = lock.newCondition();

    public void printA(){
        lock.lock();
        try {
            // 业务,判断-> 执行-> 通知
            while(number != 1){
                // 等待
                condition1.await();
            }
            System.out.println(Thread.currentThread().getName() + "-->AAA");
            // 唤醒,唤醒指定的人,B
            number = 2;
            condition2.signal();
        }  catch (InterruptedException e) {
            e.printStackTrace();
        }  finally {
            lock.unlock();
        }
    }

    public void printB(){
        lock.lock();
        try {
            // 业务,判断-> 执行-> 通知
            while(number != 2){
                // 等待
                condition2.await();
            }
            System.out.println(Thread.currentThread().getName() + "-->BBB");
            // 唤醒,唤醒指定的人,C
            number = 3;
            condition3.signal();
        }  catch (InterruptedException e) {
            e.printStackTrace();
        }  finally {
            lock.unlock();
        }
    }

    public void printC(){
        lock.lock();
        try {
            // 业务,判断-> 执行-> 通知
            while(number != 3){
                // 等待
                condition3.await();
            }
            System.out.println(Thread.currentThread().getName() + "-->CCC");
            // 唤醒,唤醒指定的人,A
            number = 1;
            condition1.signal();
        }  catch (InterruptedException e) {
            e.printStackTrace();
        }  finally {
            lock.unlock();
        }
    }
}
运行结果:ABC线程依次进行
5、8锁现象
如何判断锁的是谁!锁到底锁的是谁!
代码演示
synchronized 锁
- synchronized 修饰的同步方法自带锁,所以两个同步线程不可并发
package com.xj.lock8;

import java.util.concurrent.TimeUnit;

/*** 8锁,就是关于锁的8个问题
 * 1、标准情况下,两个线程先打印 发短信 还是 打电话? 1/发短信 2/打电话
 * 2、sendSms延迟4秒,两个线程先打印 发短信 还是 打电话? 1/发短信 2/打电话
 */
public class Test1 {
    public static void main(String[] args) {
        // 只创建了一个锁的对象
        Phone phone = new Phone();
        new Thread(()->{
            phone.send();
        } , "A").start();

        // 睡眠
        try {
            TimeUnit.SECONDS.sleep(1);
        }  catch (InterruptedException e) {
            e.printStackTrace();
        }

        new Thread(()->{
            phone.call();
        } , "B").start();
    }
}

class Phone{
    // synchronized 锁的对象是方法的调用者!
    // 两个方法用的是同一个锁,谁先拿到谁执行!
    public synchronized void send(){
        try {
            TimeUnit.SECONDS.sleep(4);
        }  catch (InterruptedException e) {
            e.printStackTrace();
        }
        System.out.println("发短信");
    }

    public synchronized void call(){
        System.out.println("打电话");
    }
}
普通方法和两把锁测试
- 普通方法没有锁!不是同步方法,不受锁的影响!
- 两把锁的时候,两个同步方法可以并发!
package com.xj.lock8;

import java.util.concurrent.TimeUnit;

/**
 * 3、 增加了一个普通方法后!先执行发短信还是Hello? 普通方法    // 先输出Hello
 * 4、 两个对象,两个同步方法, 发短信还是 打电话? // 打电话
 */
public class Test2 {
    public static void main(String[] args) {
        // 两个对象,两个调用者,两把锁!
        Phone2 phone = new Phone2();
        Phone2 phone2 = new Phone2();

        new Thread(()->{
            phone.send();
        } , "A").start();

        // 睡眠
        try {
            TimeUnit.SECONDS.sleep(1);
        }  catch (InterruptedException e) {
            e.printStackTrace();
        }

        // 执行普通方法,不被上锁
//        new Thread(()->{
//            phone.hello();
//        } ).start();

        // 使用不同对象执行
        new Thread(()->{
            phone2.call();
        } , "B").start();
    }
}

class Phone2{
    // synchronized 锁的对象是方法的调用者!
    public synchronized void send(){
        try {
            TimeUnit.SECONDS.sleep(4);
        }  catch (InterruptedException e) {
            e.printStackTrace();
        }
        System.out.println("发短信");
    }

    public synchronized void call(){
        System.out.println("打电话");
    }

    // 这里没有锁!不是同步方法,不受锁的影响
    public void hello(){
        System.out.println("hello");
    }
}
使用static修饰synchronized
这个时候synchronized 锁的是整个Class,所以两把锁还是一样!不可以并发!
package com.xj.lock8;

import java.util.concurrent.TimeUnit;

/**
 * 5、增加两个静态的同步方法,只有一个对象,先打印 发短信?打电话?
 * 6、两个对象!增加两个静态的同步方法, 先打印 发短信?打电话?
 */
public class Test3 {
    public static void main(String[] args) {
        // 两个对象,两个调用者,两把锁!
        Phone3 phone = new Phone3();
        Phone3 phone3 = new Phone3();

        new Thread(()->{
            phone.send();
        } , "A").start();

        // 睡眠
        try {
            TimeUnit.SECONDS.sleep(1);
        }  catch (InterruptedException e) {
            e.printStackTrace();
        }

        // 使用不同对象执行
        new Thread(()->{
            phone3.call();
        } , "B").start();
    }
}

// Phone3唯一的一个 Class 对象
class Phone3{
    // synchronized 锁的对象是方法的调用者!
    // static 静态方法
    // 类一加载就有了!锁的是Class
    public static synchronized void send(){
        try {
            TimeUnit.SECONDS.sleep(4);
        }  catch (InterruptedException e) {
            e.printStackTrace();
        }
        System.out.println("发短信");
    }

    public static synchronized void call(){
        System.out.println("打电话");
    }
}
静态同步方法 和 普通同步方法 的测试
- 静态的同步方法 锁的是 Class 类模板
- 普通的同步方法 锁的调用者
因为锁的类型不同,所以一个对象和两个对象的效果相同,互不影响可以并发。
package com.xj.lock8;

import java.util.concurrent.TimeUnit;

/**
 * 1、1个静态的同步方法,1个普通的同步方法 ,一个对象,先打印 发短信?打电话?     1/打电话   2/发短信
 * 2、1个静态的同步方法,1个普通的同步方法 ,两个对象,先打印 发短信?打电话?     1/打电话   2/发短信
 */
public class Test4 {
    public static void main(String[] args) {
        // 两个对象的Class类模板只有一个,static,锁的是Class
        Phone4 phone = new Phone4();
        Phone4 phone4 = new Phone4();

        new Thread(()->{
            phone.send();
        } , "A").start();

        // 睡眠
        try {
            TimeUnit.SECONDS.sleep(1);
        }  catch (InterruptedException e) {
            e.printStackTrace();
        }

        // 使用不同对象执行
        new Thread(()->{
            phone4.call();
        } , "B").start();
    }
}

class Phone4{
    // 静态的同步方法 锁的是 Class 类模板
    public static synchronized void send(){
        try {
            TimeUnit.SECONDS.sleep(4);
        }  catch (InterruptedException e) {
            e.printStackTrace();
        }
        System.out.println("发短信");
    }

    // 普通的同步方法 锁的调用者
    public synchronized void call(){
        System.out.println("打电话");
    }
}
小结
普通同步方法锁的是一个具体对象
static静态同步方法锁的是一个唯一的类模板class
6、集合类不安全
所有的单线程代码都是安全的,而在多并发的时候,很多集合则是不安全的!
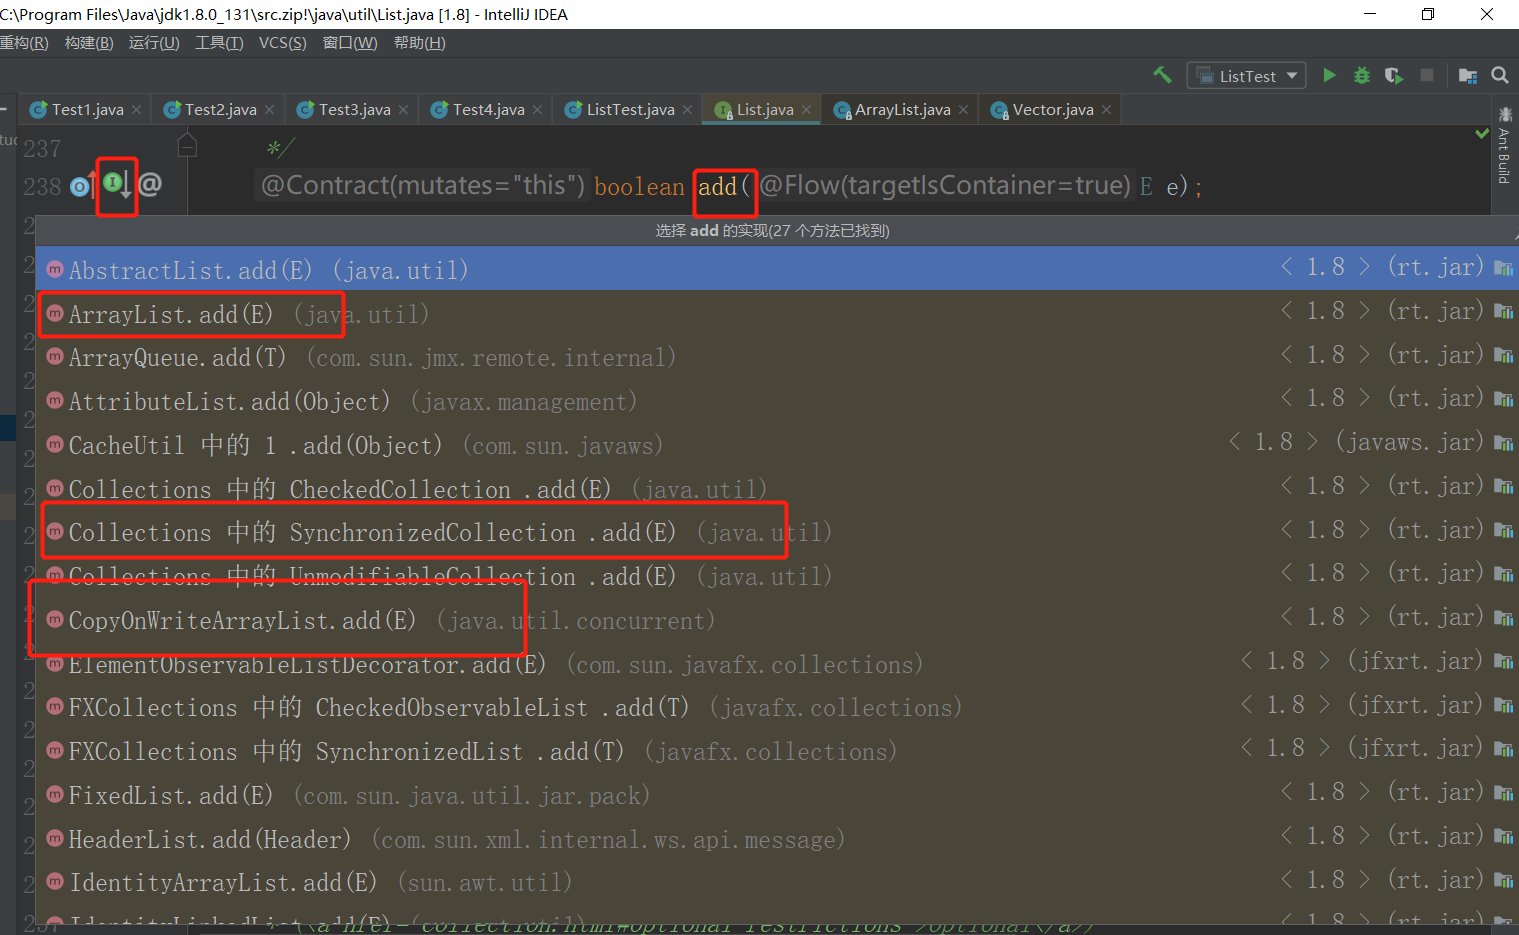
1、CopyOnWriteArrayList
CopyOnWrite 写入时复制 COW 计算机程序设计领域的一种优化策略;多个线程调用的时候,list,读取的时候,固定的,写入(覆盖)。在写入的时候应避免覆盖,造成数据问题!
单线程 List
单线程的时候,以下程序可以正常运行
public class ListTest {
    public static void main(String[] args) {
        List<String> list = new ArrayList<>();
        for (int i = 0; i < 10; i++) {
            list.add(UUID.randomUUID().toString().substring(0,5));
        }
        list.forEach(System.out::println);
    }
}
多线程 List
public class ListTest {
    public static void main(String[] args) {
        List<String> list = new ArrayList<>();
        for (int i = 0; i < 10; i++) {
            new Thread(()->{
                list.add(UUID.randomUUID().toString().substring(0,5));
                System.out.println(list);
            } , String.valueOf(i)).start();
        }
    }
} 在并发操作List集合的时候会报出下面的错误!java.util.ConcurrentModificationException 并发修改异常!

解决方法
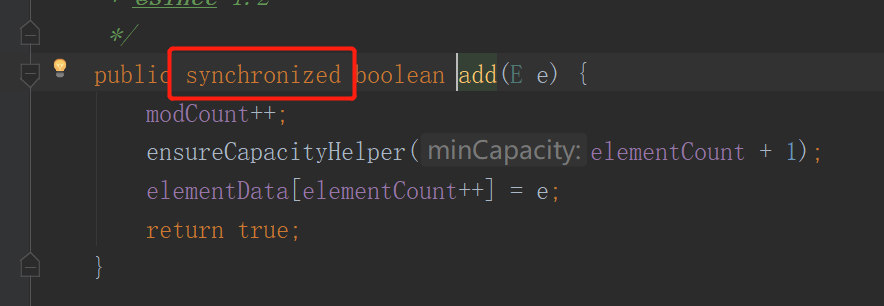
使用
List<String> list = new Vector<>();因为Vector的add 方法加了 synchronized
使用
List<String> list = Collections.synchronizedList(new ArrayList<>());同样也是加了synchronized

使用
List<String> list = new CopyOnWriteArrayList<>();而CopyOnWriteArrayList 是使用
lock锁!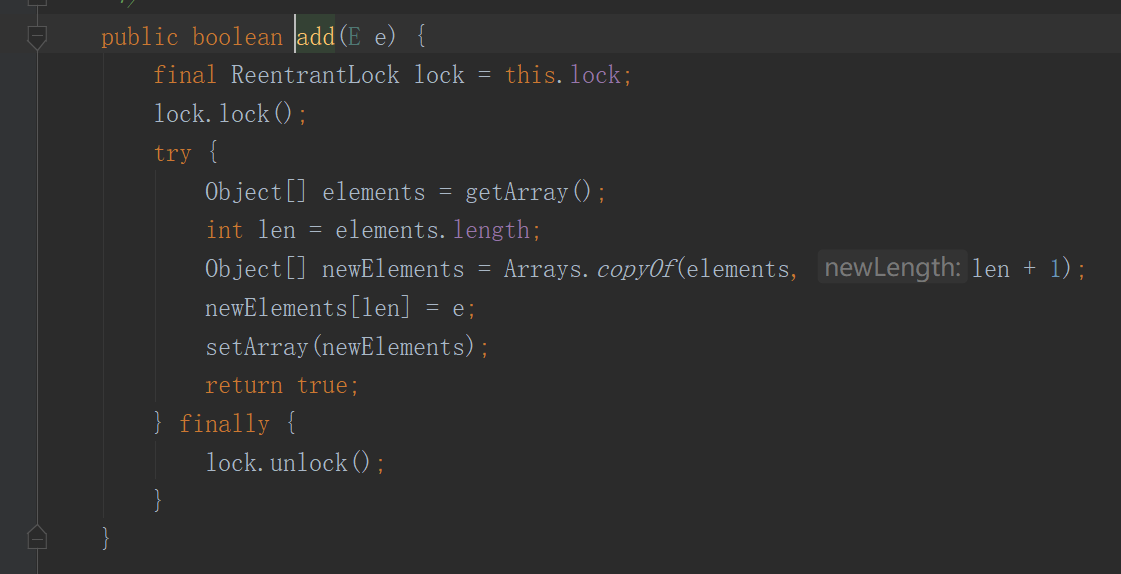
public class ListTest {
    public static void main(String[] args) {
        /**
         * 解决方案;
         * 1、List<String> list = new Vector<>();
         * 2、List<String> list = Collections.synchronizedList(new ArrayList<> ());
         * 3、List<String> list = new CopyOnWriteArrayList<>();
         */
        // CopyOnWrite 写入时复制 COW 计算机程序设计领域的一种优化策略;
        // 多个线程调用的时候,list,读取的时候,固定的,写入(覆盖)
        // 在写入的时候避免覆盖,造成数据问题!
        // 读写分离

        List<String> list = new CopyOnWriteArrayList<>();
        for (int i = 0; i < 10; i++) {
            new Thread(()->{
                list.add(UUID.randomUUID().toString().substring(0,5));
                System.out.println(list);
            } , String.valueOf(i)).start();
        }
    }
} 可以通过查看add 方法的源码,判断解决方法的原因
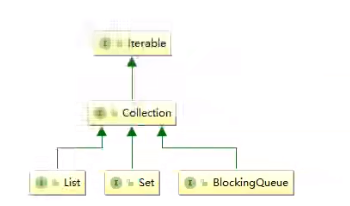
2、CopyOnWriteArraySet
Set和List其实也是Collection的同级子类
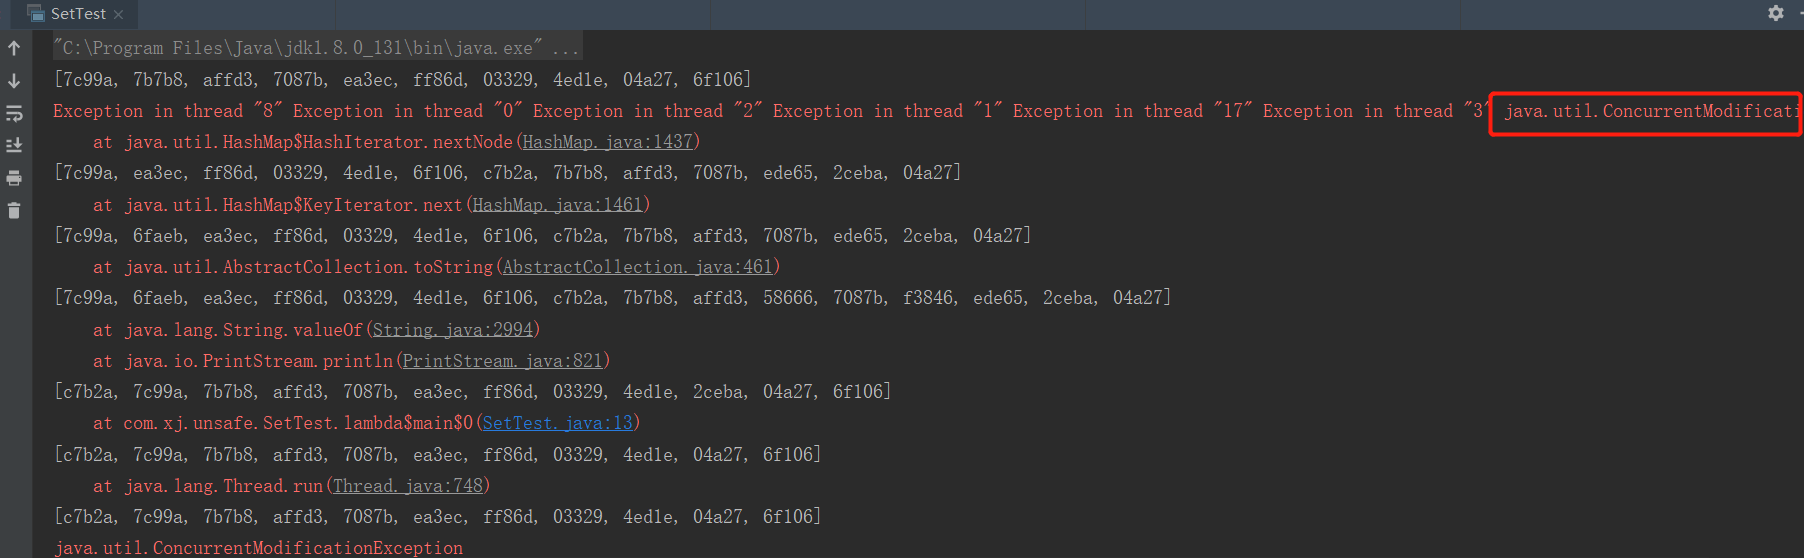
Set 不安全
使用多线程并发操作 Set集合同样也会报错!ConcurrentModificationException
public class SetTest {
    public static void main(String[] args) {
        Set<String> set = new HashSet<>();
        // 如果测试的线程不是很多,有时并不会报错
        for (int i = 0; i < 20; i++) {
            new Thread(()->{
                set.add(UUID.randomUUID().toString().substring(0, 5));
                System.out.println(set);
            } , String.valueOf(i)).start();
        }
    }
} 
解决方法
使用集合工具类
Collections.synchronizedSet,将set转为安全的Set<String> set = Collections.synchronizedSet(new HashSet<>());使用
CopyOnWriteArraySetSet<String> set = new CopyOnWriteArraySet<>();
HashSet 的底层
点击hashset的源码查看
// hashset 本质上就是 hashmap
public HashSet() {
    map = new HashMap<>();
}

// 而hashset的add方法则是使用了map.put
public boolean add(E e) {
    return map.put(e, PRESENT)==null;
}

// 其中的PRESENT只是一个不变的值
private static final Object PRESENT = new Object();
3、ConcurrentHashMap
Map 相关知识
- 工作中一般不使用
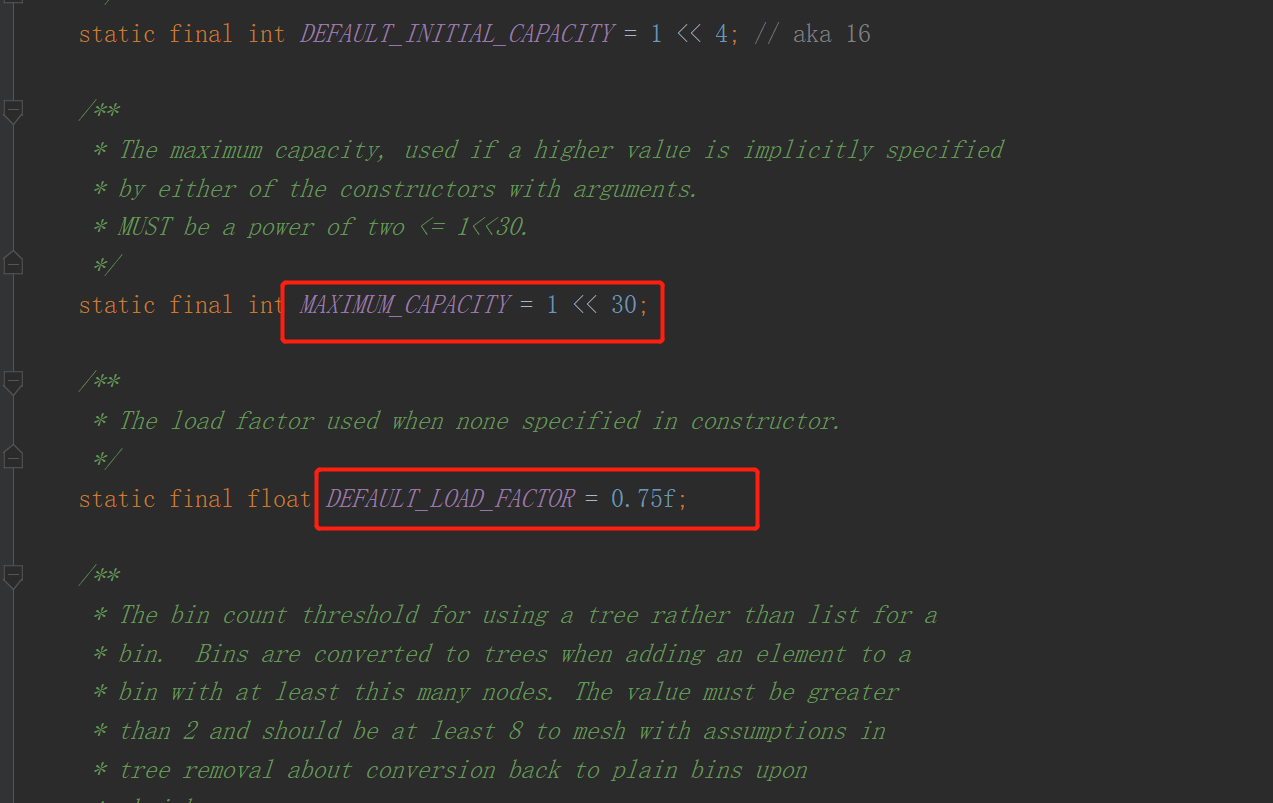
HashMap - 默认等价于 new HashMap<>(16, 0.75)
- 分别是 初始化容量、加载因子
Map 不安全
public class MapTest {
    public static void main(String[] args) {
        Map<String, Object> map = new HashMap<>();
        for (int i = 0; i < 20; i++) {
            new Thread(()->{
                map.put(Thread.currentThread().getName(), UUID.randomUUID().toString().substring(0, 5));
                System.out.println(map);
            } , String.valueOf(i)).start();
        }
    }
} 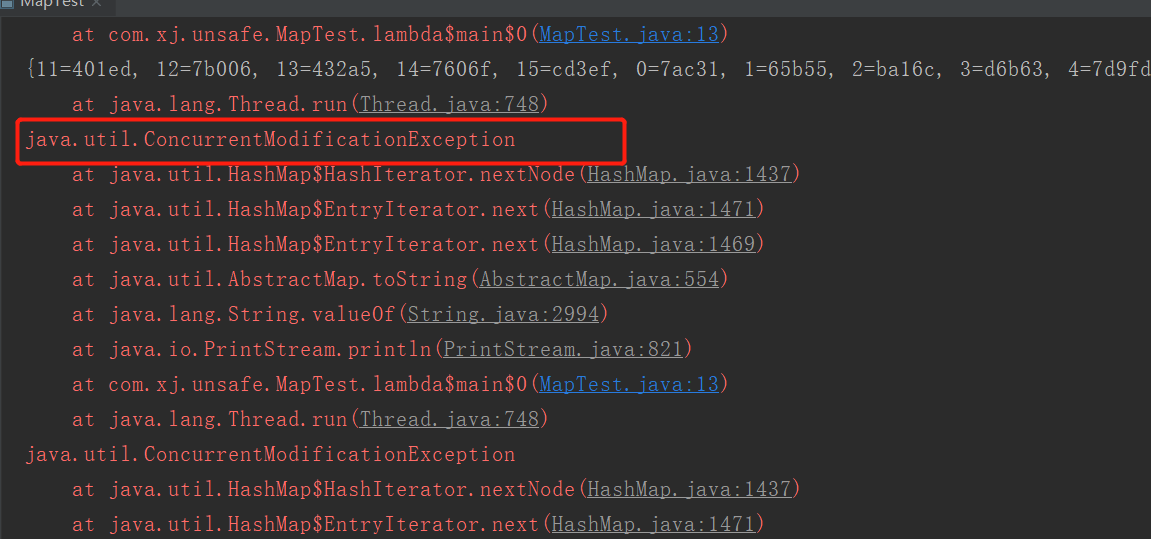
解决方法
使用工具类
Collections.synchronizedMapMap<String, Object> map = Collections.synchronizedMap(new HashMap<>());注意map使用的是
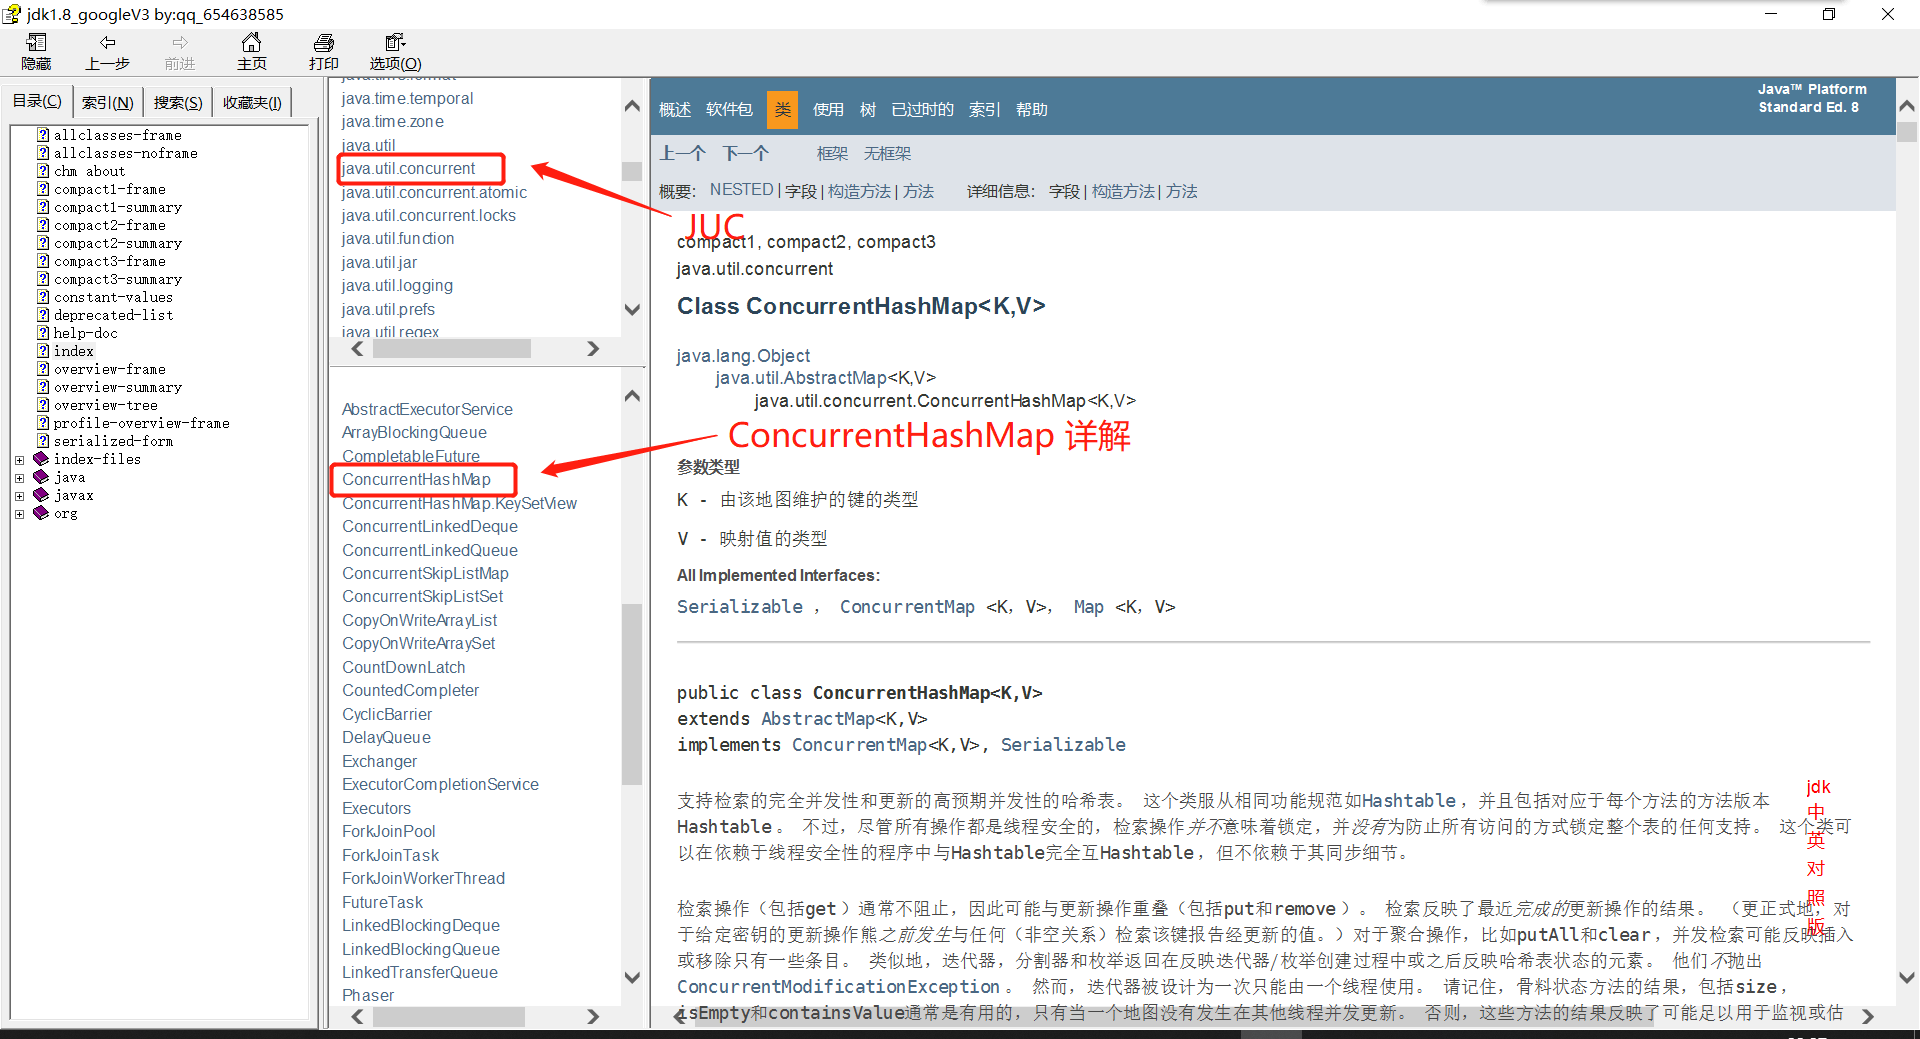
ConcurrentHashMapMap<String, Object> map = new ConcurrentHashMap<>();
关于ConcurrentHashMap的底层原理可以查看jdk8文档
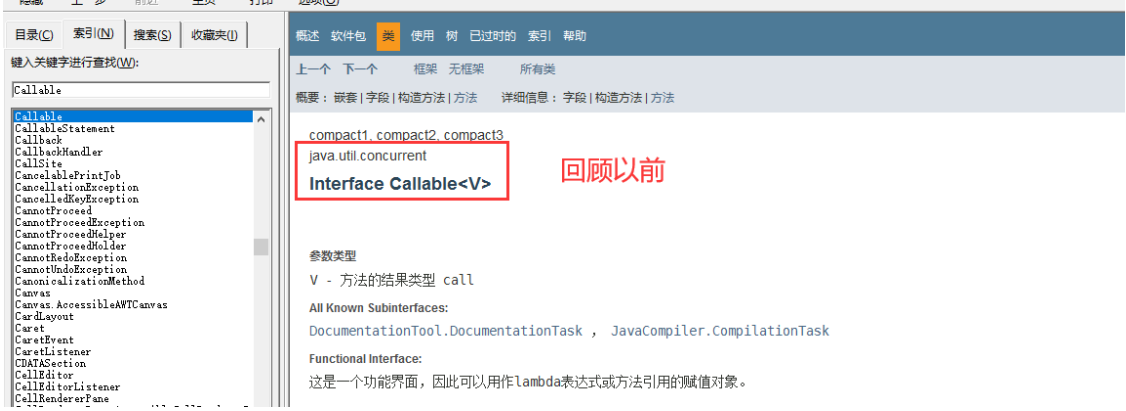
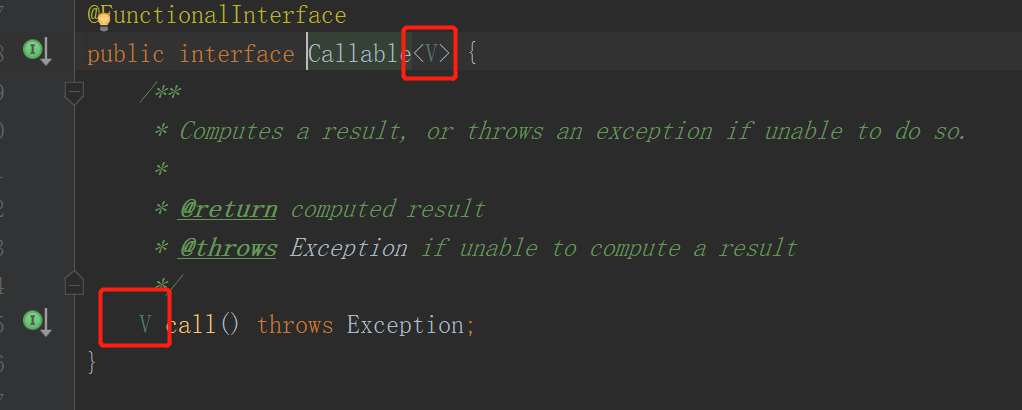
4、Callable
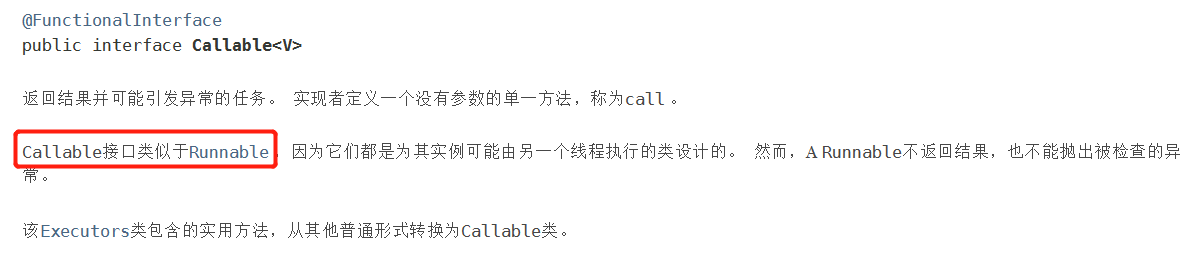
- 可以有返回值
- 可以抛出异常
- 方法不同,run() 换为
call()
原理
通过jdk8文档索引Runnable查看关系
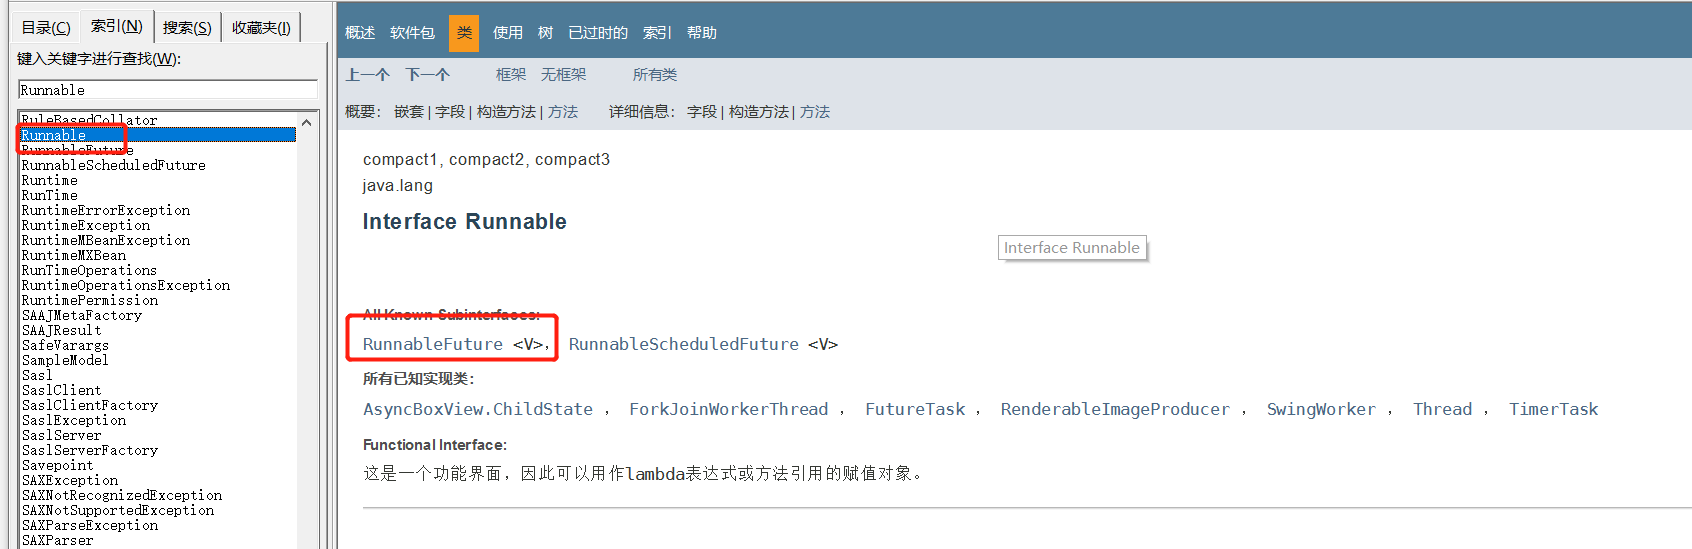
点进RunnableFuture 类进行查看
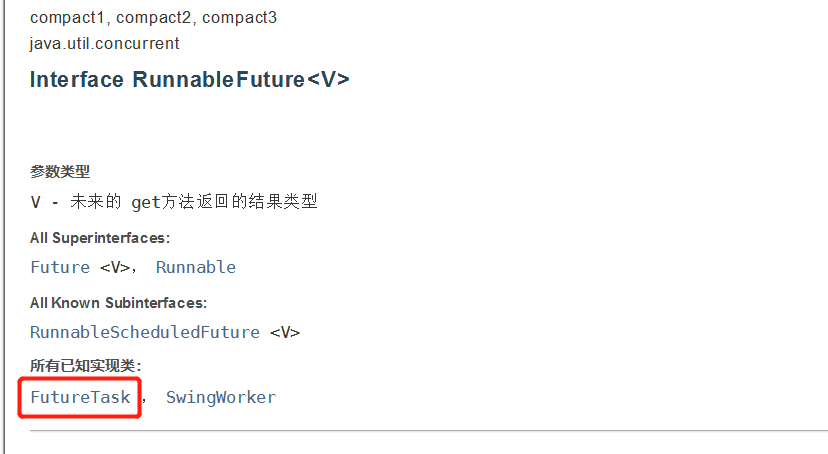
再查看已知实现类 FutureTask
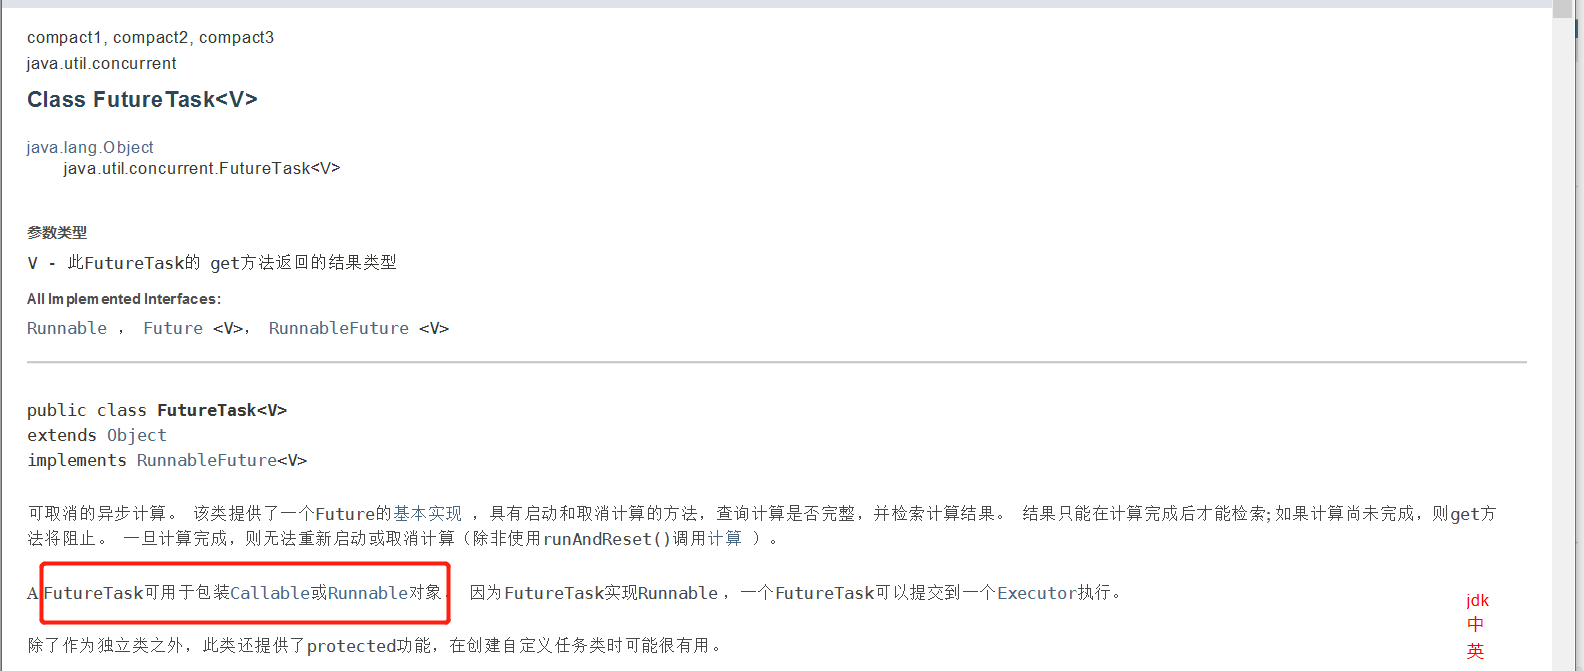
可以看到
FutureTask可用于包装Callable和Runnable对象
使用方法
package com.xj.Callable;

import java.util.concurrent.Callable;
import java.util.concurrent.ExecutionException;
import java.util.concurrent.FutureTask;

public class CallableTest {
    public static void main(String[] args) throws ExecutionException, InterruptedException {
        // new Thread(new Runnable()).start();     // 直接使用Runnable的方法
        // new Thread(new FutureTask<V>()).start();
        // new Thread(new FutureTask<V>( Callable )).start();   // FutureTask作为适配类

        Mythread mythread = new Mythread();
        FutureTask futureTask = new FutureTask(mythread);    // 适配类

        new Thread(futureTask, "A").start();    // 执行的时候不会直接输出返回值,结果会被缓存提高效率
        // 获取结果,但使用get方法可能会造成线程阻塞,故放到最后或者使用异步通信处理
        String result = (String) futureTask.get();
        System.out.println(result);
    }
}

// 创建线程类,实现Callable<T>
// 参数 T 与返回值类型一致
class Mythread implements Callable<String> {

    @Override
    public String call() throws Exception {
        System.out.println("Call()");
        return "CallableTest";
    }
} 
8、常用的辅助类(必会)
1、CountDownLatch
减法计数器

使用方法
new CountDownLatch(6)定义数值大小countDownLatch.countDown()数值减一countDownLatch.await()计数器等待
每次有线程调用 countDown() 数量-1,假设计数器变为0,countDownLatch.await() 就会被唤醒,继续
执行
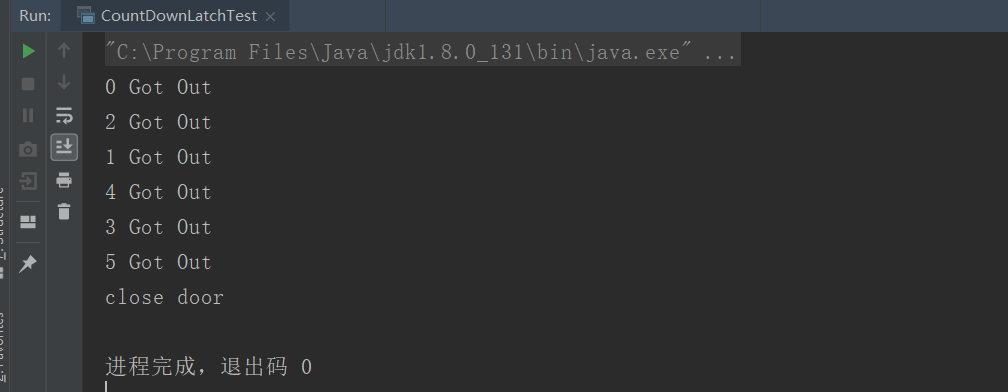
public class CountDownLatchTest {
    public static void main(String[] args) throws InterruptedException {
        // 设置总数是6,必须要执行任务的时候,可以使用来指定次数
        CountDownLatch countDownLatch = new CountDownLatch(6);

        for (int i = 0; i < 6; i++) {
            new Thread(()->{
                System.out.println(Thread.currentThread().getName() + " Got Out");
                // 计数器减一
                countDownLatch.countDown();
            } , String.valueOf(i)).start();
        }

        // 等待执行计数器归零,才继续执行,注意不是使用wait()
        countDownLatch.await();
        System.out.println("close door");
    }
} 
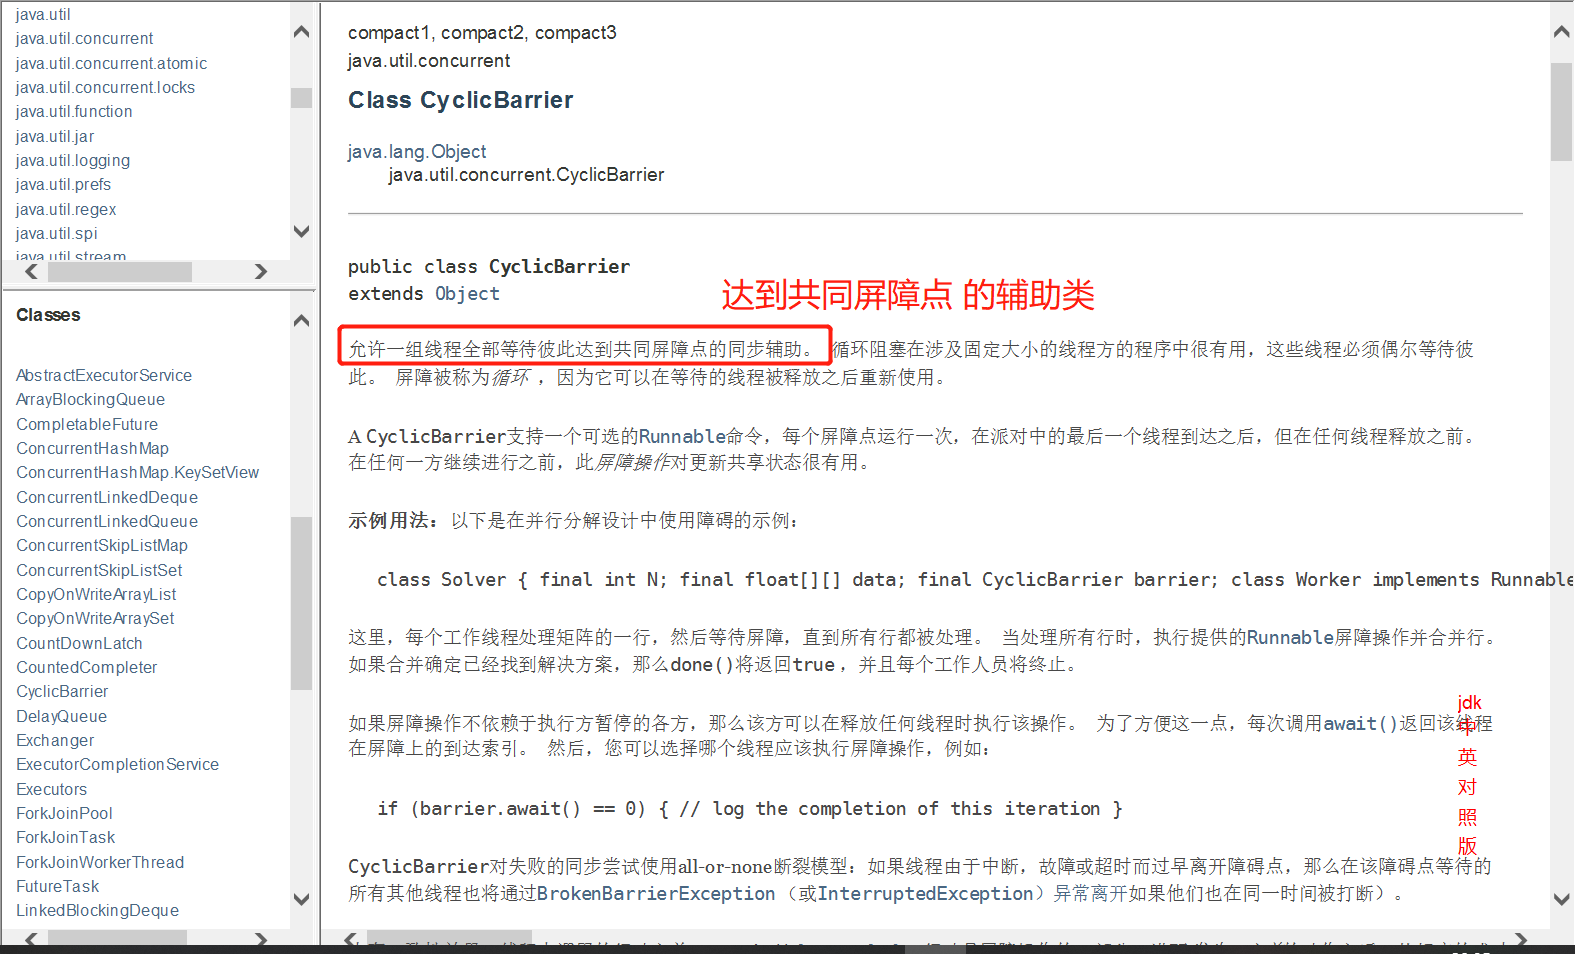
2、CyclicBarrier
加法计数器
使用方法
package com.xj.add;
import java.util.concurrent.BrokenBarrierException;
import java.util.concurrent.CyclicBarrier;
public class CyclicBarrierTest {
public static void main(String[] args) {
/**
* 集齐7颗龙珠召唤神龙
*/
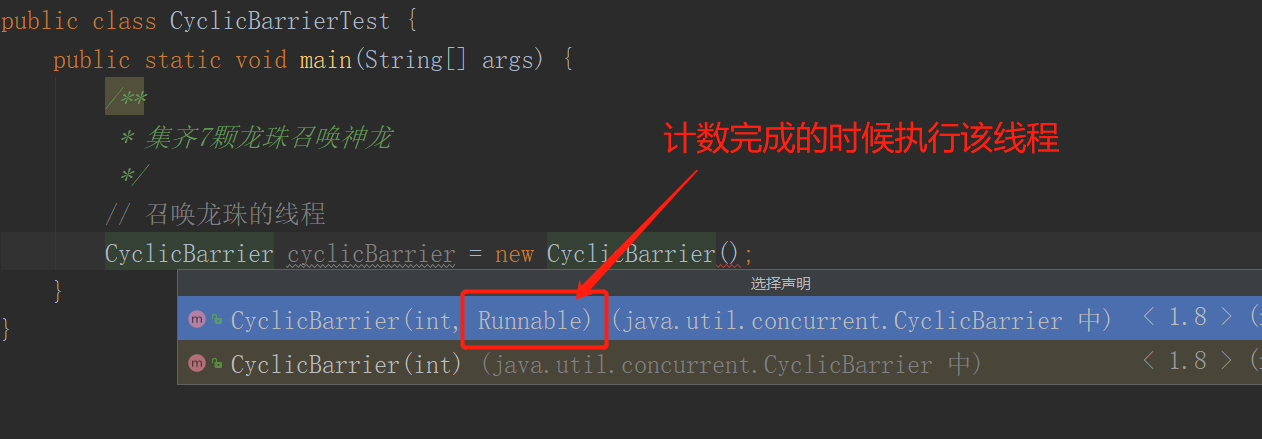
// 召唤龙珠的线程,当有7个线程在等待的时候才开始执行
CyclicBarrier cyclicBarrier = new CyclicBarrier(7, ()->{
System.out.println("召唤神龙成功!");;
} );
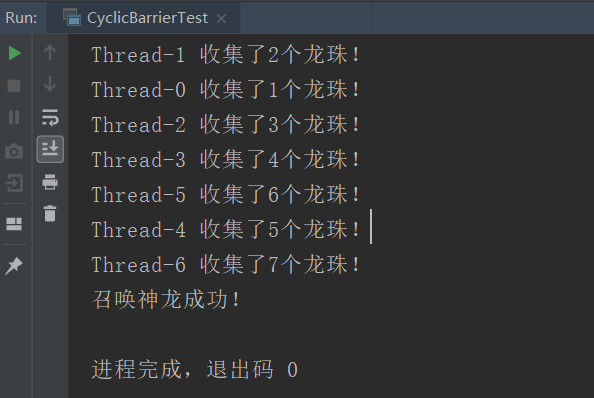
for (int i = 1; i <= 7; i++) {
final int temp = i;
// 注意: 在lambda表达式中不能直接操作到 i ,因为这相当于先创建了一个类,所以需要使用final(变量的作用域问题)
new Thread(()->{
System.out.println(Thread.currentThread().getName() + " 收集了" + temp + "个龙珠!");
try {
cyclicBarrier.await(); // 等待
} catch (InterruptedException e) {
e.printStackTrace();
} catch (BrokenBarrierException e) {
e.printStackTrace();
}
} ).start();
}
}
} 
当在等待的线程数量足够的时候才开始执行
3、Semaphore
Semaphore :信号量
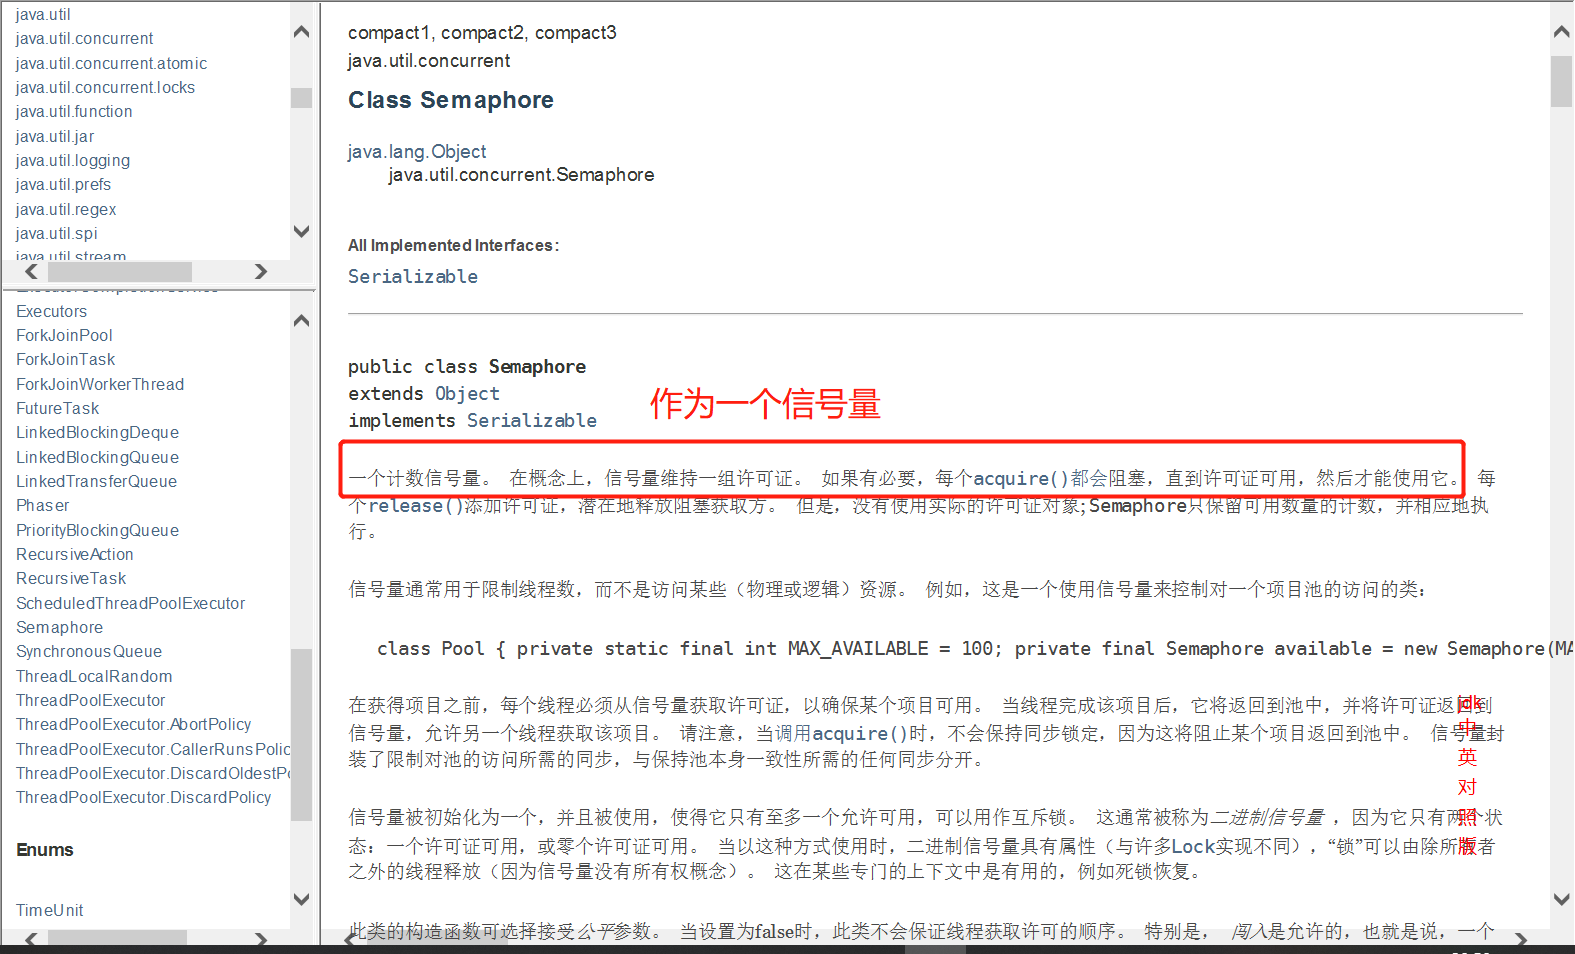
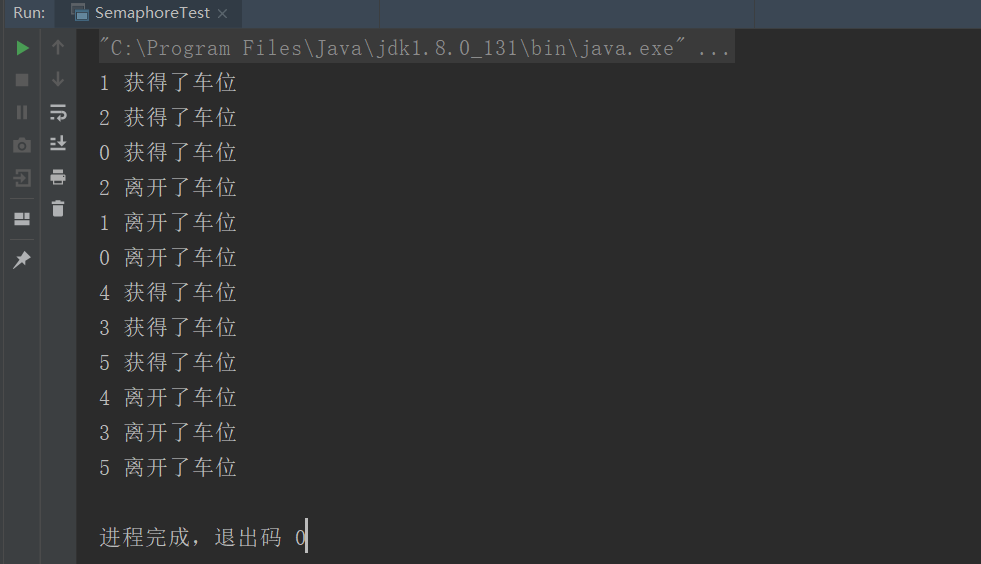
相当于抢车位,需要等待前面线程执行完毕之后,后面的线程才可以补充上去!
使用方法
- acquire 获得权限
- release 释放权限
package com.xj.add;

import java.util.concurrent.Semaphore;
import java.util.concurrent.TimeUnit;

public class SemaphoreTest {
    public static void main(String[] args) {
        // 可执行的线程数量(停车位),限流!
        Semaphore semaphore = new Semaphore(3);

        for (int i = 0; i < 6; i++) {
            new Thread(()->{
                try {
                    // 获得权限
                    semaphore.acquire();
                    System.out.println(Thread.currentThread().getName() + " 获得了车位");
                    // 停车2秒钟
                    TimeUnit.SECONDS.sleep(2);
                    System.out.println(Thread.currentThread().getName() + " 离开了车位");
                }  catch (InterruptedException e) {
                    e.printStackTrace();
                } finally {
                    // 释放权限
                    semaphore.release();
                }
            } , String.valueOf(i)).start();
        }
    }
} semaphore.acquire()获得,假设已经满了,等待,等待被释放为止!
semaphore.release()释放,会将当前的信号量释放 + 1,然后唤醒等待的线程!
作用: 多个共享资源互斥的使用!并发限流,控制最大的线程数!
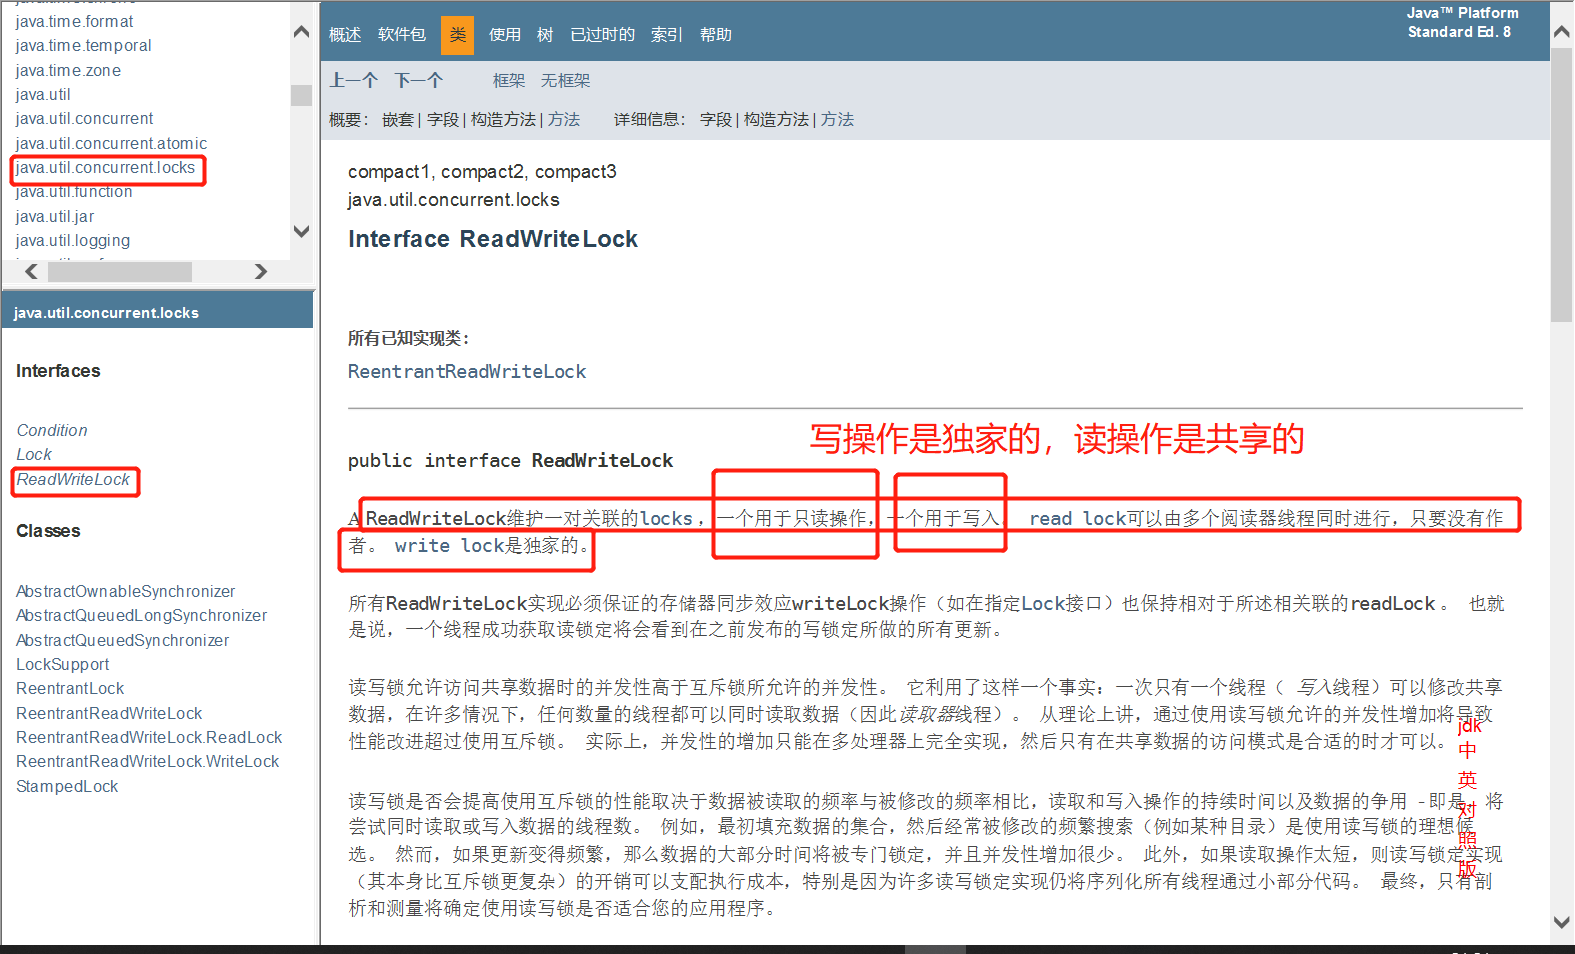
9、读写锁ReadWriteLock
也是锁的一种,但将读写操作区分开来,读的时候可以多线程读取,写的时候只能单个线程进行!
不适用读写锁的时候
package com.xj.rw;
import java.util.HashMap;
import java.util.Map;
public class ReadWriteLockTest {
public static void main(String[] args) {
MyCache cache = new MyCache();
// 写入
for (int i = 0; i < 6; i++) {
final int temp = i;
new Thread(()->{
cache.put(temp+"", temp);
} , String.valueOf(i)).start();
}
// 读取
for (int i = 0; i < 5; i++) {
final int temp = i;
new Thread(()->{
cache.get(temp+"");
} , String.valueOf(i)).start();
}
}
}
/**
* 自定义缓存类
*/
class MyCache{
private volatile Map<String, Object> map = new HashMap<>();
// 写操作
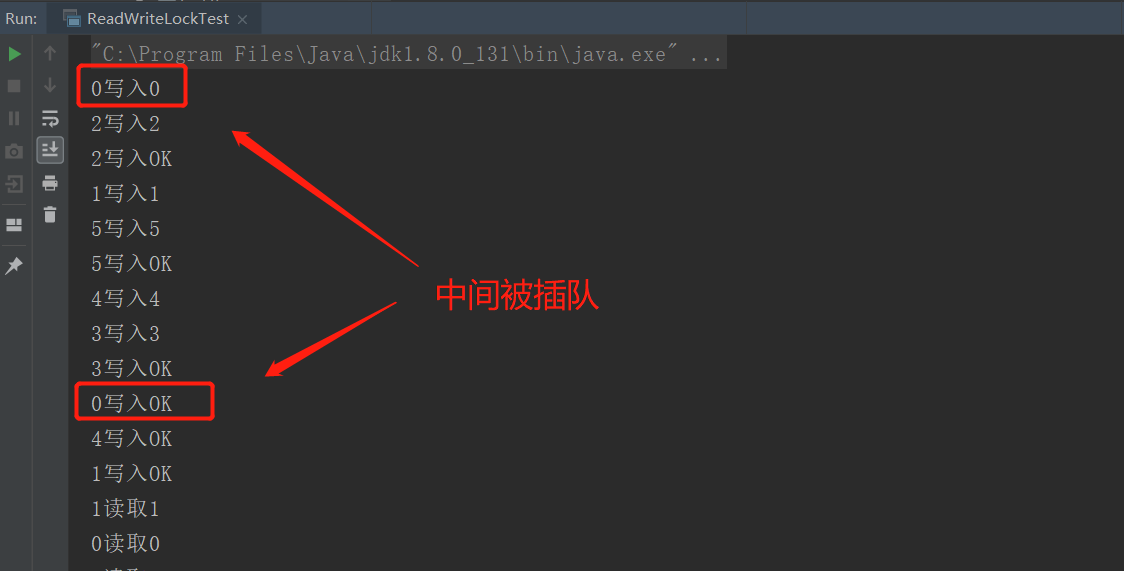
public void put(String key, Object value){
System.out.println(Thread.currentThread().getName() + "写入" + key);
map.put(key, value);
System.out.println(Thread.currentThread().getName() + "写入OK");
}
// 读操作
public void get(String key){
System.out.println(Thread.currentThread().getName() + "读取" + key);
Object value = map.get(key);
System.out.println(Thread.currentThread().getName() + "读取" + value + "OK");
}
} 发现在写数据完成之前总是会被插队写数据!
使用读写锁
package com.xj.rw;
import java.util.HashMap;
import java.util.Map;
import java.util.concurrent.locks.ReadWriteLock;
import java.util.concurrent.locks.ReentrantReadWriteLock;
/**
* 独占锁(写锁) 一次只能被一个线程占有
* 共享锁(读锁) 多个线程可以同时占有
* ReadWriteLock
* 读-读 可以共存!
* 读-写 不能共存!
* 写-写 不能共存!
*/
public class ReadWriteLockTest {
public static void main(String[] args) {
MyCacheLock cache = new MyCacheLock();
// 写入
for (int i = 0; i < 6; i++) {
final int temp = i;
new Thread(()->{
cache.put(temp+"", temp);
} , String.valueOf(i)).start();
}
// 读取
for (int i = 0; i < 5; i++) {
final int temp = i;
new Thread(()->{
cache.get(temp+"");
} , String.valueOf(i)).start();
}
}
}
/**
* 使用读写锁
*/
class MyCacheLock{
private volatile Map<String, Object> map = new HashMap<>();
// 读写锁: 更加细粒度的控制
private ReadWriteLock readWriteLock = new ReentrantReadWriteLock();
// 写入
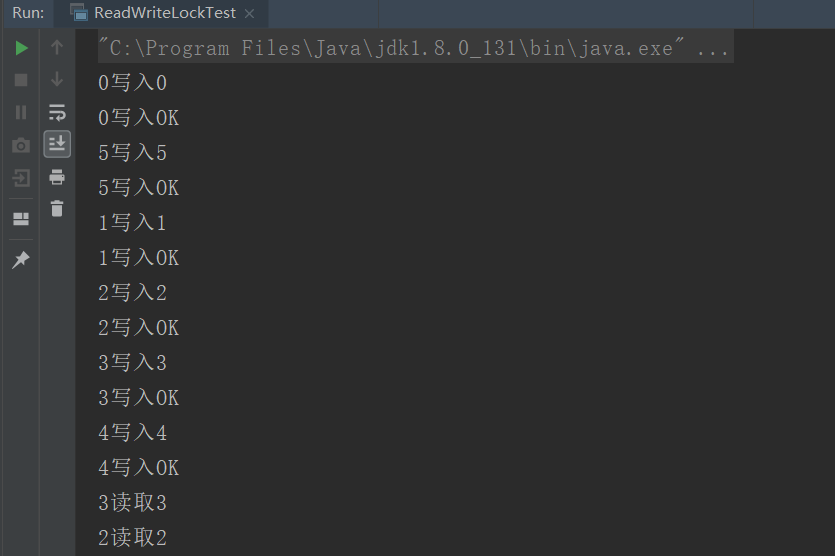
public void put(String key, Object value){
try {
// 加写锁
readWriteLock.writeLock().lock();
// 执行业务代码
System.out.println(Thread.currentThread().getName() + "写入" + key);
map.put(key, value);
System.out.println(Thread.currentThread().getName() + "写入OK");
} catch (Exception e) {
e.printStackTrace();
} finally {
// 释放锁
readWriteLock.writeLock().unlock();
}
}
// 读取
public void get(String key){
try {
// 加读锁
readWriteLock.readLock().lock();
// 执行业务代码
System.out.println(Thread.currentThread().getName() + "读取" + key);
Object value = map.get(key);
System.out.println(Thread.currentThread().getName() + "读取" + value + "OK");
} catch (Exception e) {
e.printStackTrace();
} finally {
// 释放锁
readWriteLock.readLock().unlock();
}
}
} 创建读写锁
ReadWriteLock readWriteLock = new ReentrantReadWriteLock();加写锁
readWriteLock.writeLock().lock();释放写锁
readWriteLock.writeLock().unlock();加读锁
readWriteLock.readLock().lock();释放读锁
readWriteLock.readLock().unlock();
从而实现写操作的时候只有一个线程执行,读取的时候可以多线程读取
10、阻塞队列
后续更新~
- 本文链接:https://lxjblog.gitee.io/2020/10/20/JUC%E5%B9%B6%E5%8F%91%E7%BC%96%E7%A8%8B/
- 版权声明:本博客所有文章除特别声明外,均默认采用 许可协议。