官方文档:
OAuth2 :: Spring Security
概念
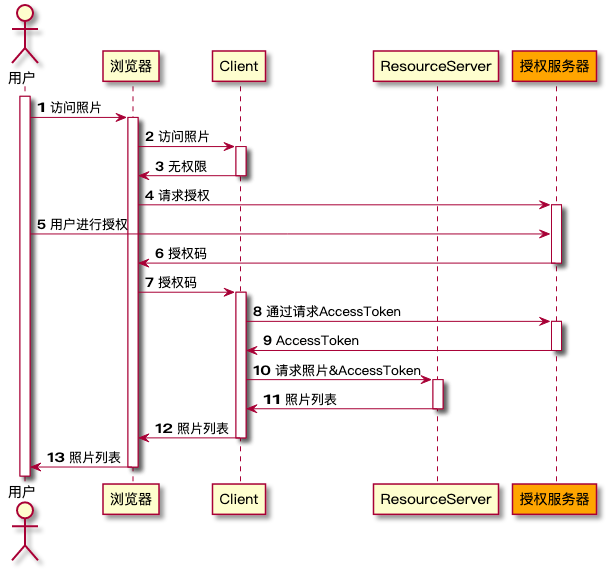
OAuth是一个开放标准,也就是一个授权框架,使应用程序能够访问其它公司提供的资源,允许用户在第三方应用访问存储在其他服务器上的私密资源,而在整个过程不需要提供用户名和密码给到第三方应用,可以通过提供一个令牌(token)实现该功能,采用令牌的方式可以让用户灵活的对第三方应用授权或收回权限。
OAuth2 四种角色
Oauth一共定义了四种角色:
- 资源所有者(Resource Owner):即代表用户本身
- 资源服务器(Resource Server) :存储受保护的账号信息
- 授权服务器(Authorization Server):在成功验证用户身份,并获得授权后,给客户端派发访问资源令牌
- 客户端(Client):即代表你访问的第三方应用
OAuth2的四种模式
参考文章:
【OAuth2】详细讲解-CSDN博客
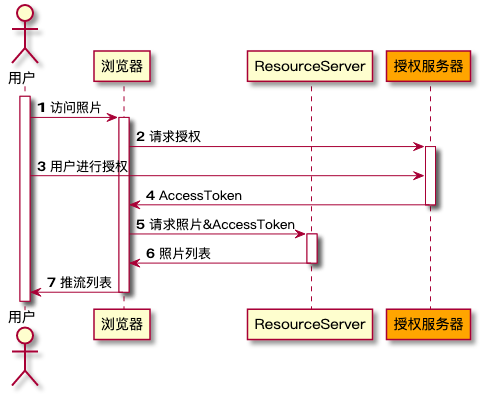
授权码模式
简化模式
密码模式
客户端模式

Springboot 集成
认证服务器配置
参考文章:
Spring Security OAuth2的基本使用_security.oauth2.client-CSDN博客
1、导入依赖
<dependency>
    <groupId>org.springframework.cloud</groupId>
    <artifactId>spring-cloud-starter-oauth2</artifactId>
    <version>2.2.5.RELEASE</version>
</dependency>
<dependency>
    <groupId>org.springframework.boot</groupId>
    <artifactId>spring-boot-starter-web</artifactId>
</dependency>
注意 springboot 版本和 jdk 版本也会导致项目启动不起来,可以将 springboot 2.2.8.RELEASE 版本,用 jdk 8 测试
2、在 conf 配置类添加上 @EnableAuthorizationServer 注解,使 oauth2 能够自动装配,这个注解配置的认证服务器(将该项目定义为认证服务器),security 的配置就直接看这个。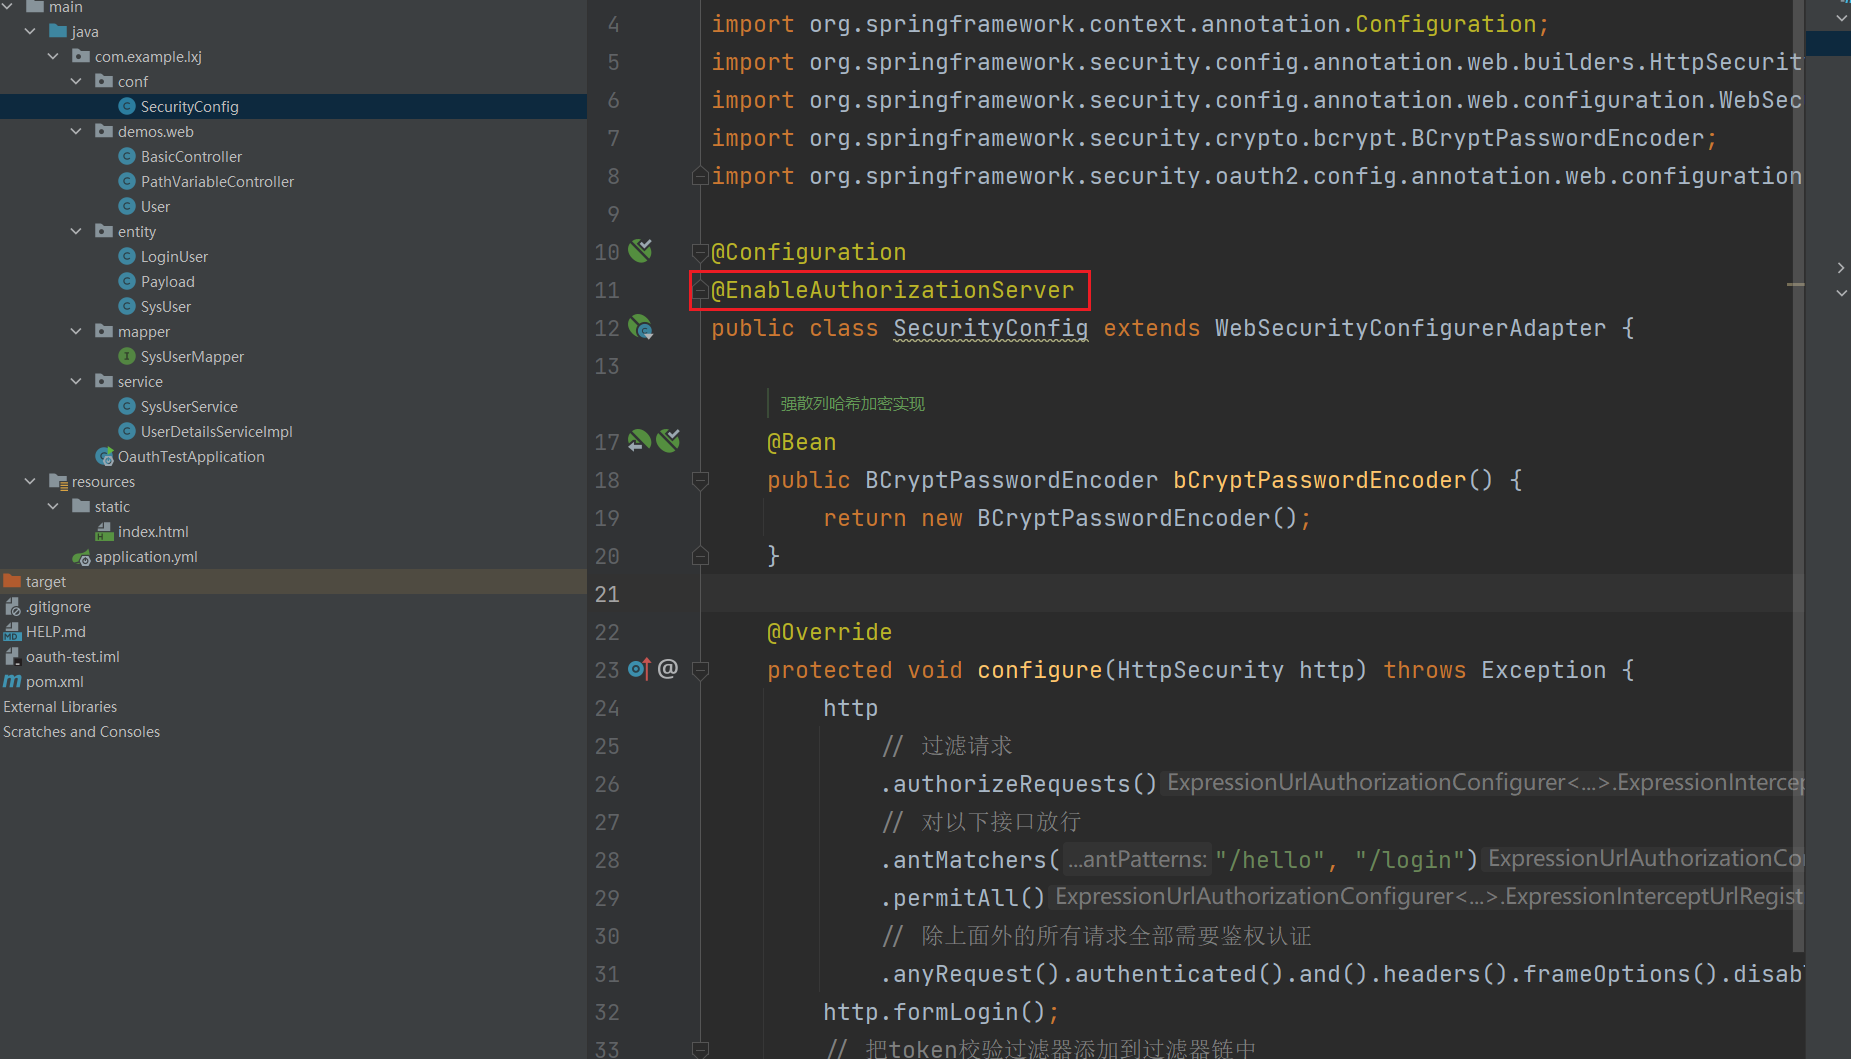
3、修改配置文件
security:
  oauth2:
    client:
      client-id: web
      client-secret: 123456789
      registered-redirect-uri: http://127.0.0.1:8080/hello
4、启动项目,因为添加了 @EnableAuthorizationServer 注解,所以会自动配置 oauth 的信息
5、访问链接获取 token
http://localhost:8080/oauth/authorize?response_type=code&client_id=web&redirect_uri=http://127.0.0.1:8080/hello&scope=all
response_type=code:表示授权码模式
client_id=web:配置文件中指定的web
redirect_uri:指定一个地址,用来重定向获取授权码,这个地址必须存在配置文件中,否则无效
scope=all:表示所有权限
登录成功之后会让用户进行授权,选择 Approve 然后授权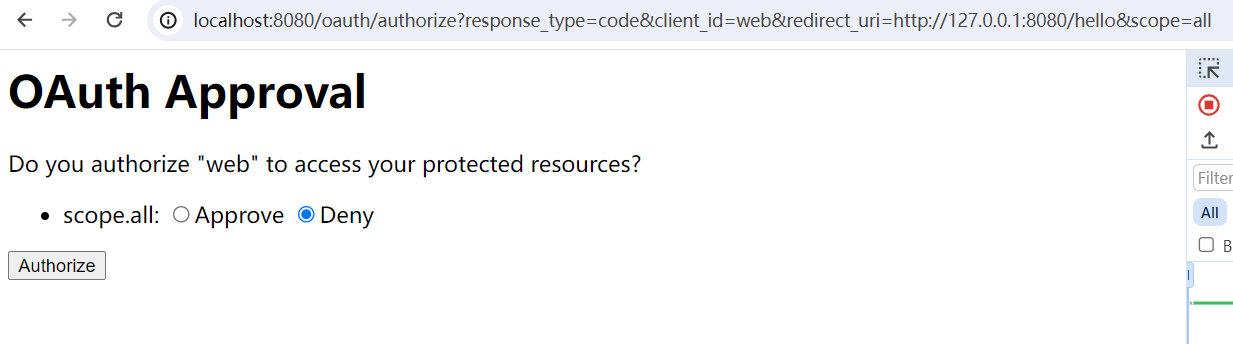
则会跳转到指定的链接,并携带上 code 凭证
6、根据凭证获取 token
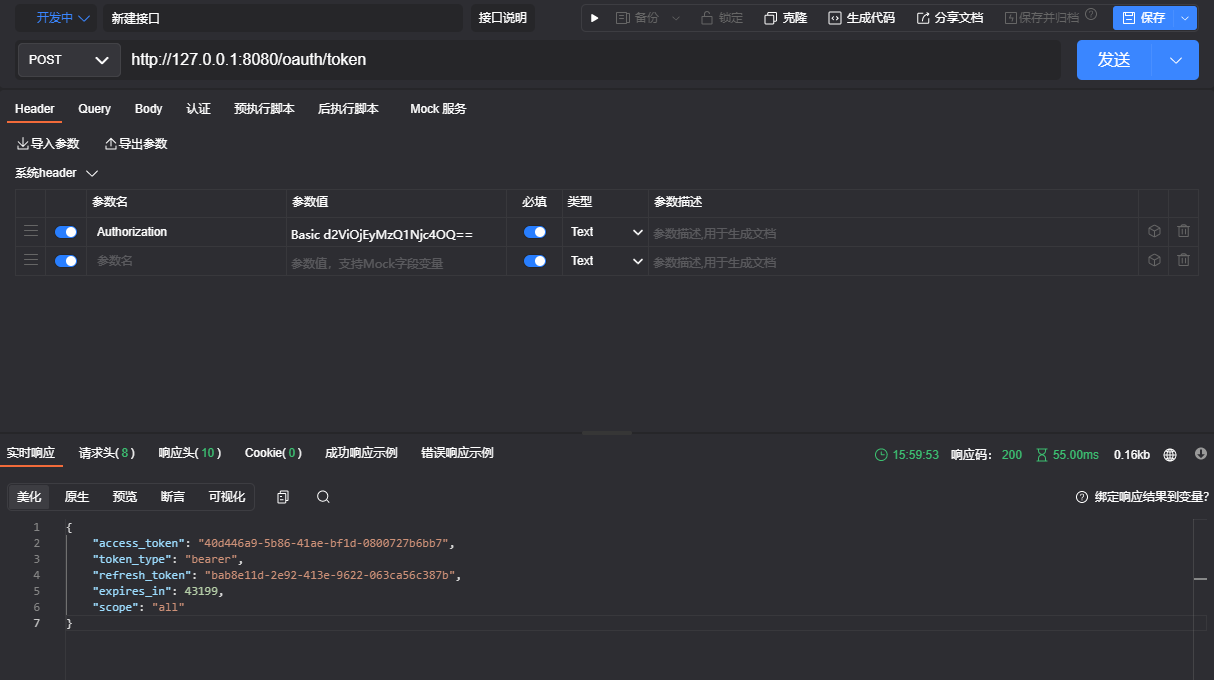
请求地址:http://127.0.0.1:8080/oauth/token

header:
Authorization: Basic [client_id:client_secret]的base64加密

body:
grant_type:authorization_code    # 凭证模式
code:授权码
client_id:web
redirect_uri:http://127.0.0.1:8080/hello
scope:all
请求头需要使用 client_id 和 client_secret 的 base64 编码,可以使用 base64在线编码 网站进行编码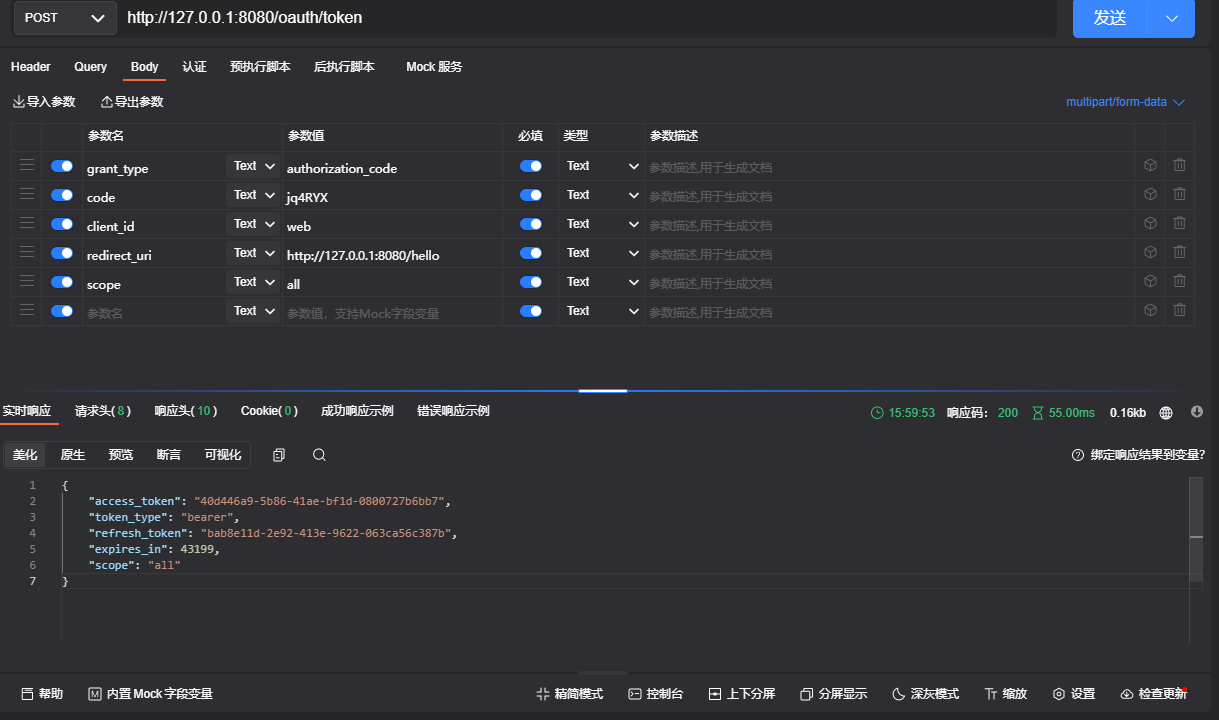
7、此时获取得到的 token 还无法直接访问资源,还需要配置资源服务器之后才能进行访问
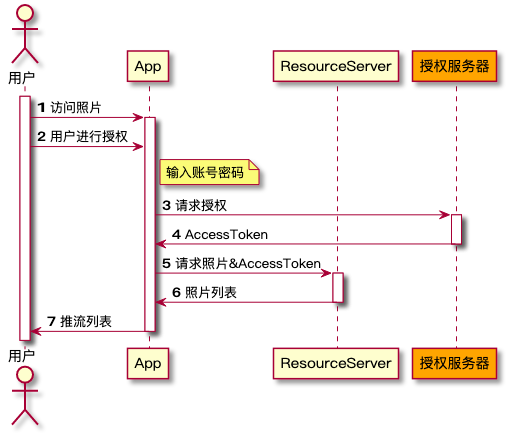
密码模式获取 token
1、直接发起认证请求即可获取 token
请求地址:http://127.0.0.1:8080/oauth/token

header:
Authorization: Basic [client_id:client_secret]的base64加密

body:
grant_type:password        # 密码模式
username: admin                # 使用 security 的账号密码
password: admin123
scope:all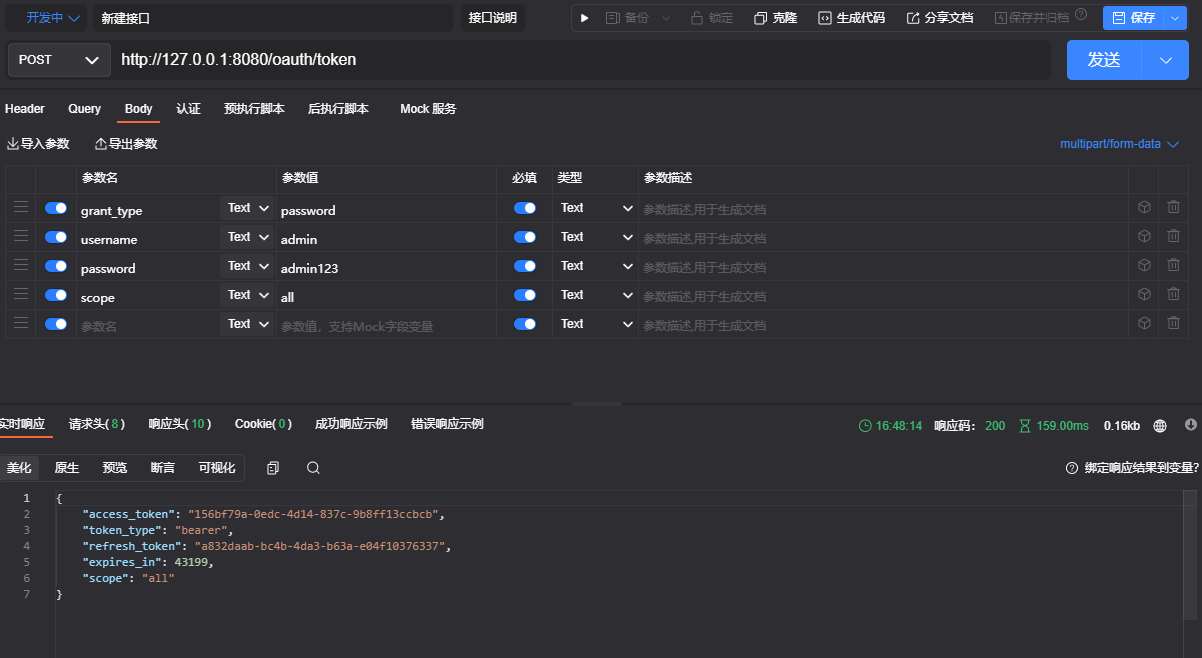
资源服务器配置
1、导入依赖
<dependency>
    <groupId>org.springframework.cloud</groupId>
    <artifactId>spring-cloud-starter-oauth2</artifactId>
    <version>2.2.5.RELEASE</version>
</dependency>
<dependency>
    <groupId>org.springframework.boot</groupId>
    <artifactId>spring-boot-starter-web</artifactId>
</dependency>
2、修改配置文件
security:
  oauth2:
    client:
      clientId: clientId
      clientSecret: 123456
      accessTokenUri: http://localhost:8080/auth/token
      userAuthorizationUri: http://localhost:8080/auth/authorize
3、在配置文件添加注解
@EnableResourceServer这样应该就完成了
源码分析
认证服务

而在 EnableAuthorizationServer 注解中导入了两个配置类
其中的 AuthorizationServerSecurityConfiguration 配置类继承了 WebSecurityConfigurerAdapter 类,相当于覆盖了 security 的默认配置类,这一步跟我们配置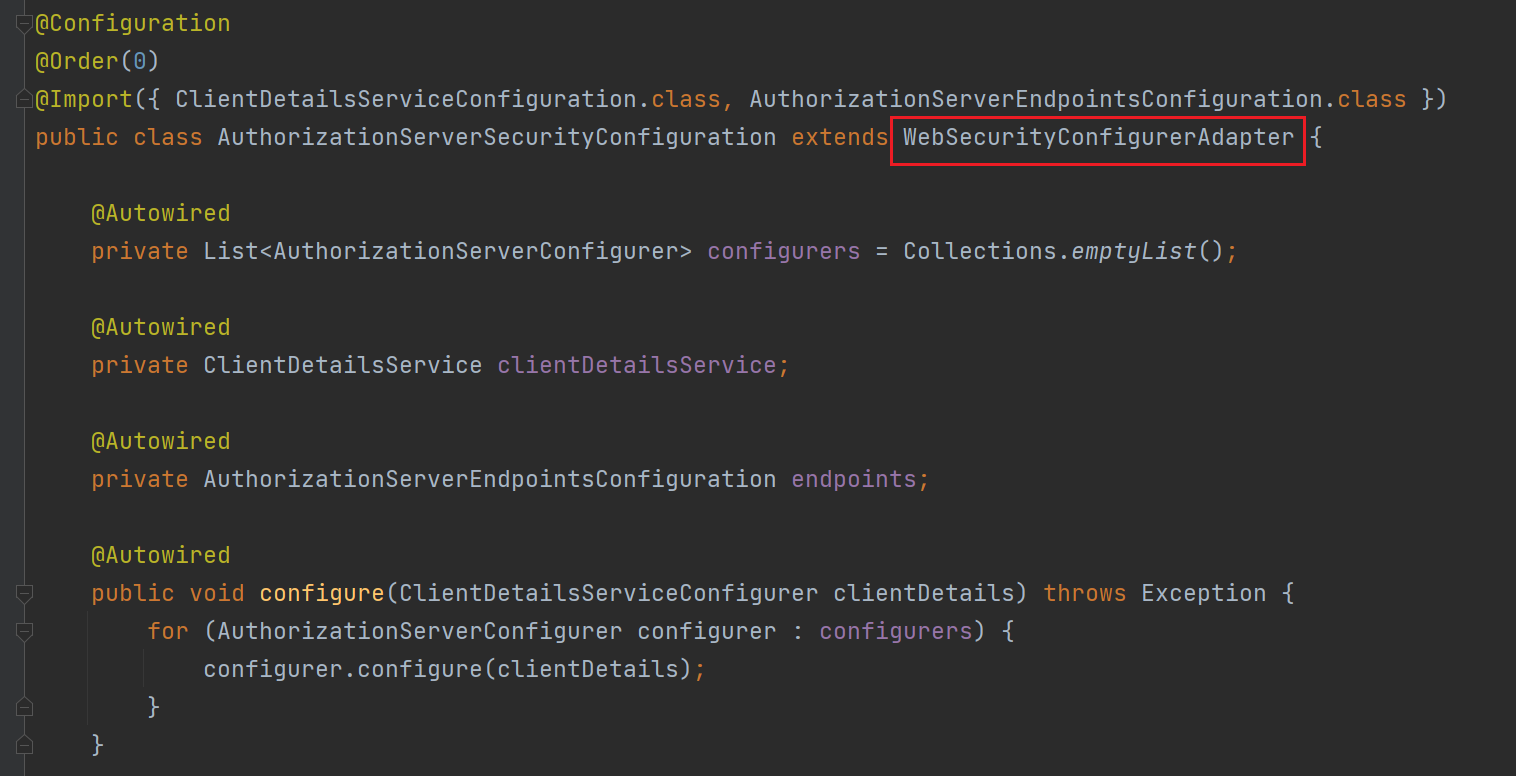
重写 security 的 configure 方法,对请求进行配置,其中的配置类 configurers 是通过依赖注入的方式引用的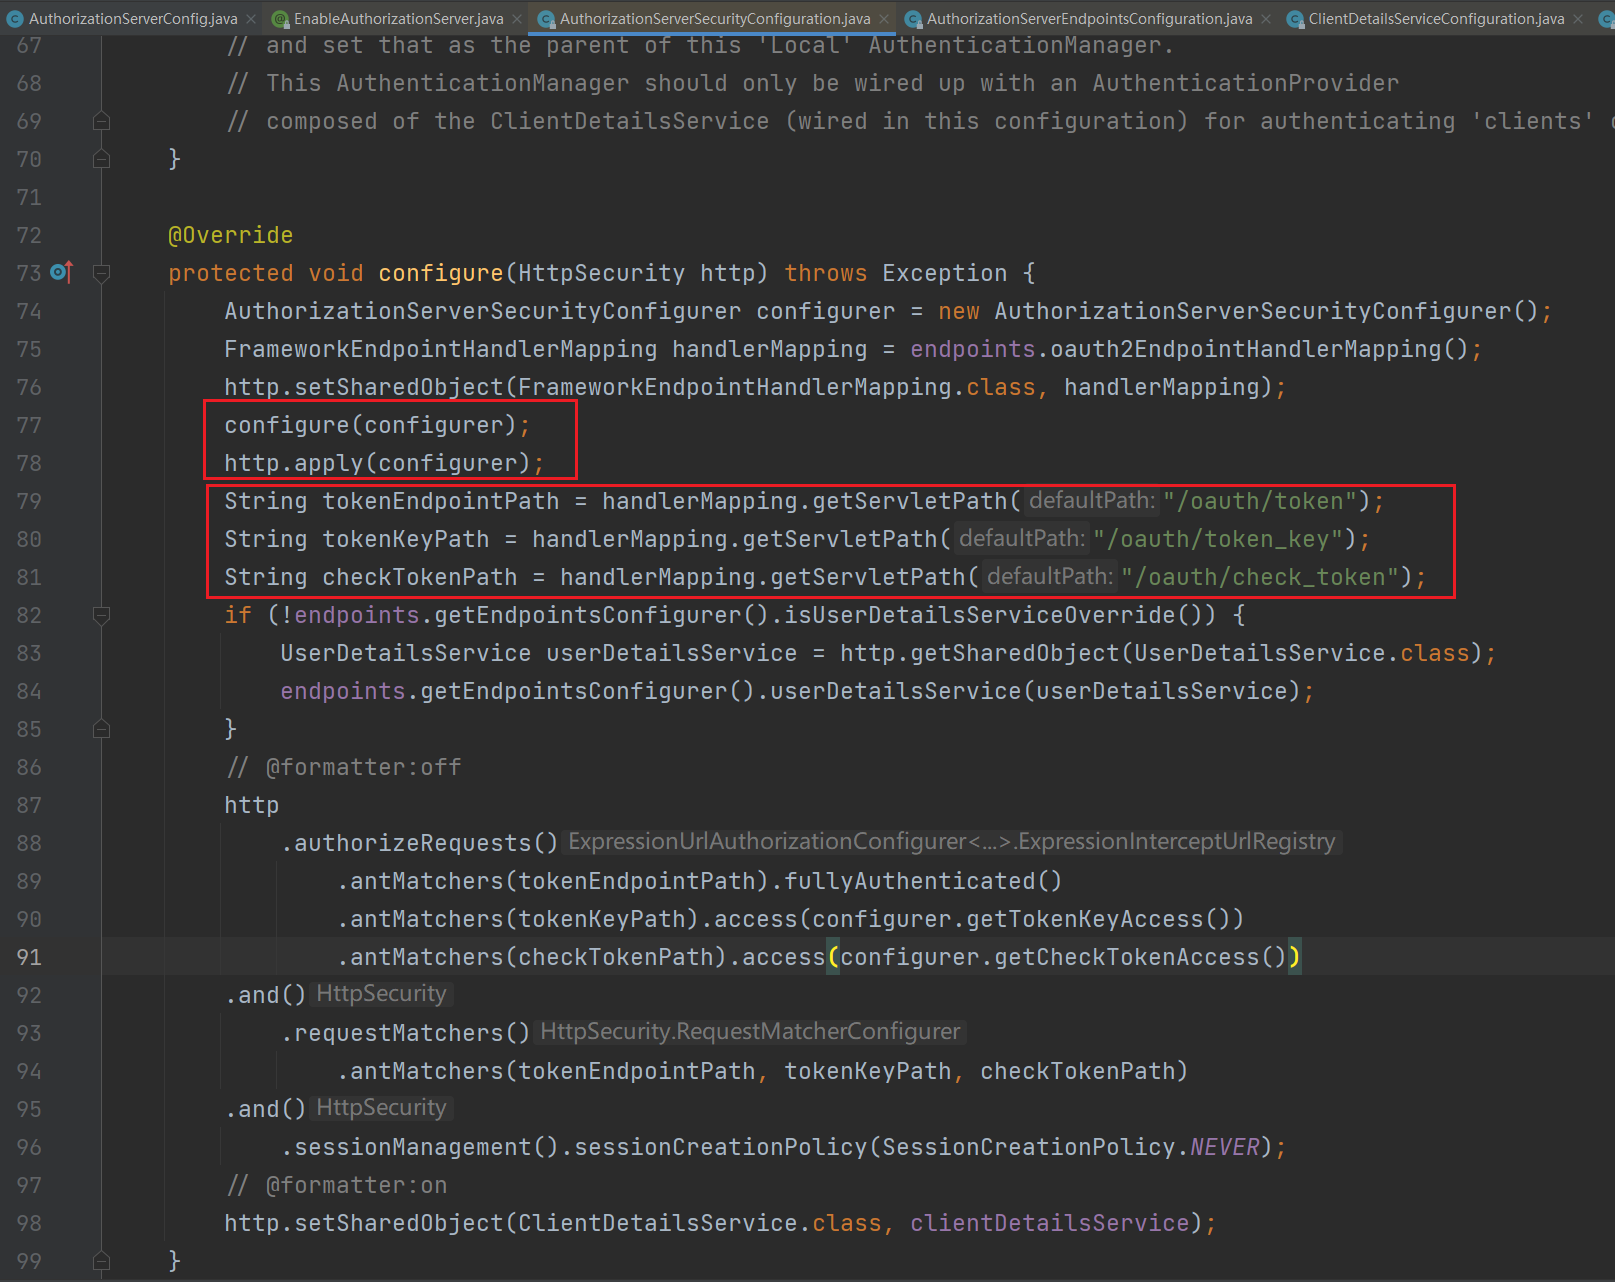


所以在 oauth2 认证服务项目中,我们可以通过自定义 AuthorizationServerConfigurer 实现类的 bean,即可对 security 的认证流程进行配置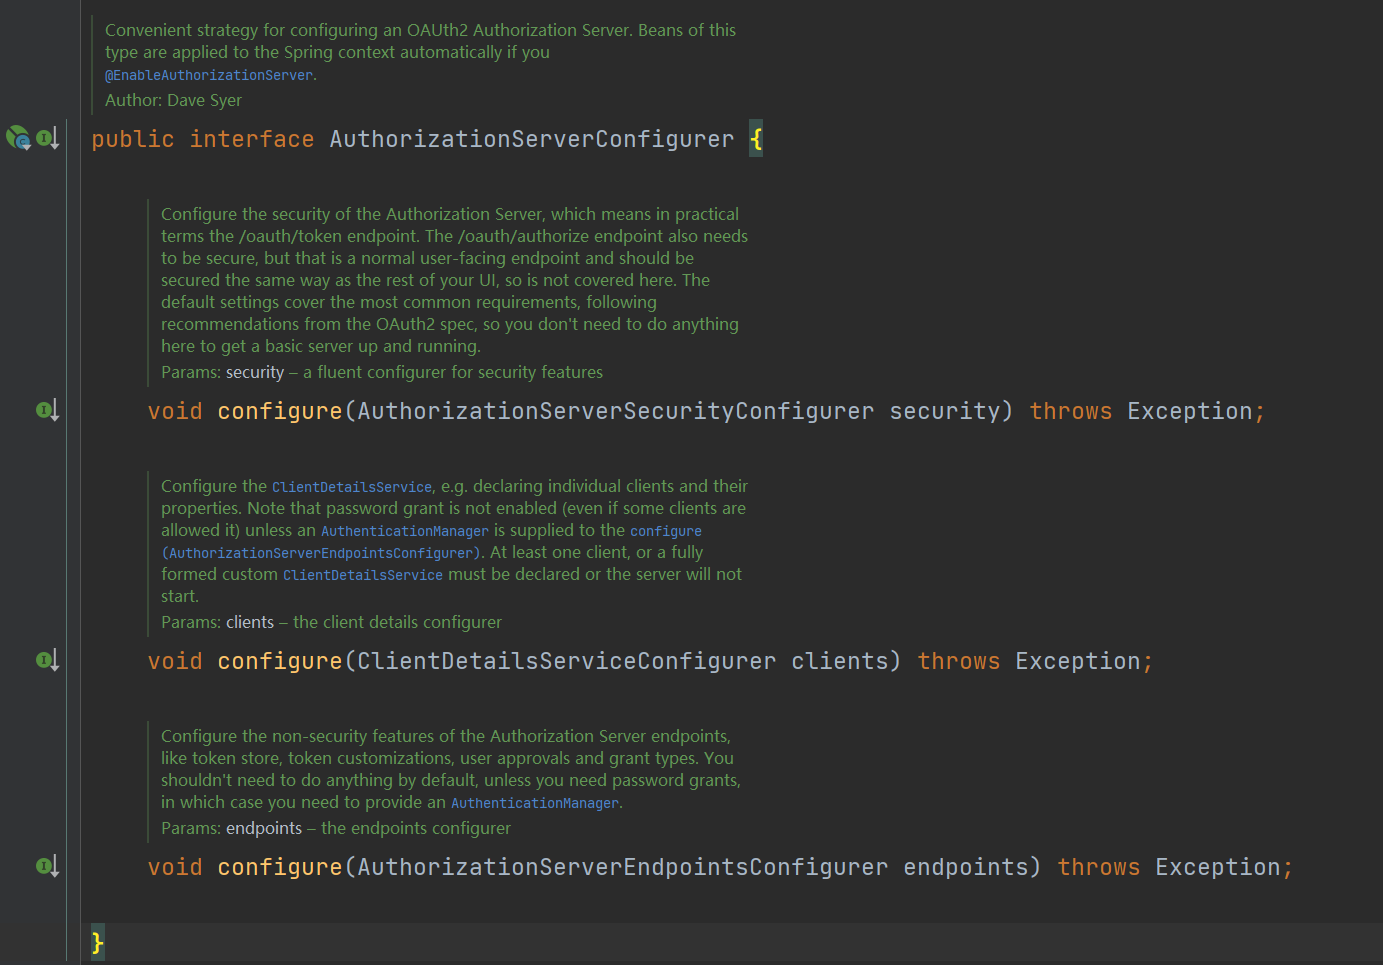
例如
@Configuration
@EnableAuthorizationServer
public class AuthorizationServerConfig extends AuthorizationServerConfigurerAdapter {
    @Override
    public void configure(AuthorizationServerSecurityConfigurer security) {
        security.allowFormAuthenticationForClients().tokenKeyAccess("permitAll()").checkTokenAccess("permitAll()");
    }
}
配置类说明:
ClientDetailsServiceConfigurer:用来配置客户端详情服务,看支持哪些客户端来请求
AuthorizationServerEndpointsConfigurer:解决两点:客户端来申请令牌了,申请的地址是什么(令牌端点)以及令牌怎么发放
AuthorizationServerSecurityConfigurer:配置令牌端点的安全约束,哪些url开放,哪些需要鉴权
资源服务
导入 @EnableResourceServer 注解之后就会导入 ResourceServerSecurityConfigurer 配置文件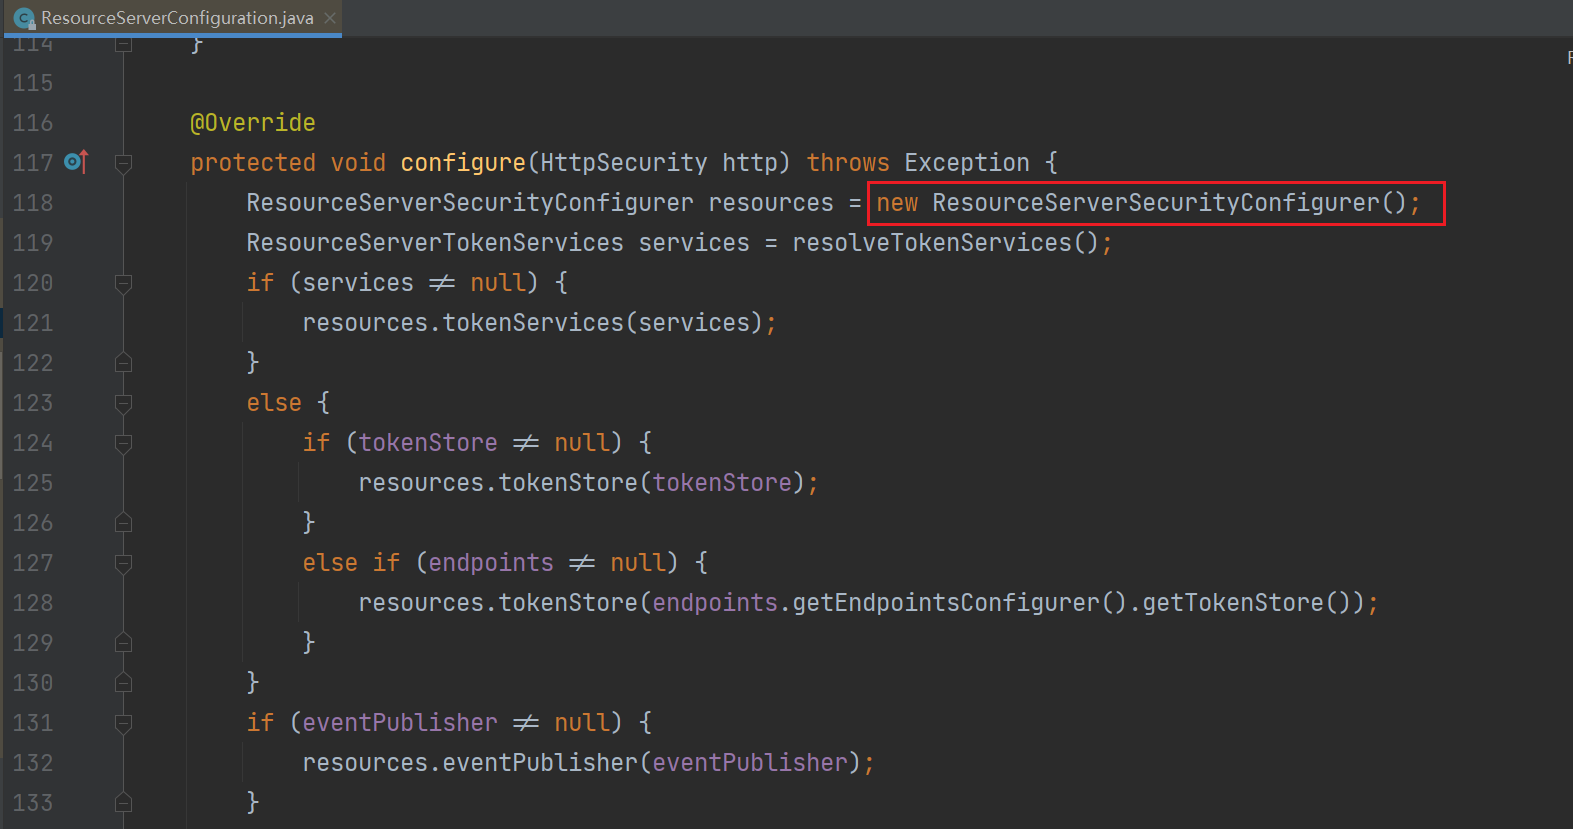

而这个配置文件会添加一个 过滤器,并指定一个 AuthenticationManager 实现类 OAuth2AuthenticationManager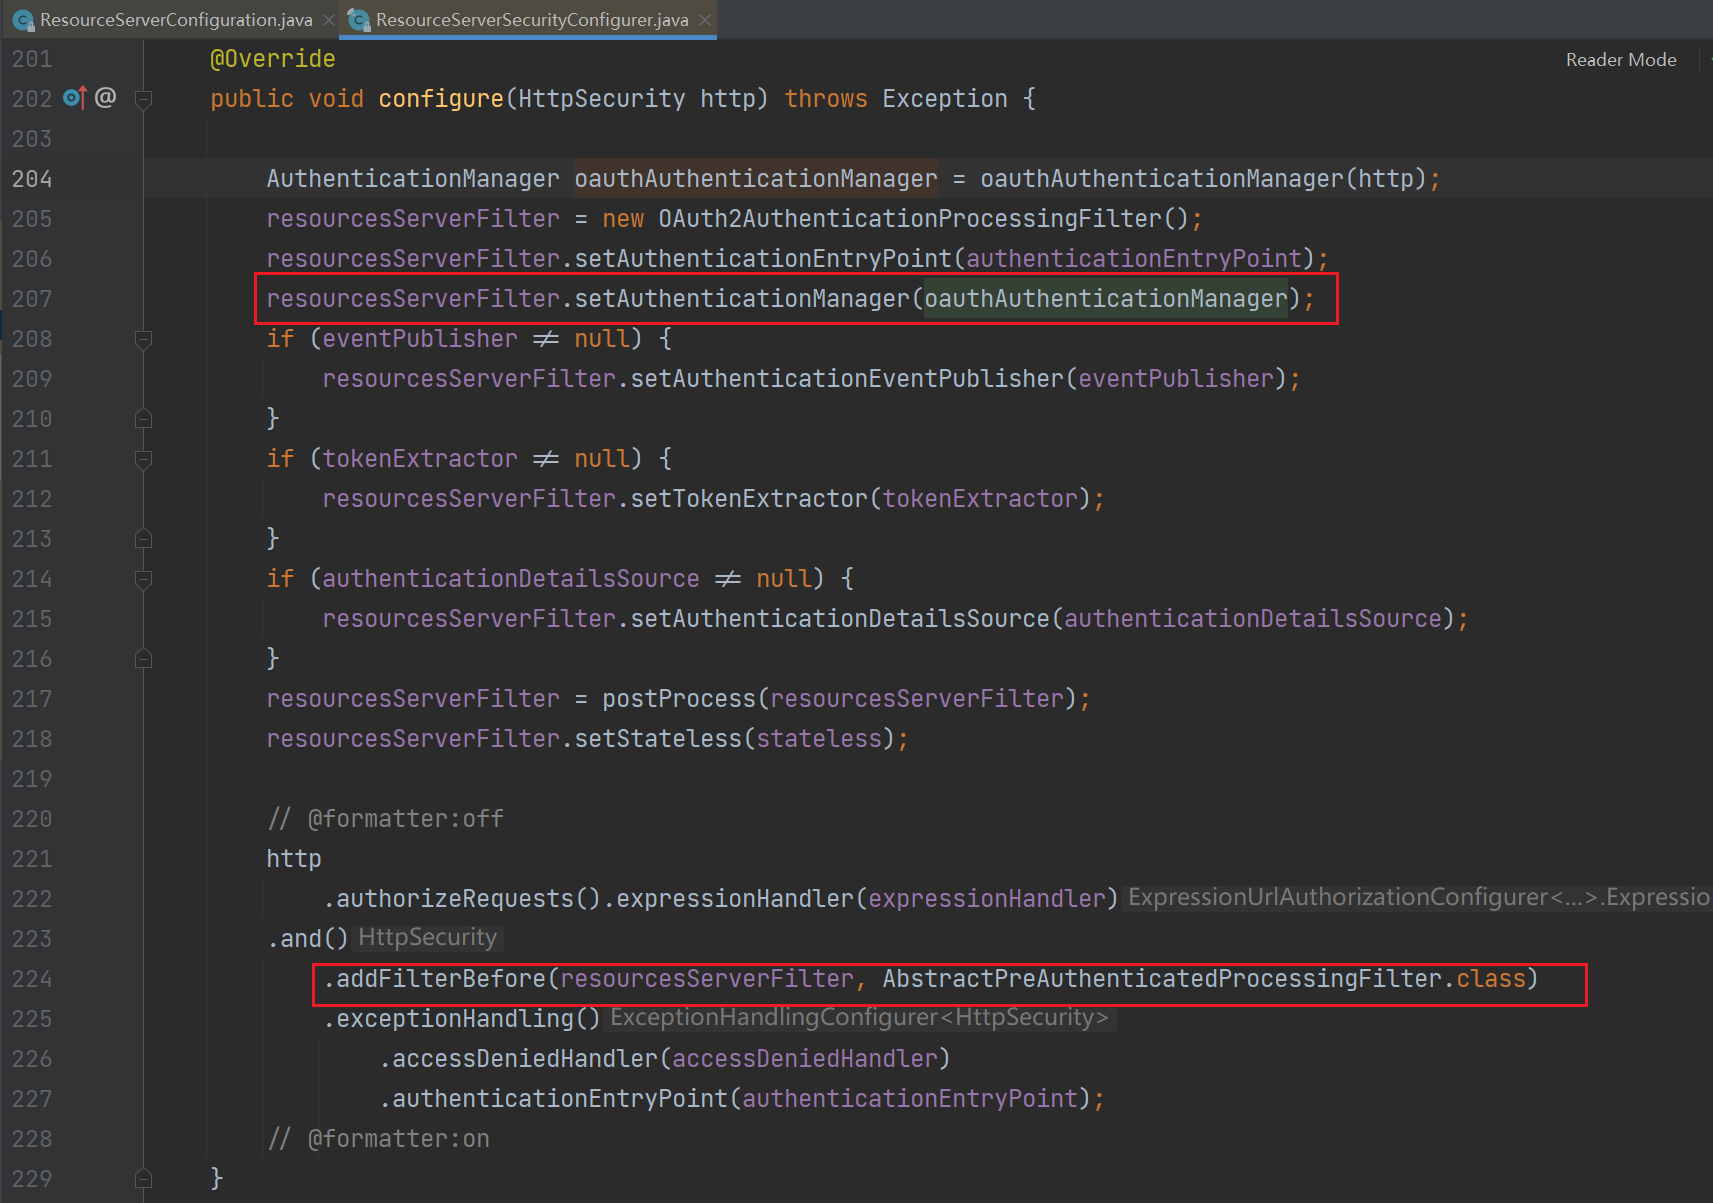
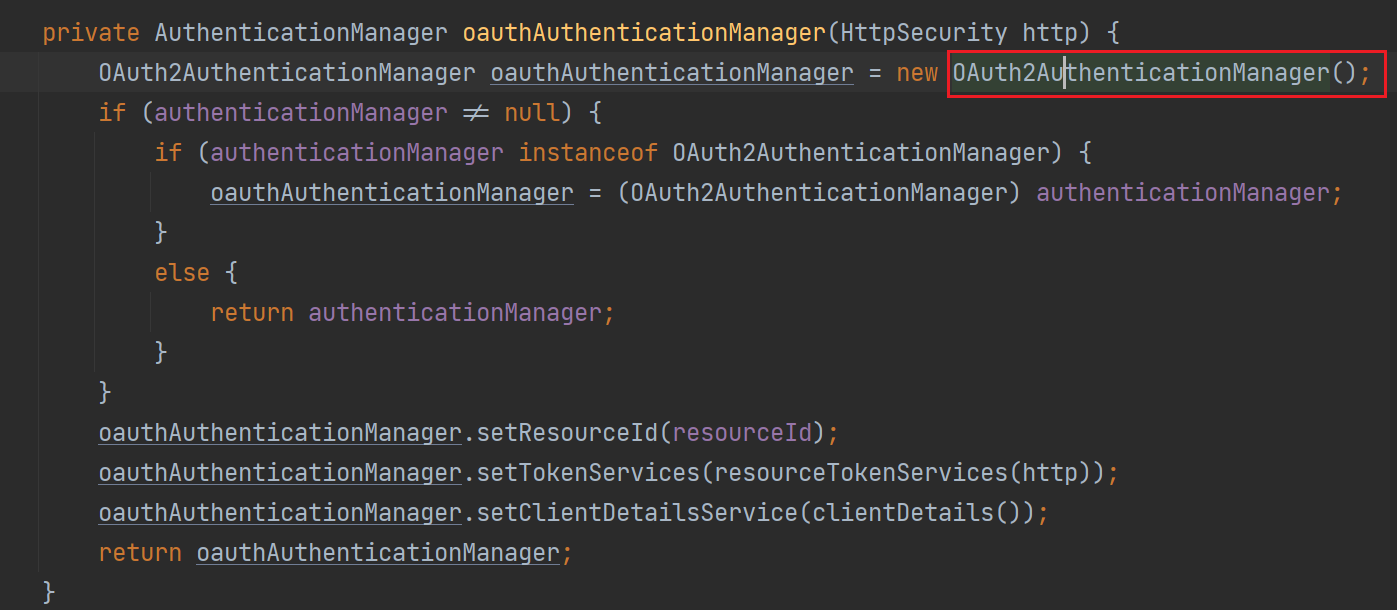

所以当请求资源服务器的时候就会经过 过滤器,从而调用 OAuth2AuthenticationManager 的 authenticate() 方法进行鉴权并获取用户信息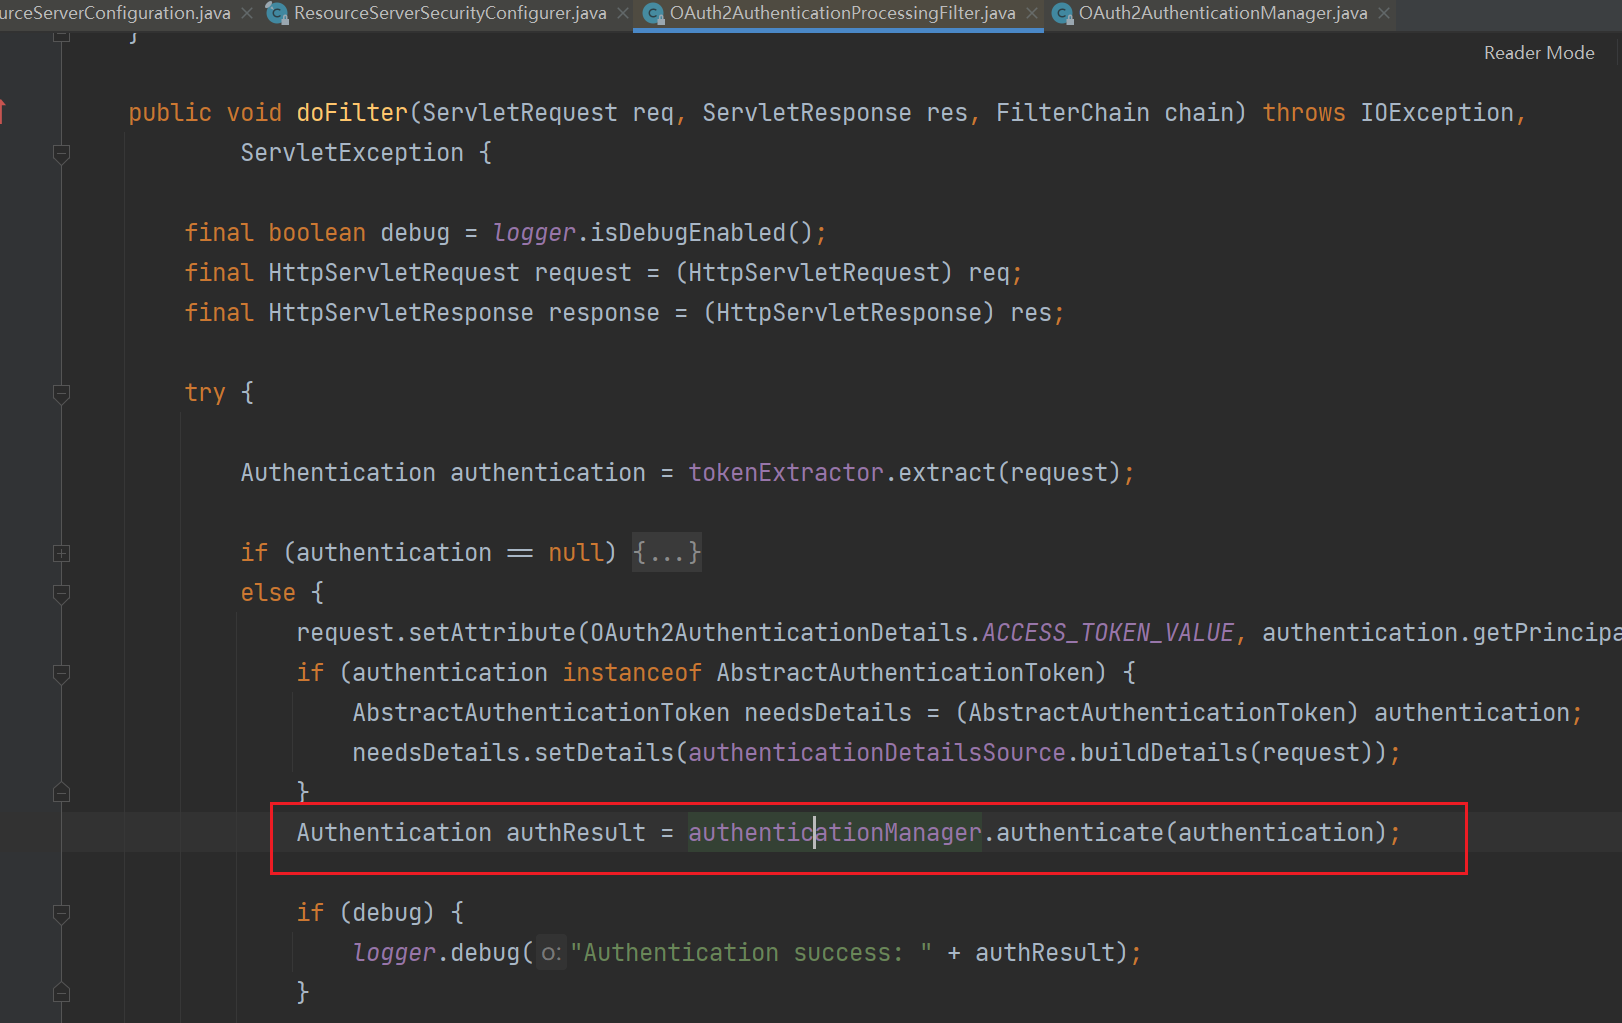
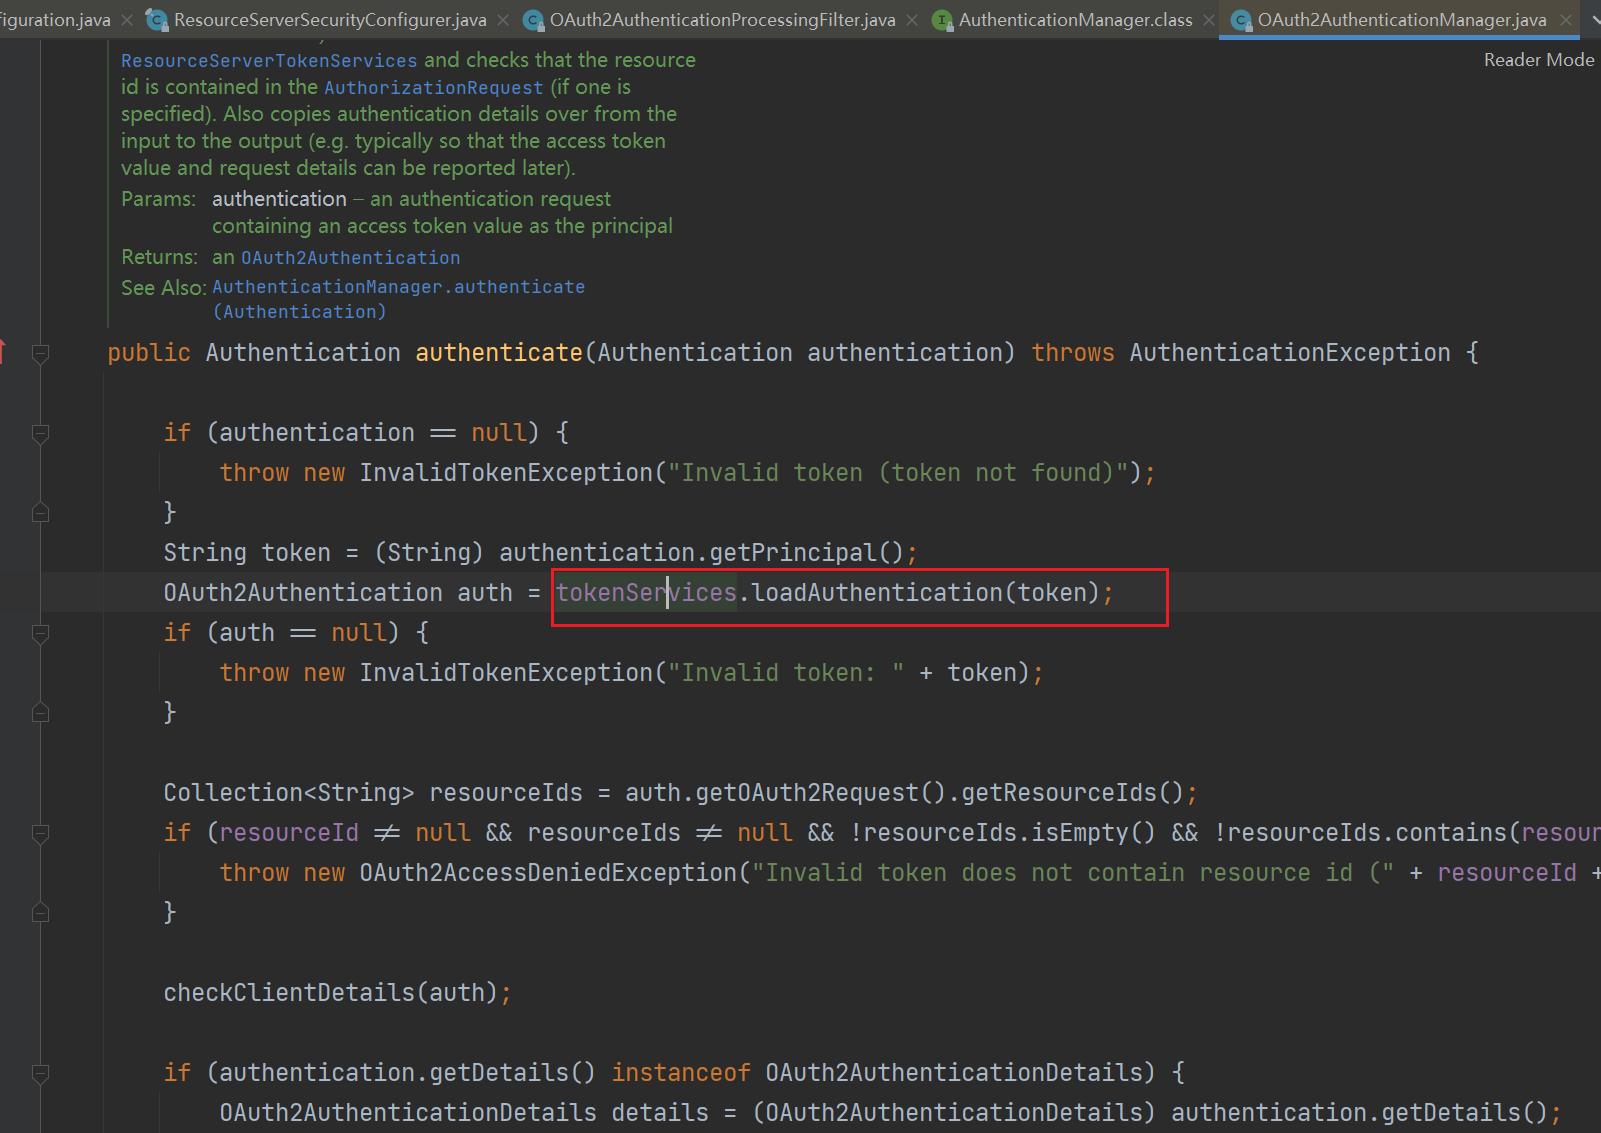
而这里的 tokenService 默认是使用 UserInfoTokenServices 这个类型的 bean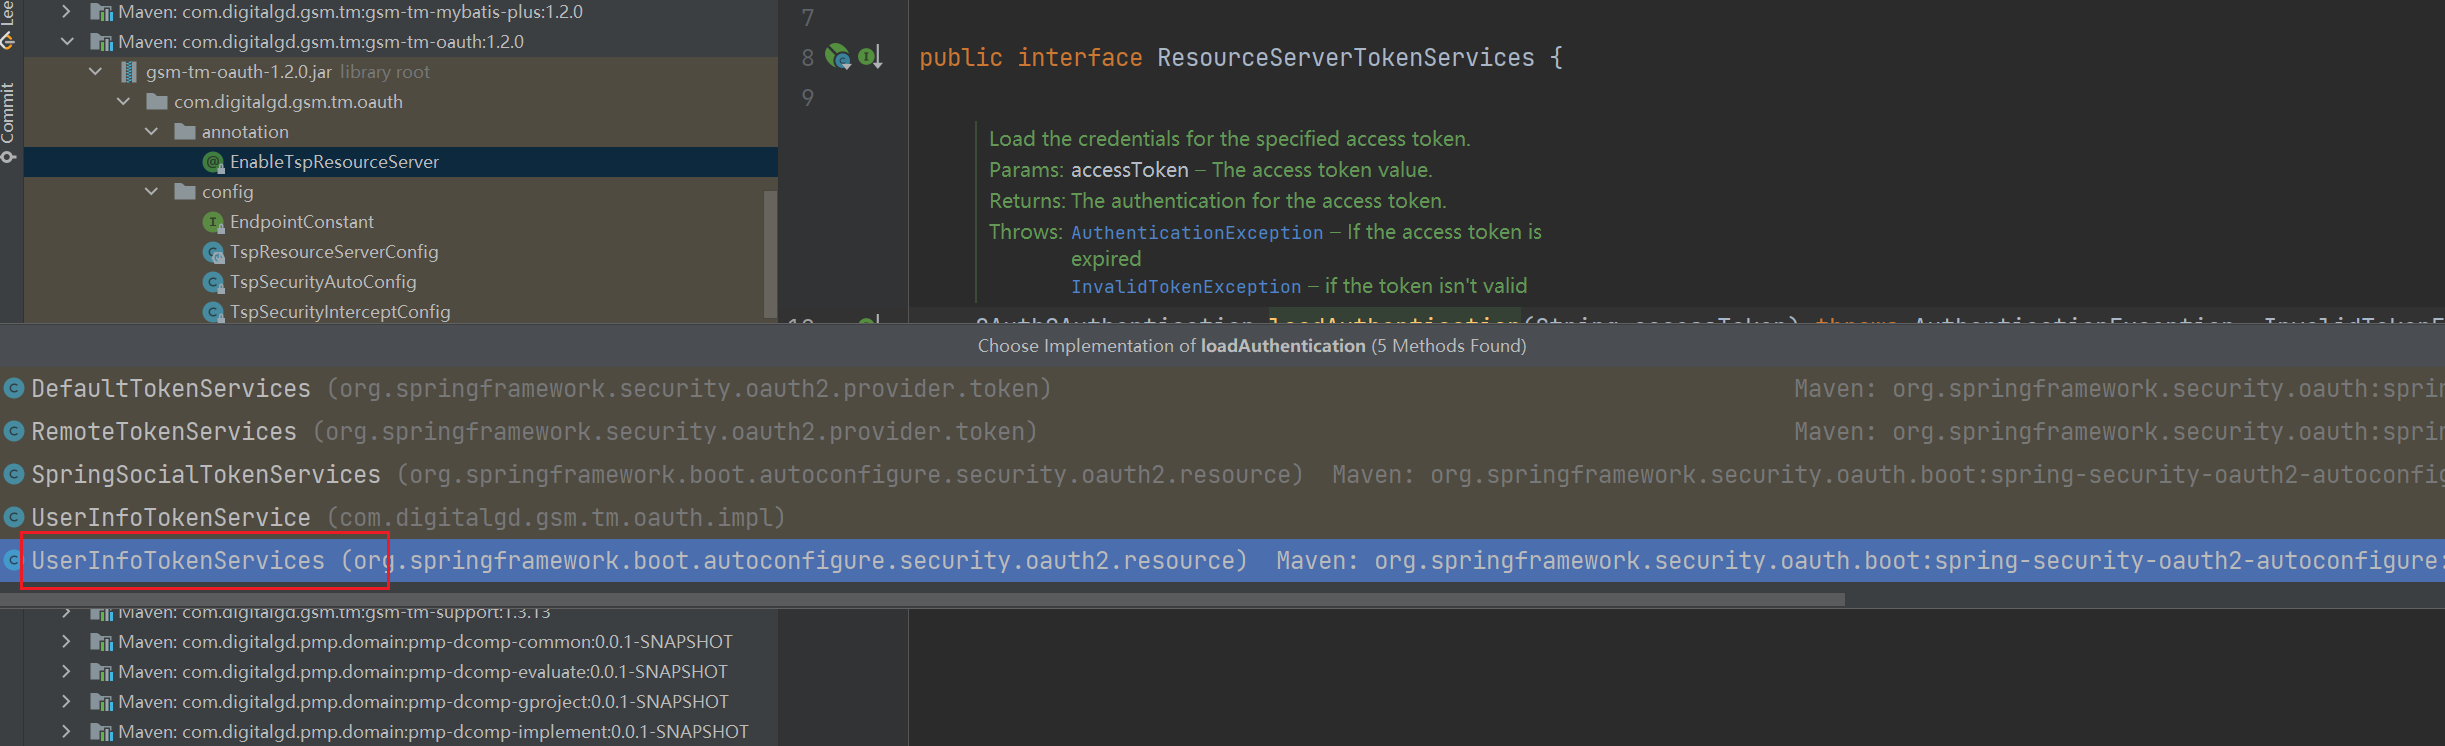
因为当我们没配置的时候会自动创建这个 bean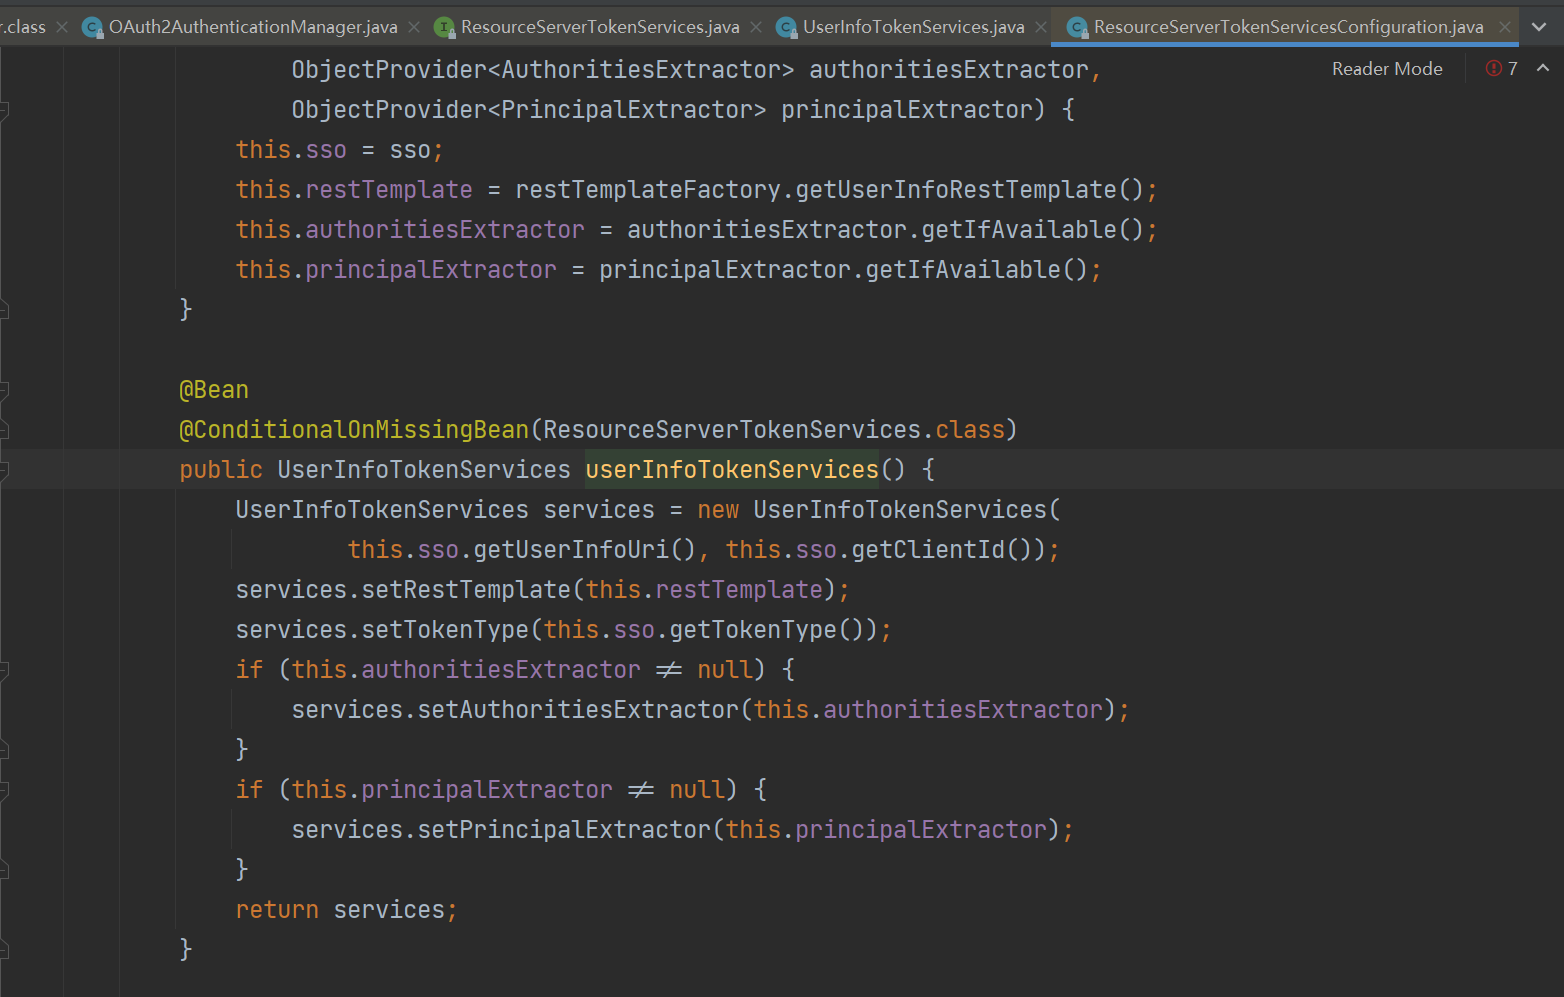
UserInfoTokenServices 就会再根据配置的路径信息和 token 去获取用户信息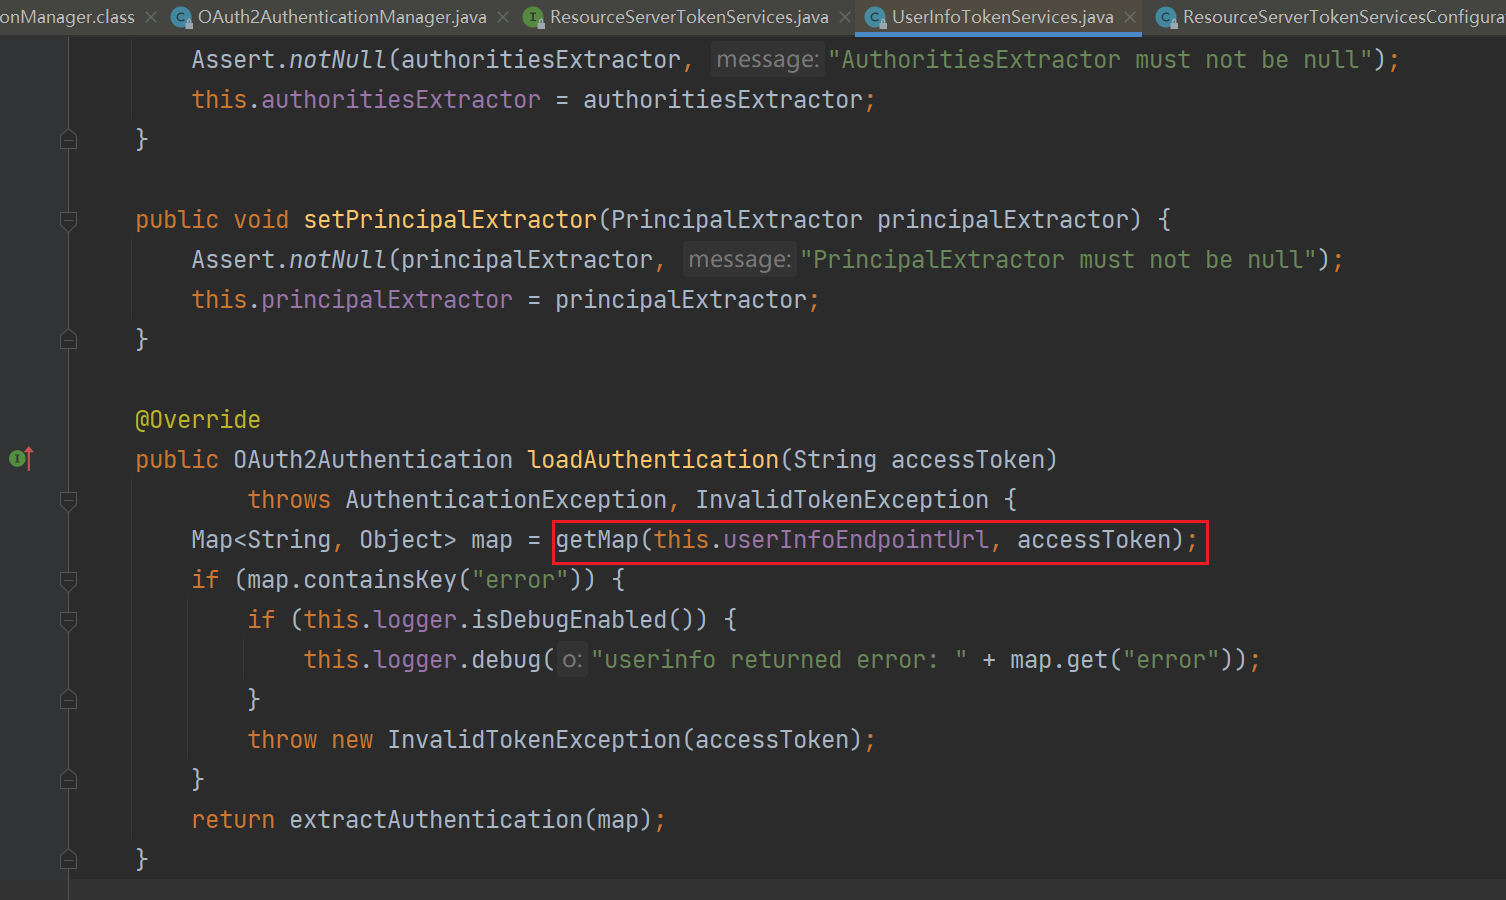
而这里用到的 restTemplate 是 OAuth2RestTemplate 类型的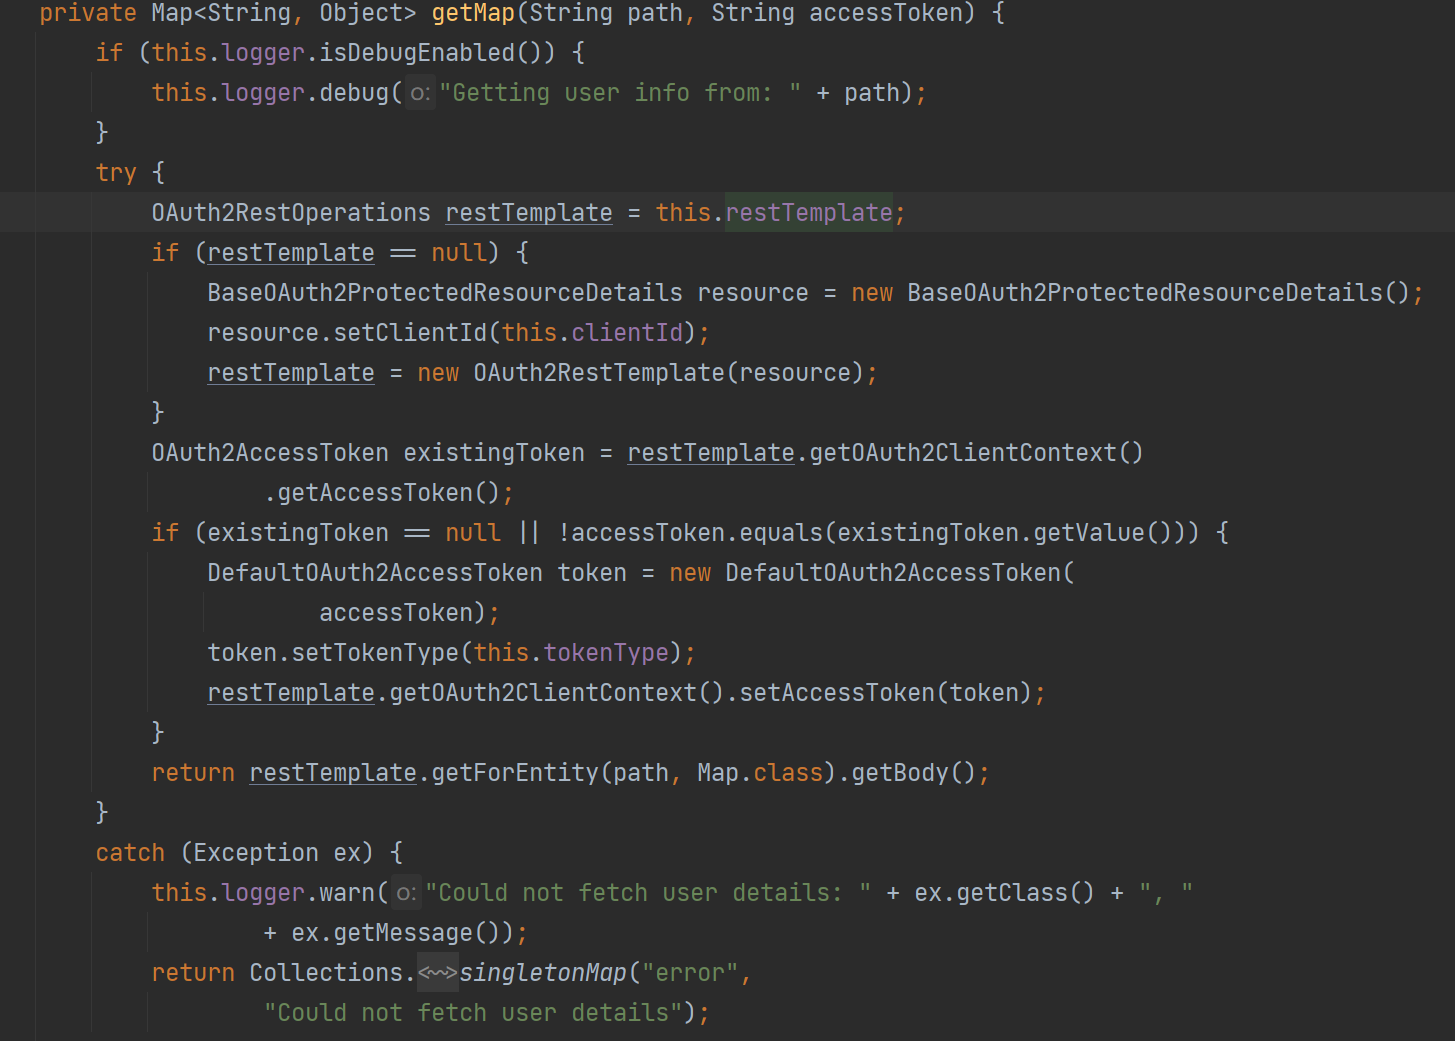
自定义登录接口
在 oauth2 代码中,默认是直接使用 TokenEndpoint 类的 postAccessToken 方法进行密码模式的登录功能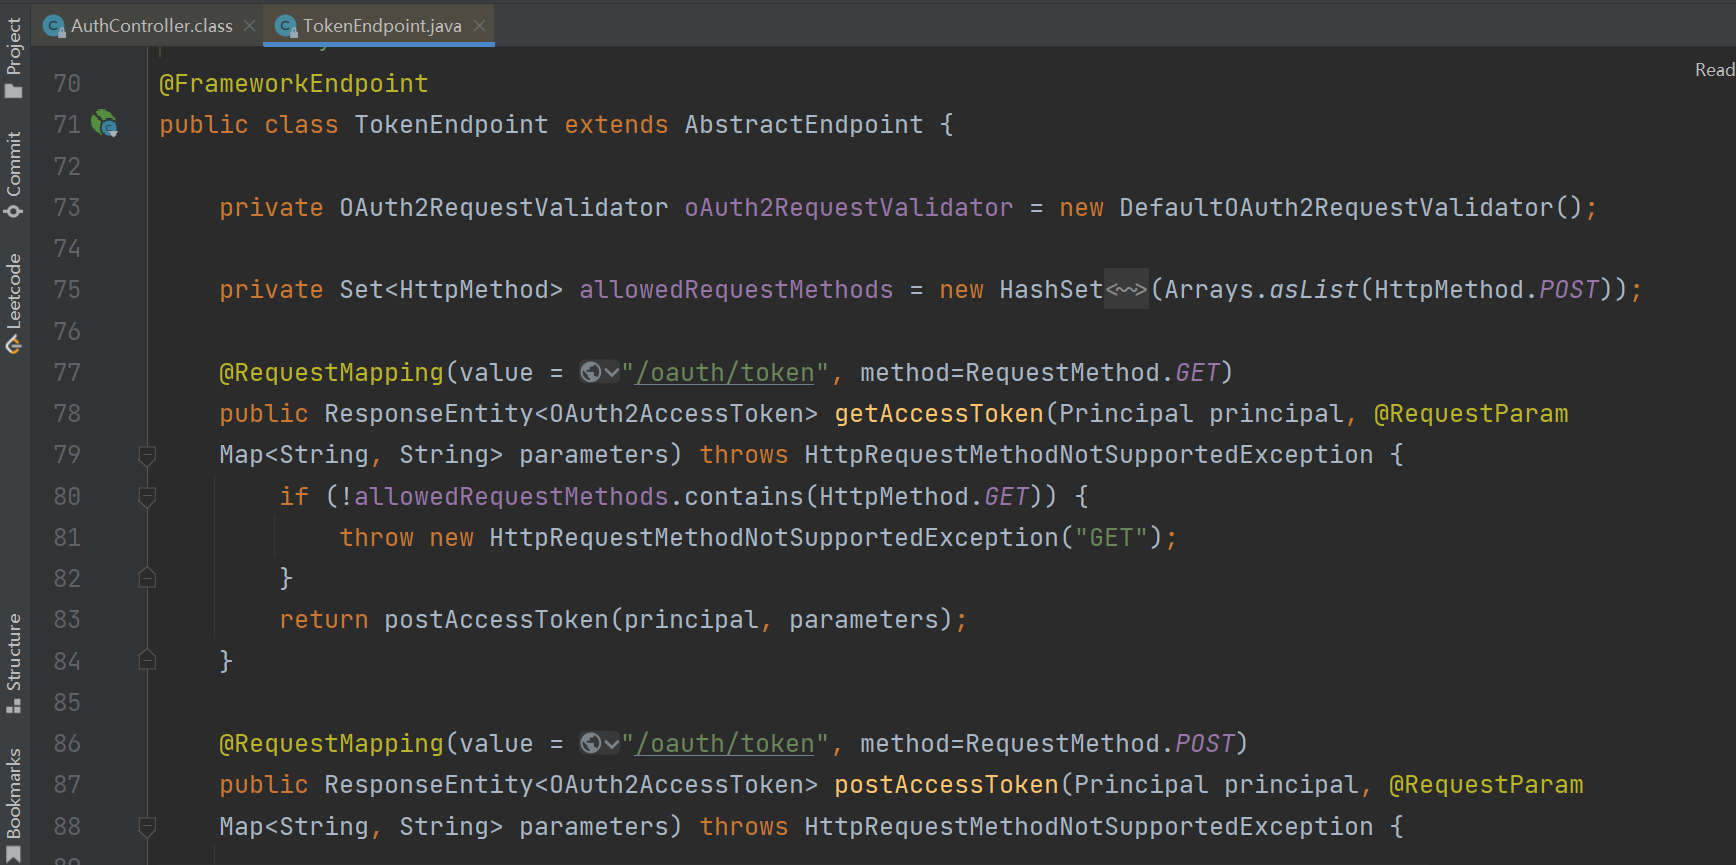
jwt 的使用
- 本文链接:https://lxjblog.gitee.io/2024/04/12/OAuth2/
- 版权声明:本博客所有文章除特别声明外,均默认采用 许可协议。