条件注解
@ConditionalOnClass:当指定的类在类路径上可用时,才创建 Bean
@ConditionalOnMissingClass:当指定的类在类路径上不可用时,才创建 Bean
@ConditionalOnProperty:指定的属性存在且具有特定的值时,才创建 Bean,注意 havingValue 才是指定属性值
public @interface ConditionalOnProperty {

 /**
  * Alias for { @link #name()} .
  * @return the names
  */
 String[] value() default { } ;

 /**
  * 配置文件的属性前缀
  */
 String prefix() default "";

 /**
  * 配置文件的属性名(key)
  */
 String[] name() default { } ;

 /**
  * 配置文件中的属性值(value)
  */
 String havingValue() default "";

 /**
  * 如果未设置属性,条件是否应匹配。默认为false
  */
 boolean matchIfMissing() default false;
}
4. **@ConditionalOnResource**:当指定的资源存在时,才创建 Bean
5. **@ConditionalOnExpression**:当指定的 SpEL(Spring Expression Language)表达式计算结果为 true 时,才创建 Bean
6. **@ConditionalOnJava**:当 Java 版本满足特定条件时,才创建 Bean
```java
@Bean
@ConditionalOnJava(JavaVersion.EIGHT)
public MyBean myBean() {
    return new MyBean();
}
在 springboot 中是通过判断是否存在指定类且存在指定方法,从高到低去判断 java 版本的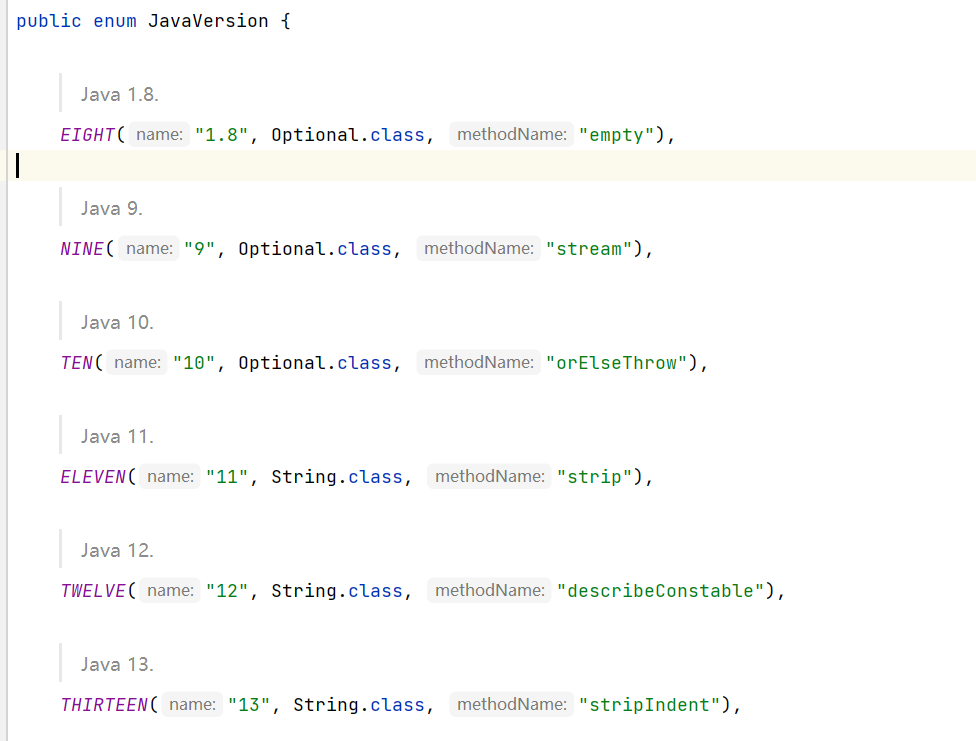
- @ConditionalOnSingleCandidate:当指定的 Bean 在容器中只有一个候选者时,才创建 Bean
- @ConditionalOnWebApplication:当前项目为 web 项目的时候,才创建 Bean
- @ConditionalOnNotWebApplication:当前项目不为 web 项目的时候,才创建 Bean
配置文件
springboot 项目默认会使用 resources 目录下的 application.properties 作为配置文件,当然也可以直接使用注解指定,例如 springcloud 项目就会多指定一个 bootstrap.yaml 作为配置文件
@PropertySource("classpath:application.properties")默认配置文件官方文档:
Core Features
优先级顺序:
- 命令行参数:命令行参数具有最高的优先级,可以覆盖其他任何配置文件中的设置
- 系统环境变量:系统环境变量在优先级上仅次于命令行参数,同样可以覆盖其他配置文件中的设置(虽然是读取环境变量的值,但是项目启动后,并不可以通过修改环境变量动态修改变量值)
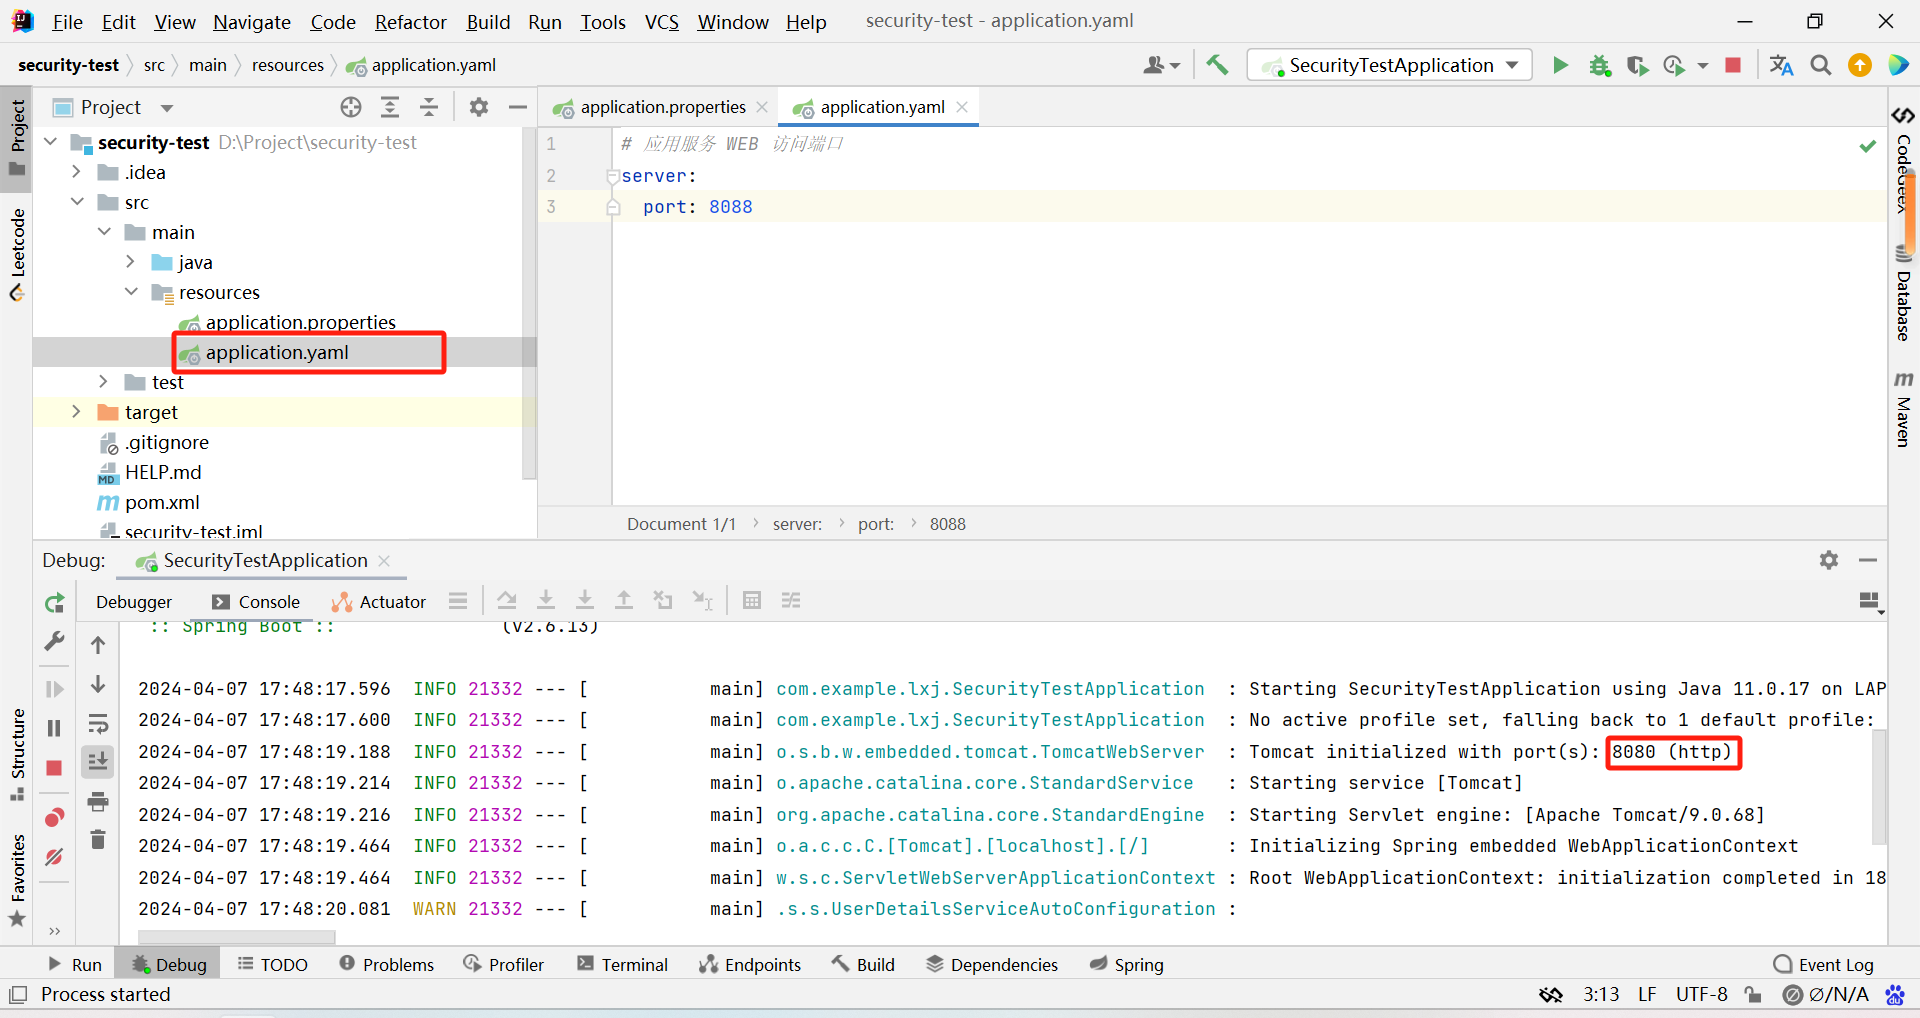
- 配置文件:配置文件的优先级受到其类型和位置的影响(在相同的位置和类型下,.properties格式的配置文件优先级高于.yaml或.yml格式的配置文件)
命令行参数 > 系统环境变量 > 外部指定配置文件 > jar包外部的特定配置文件 > jar包外部的普通配置文件 > jar包内部的指定配置文件 > jar包内部的普通配置文件 > 默认配置
位置影响:
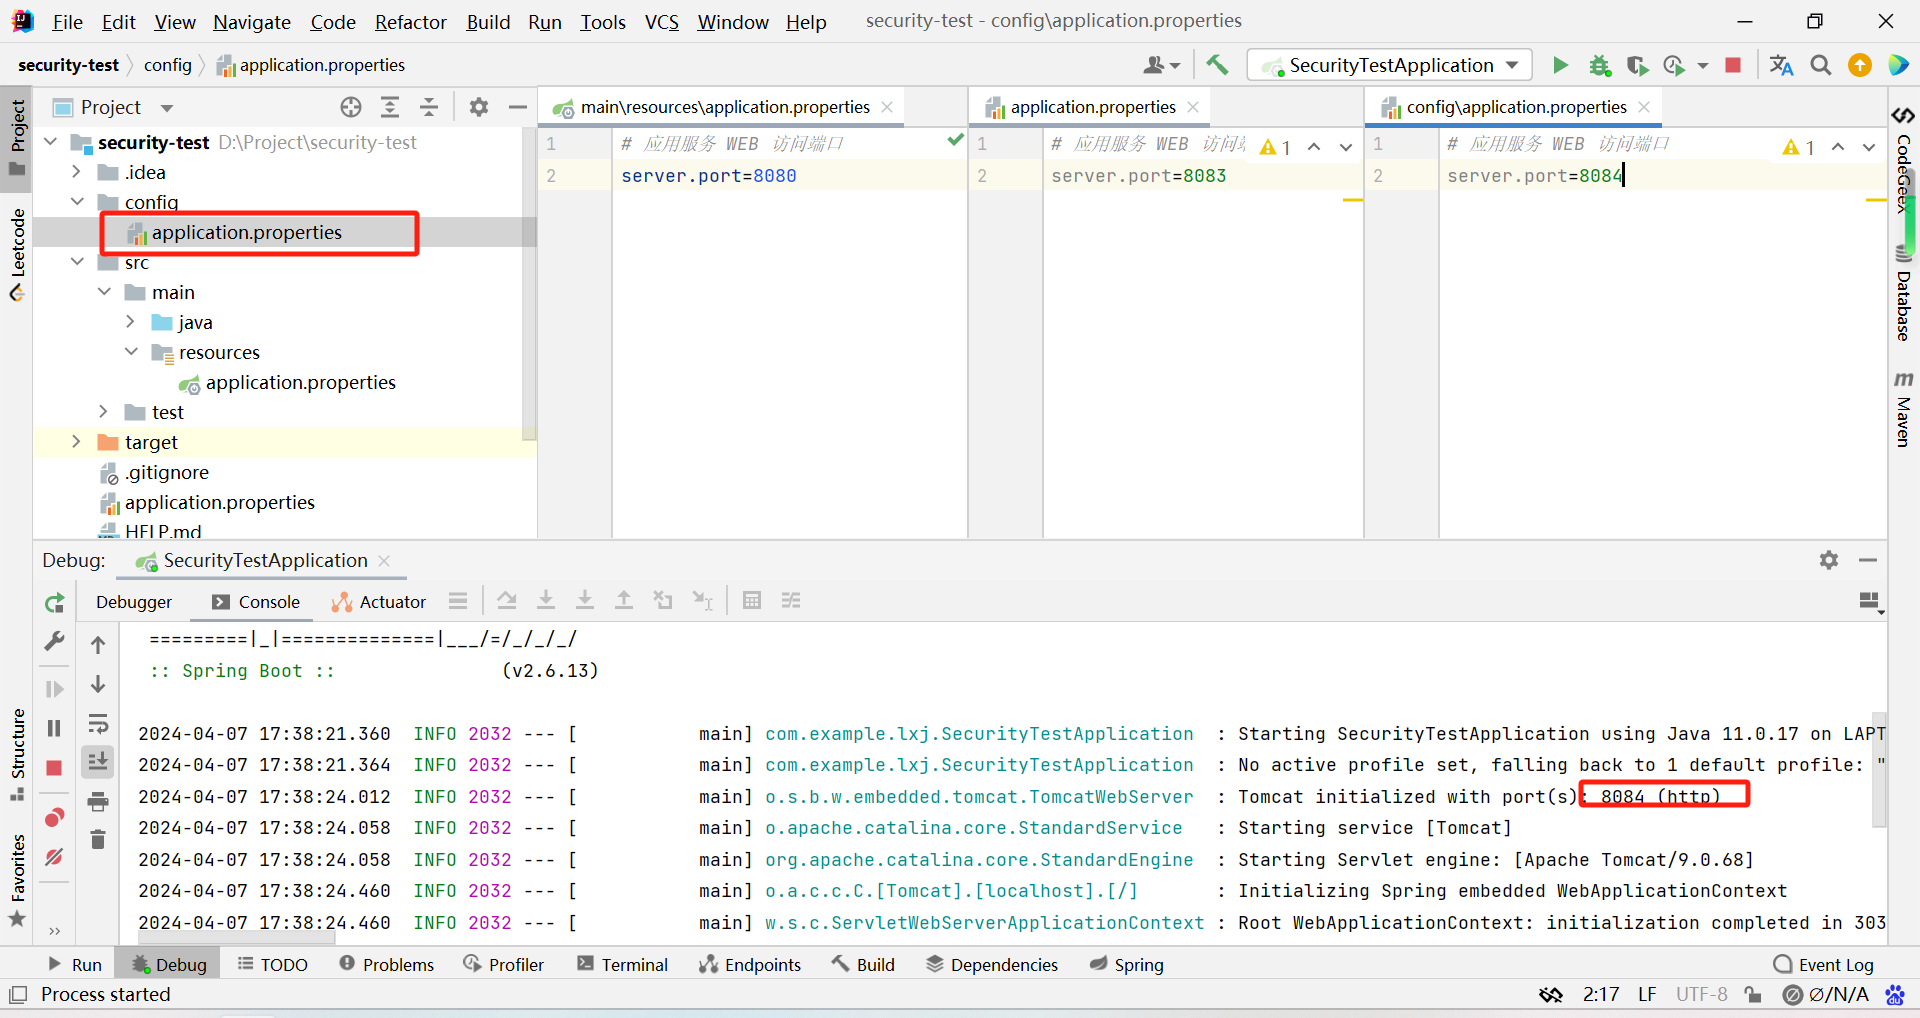
- 内部配置文件位置优先级:config 目录下的配置文件优先级更高
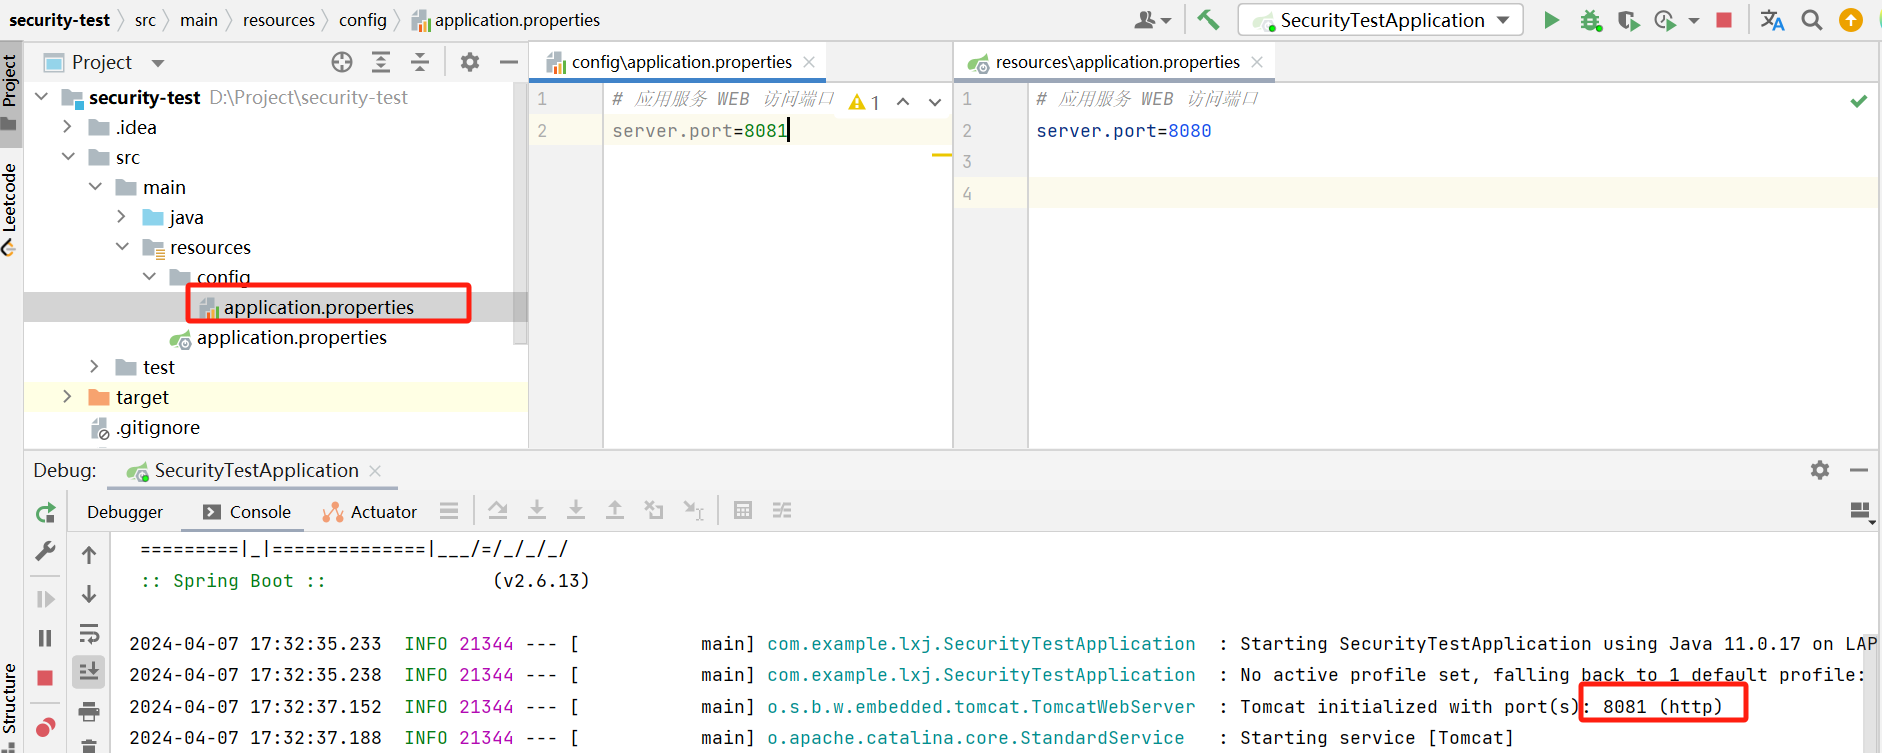
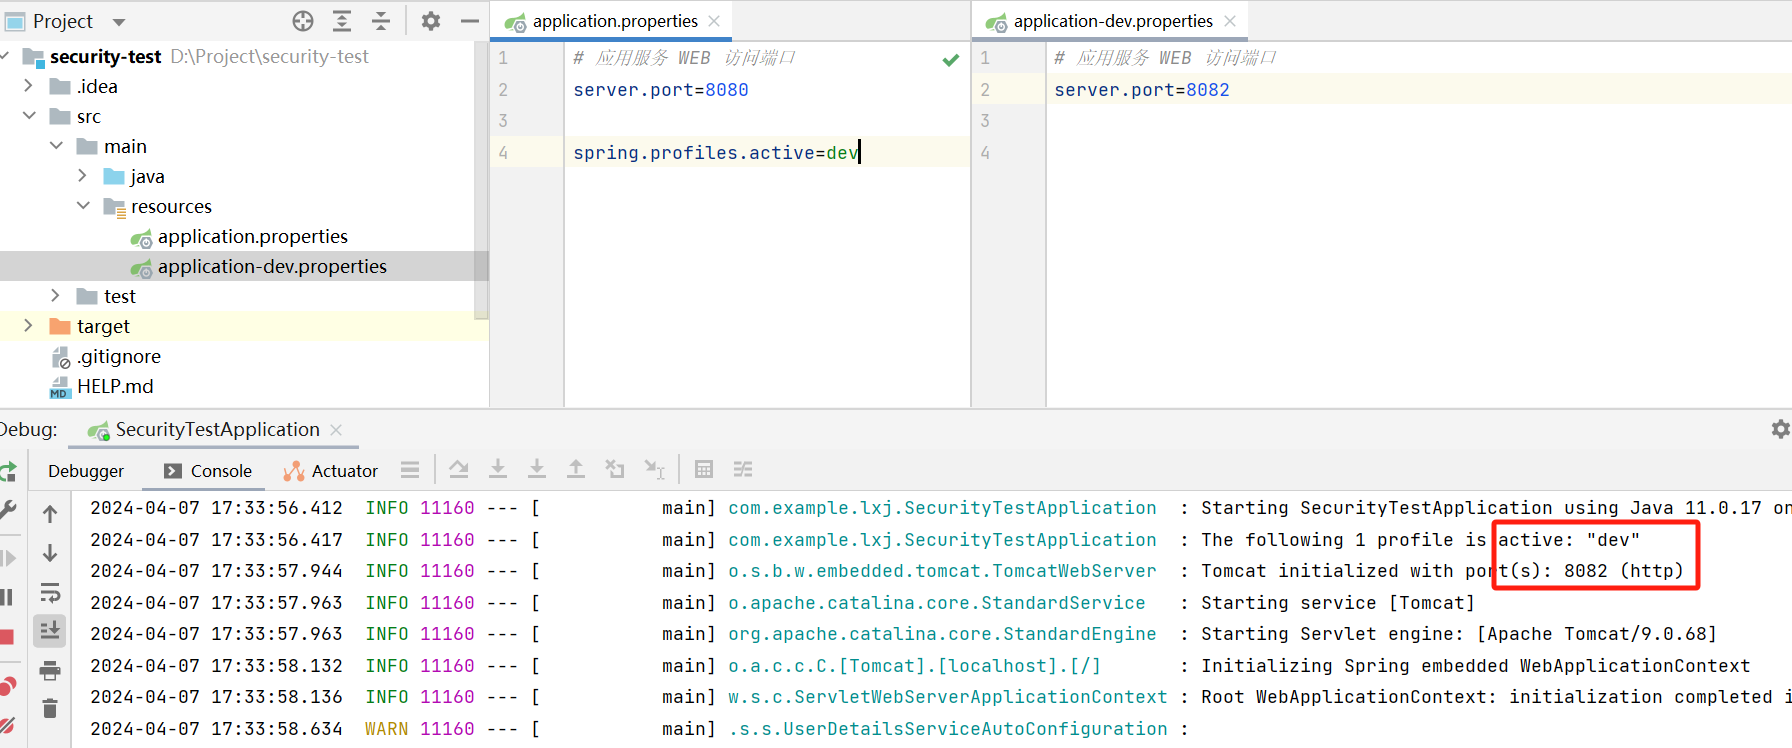
- 在同目录下,指定环境的配置内容会优先于默认配置
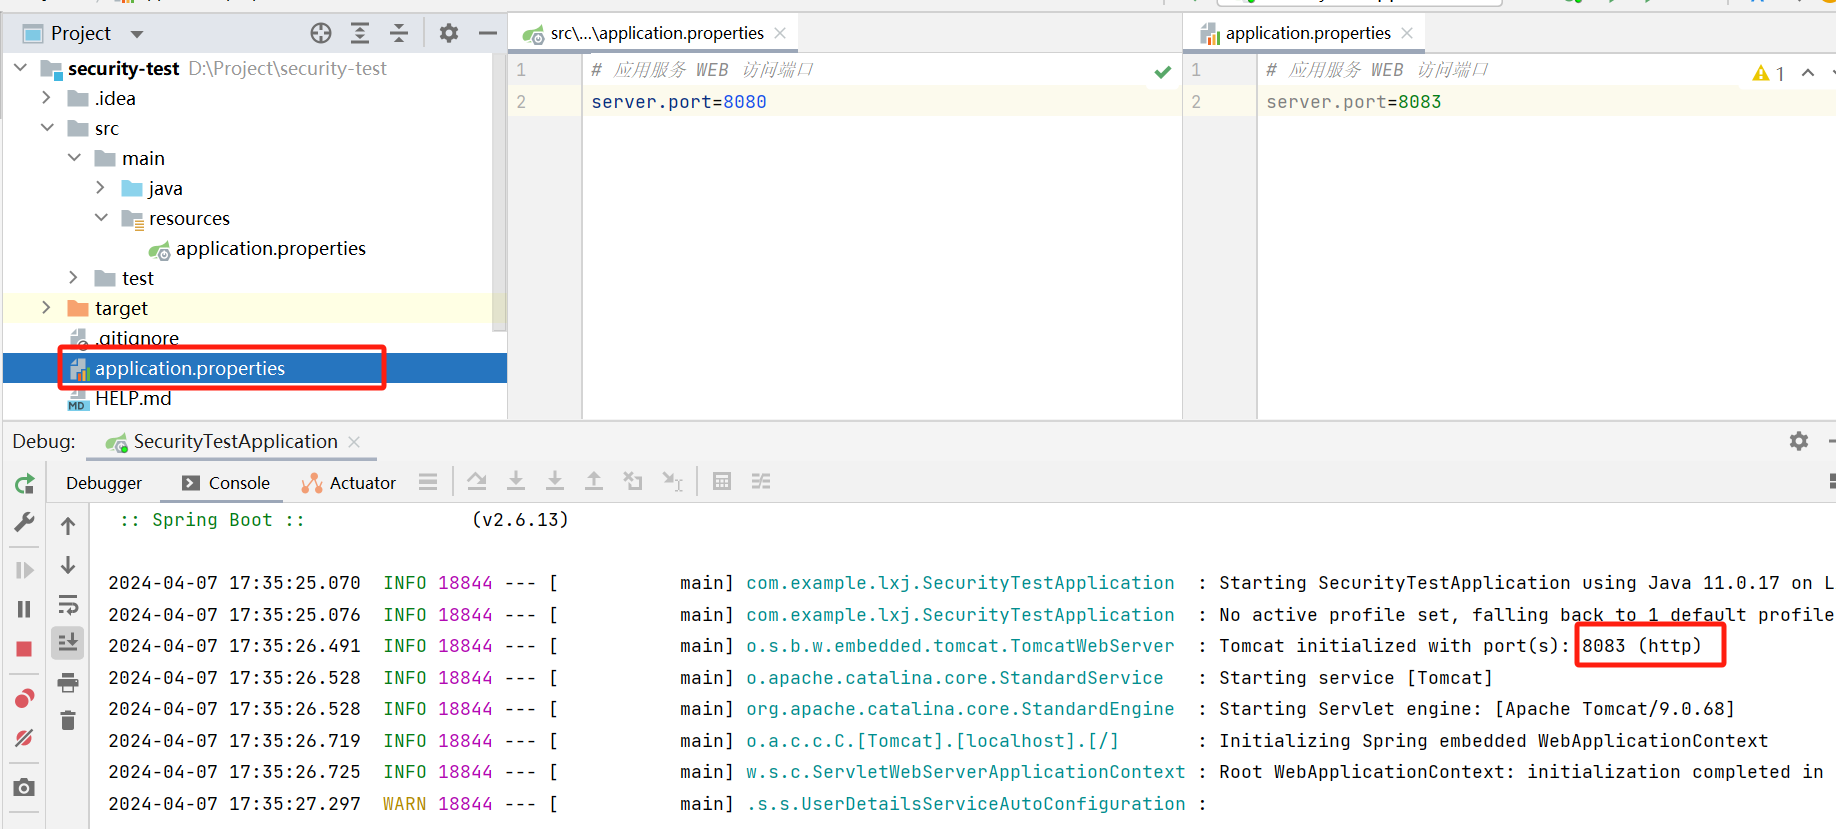
- jar 包外部的配置文件优先级会高于内部,所以我们可以在 jar 包的同级目录下创建配置文件,从而覆盖默认的配置内容
- 外部目录 config 下的配置文件优先级更高
- 而在 config 目录下的任意目录,优先级更高
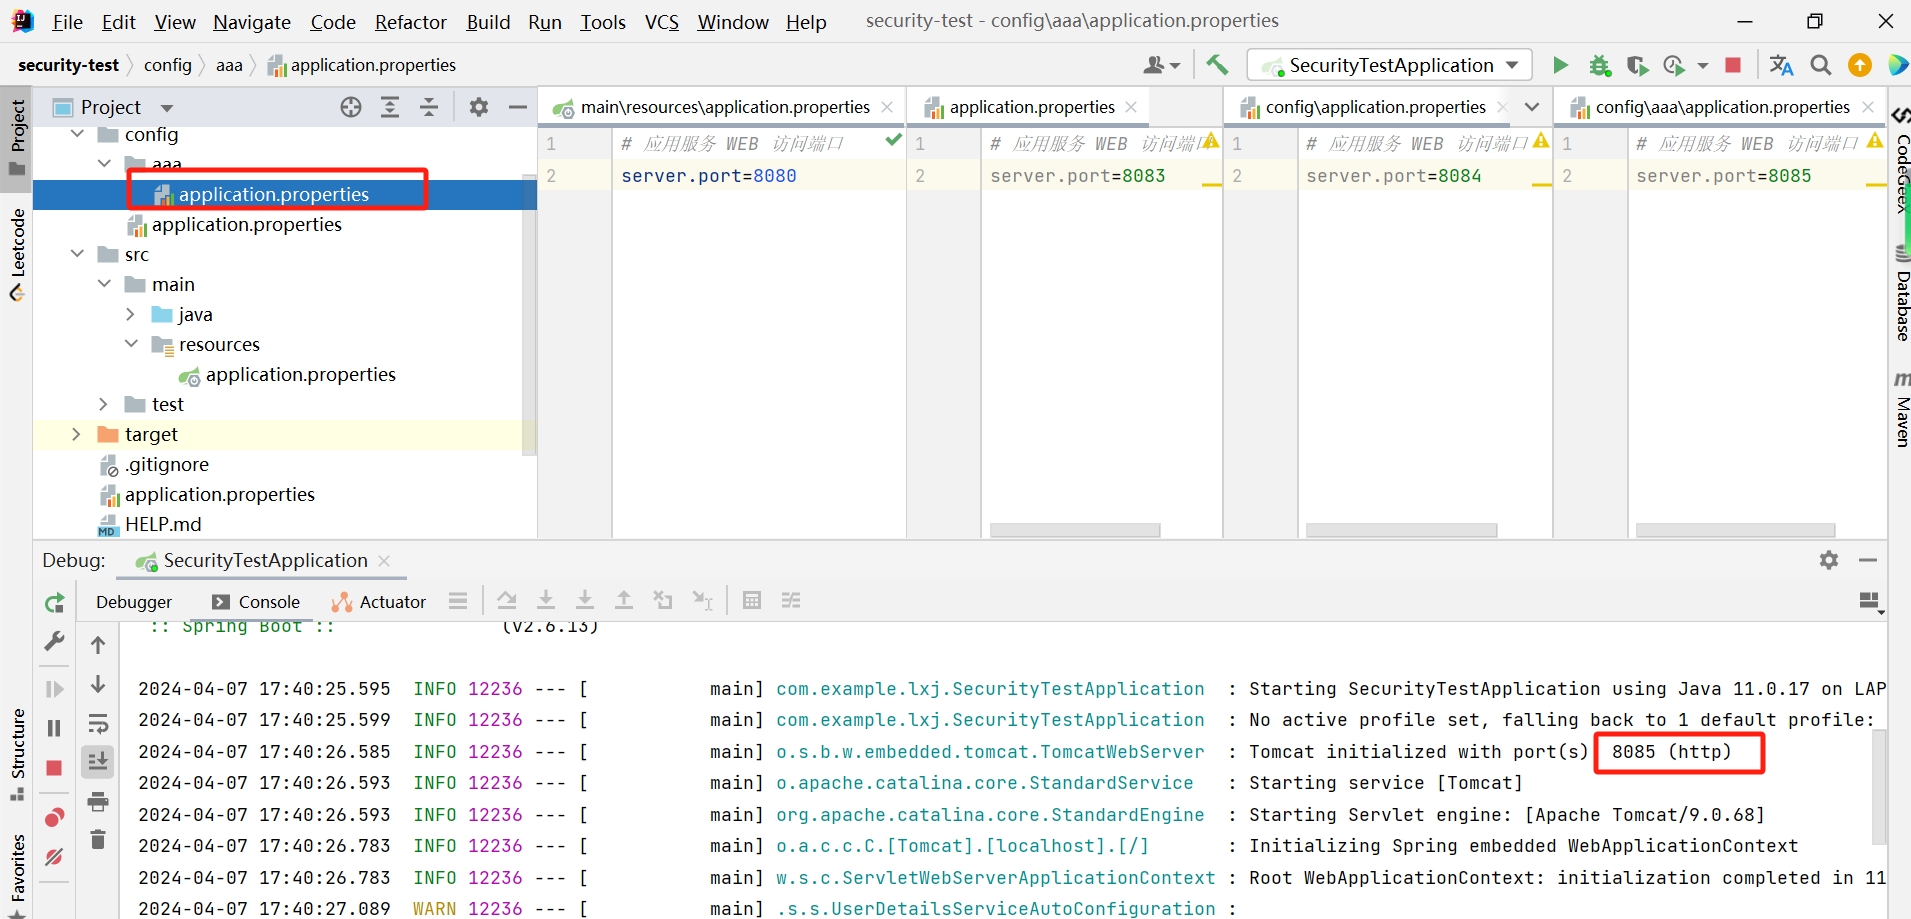
- 如果 config 目录下存在多个二级目录,则会取目录文件名排序较大的优先
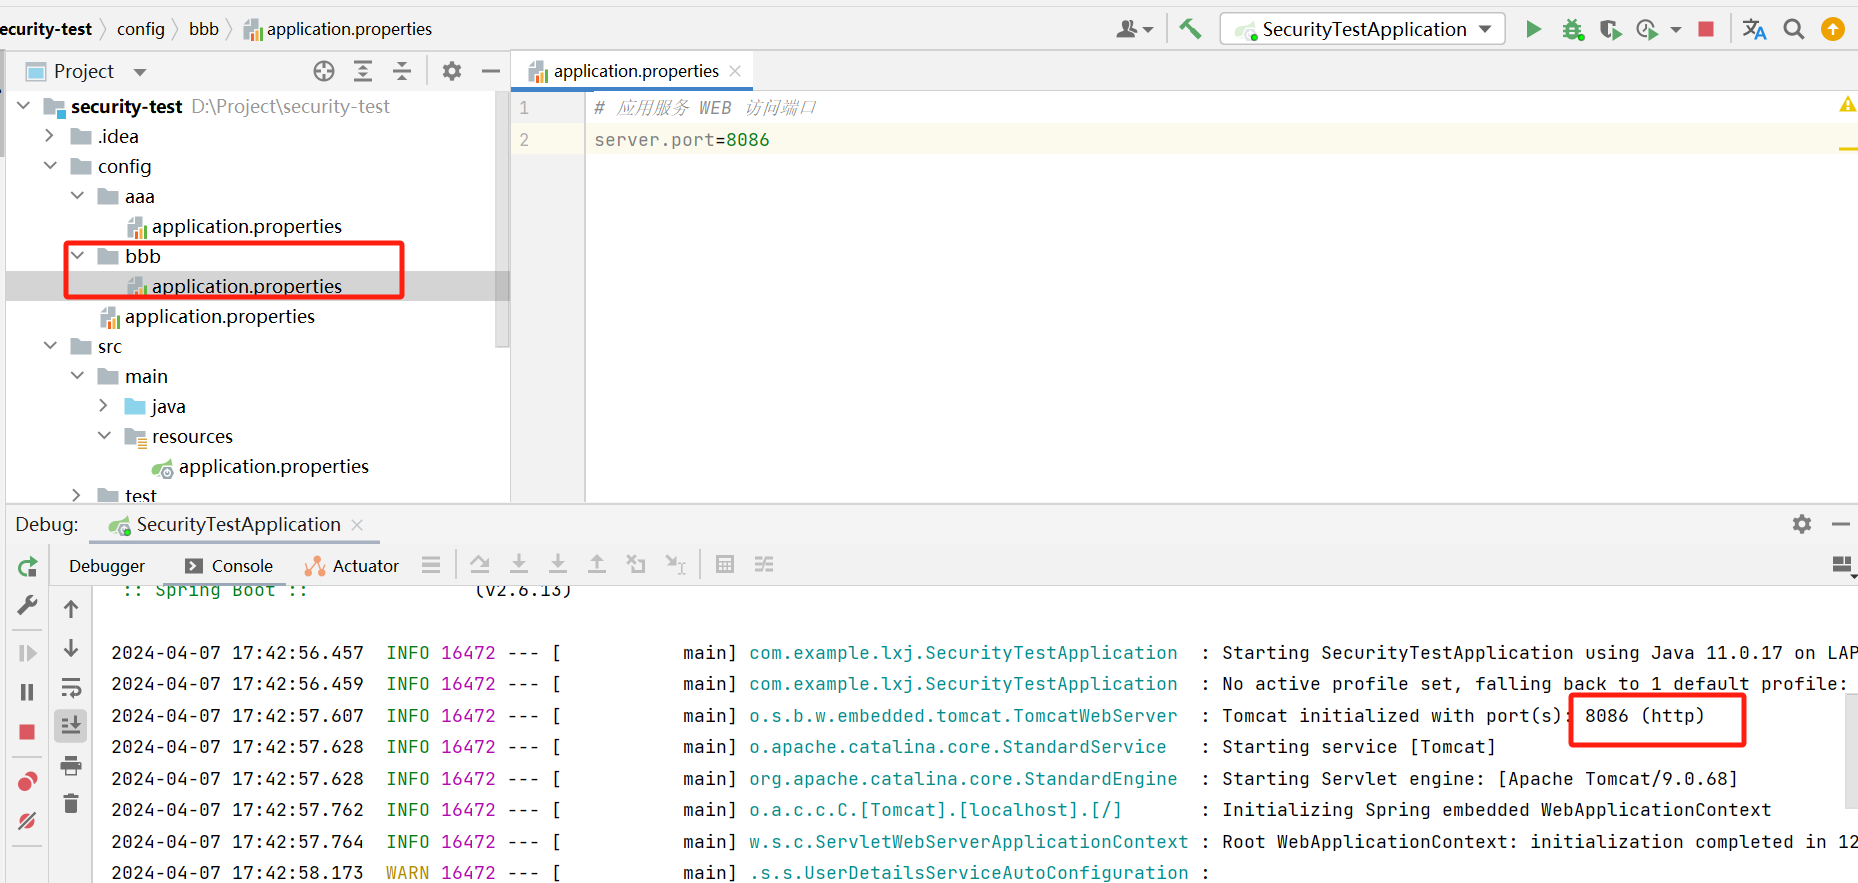
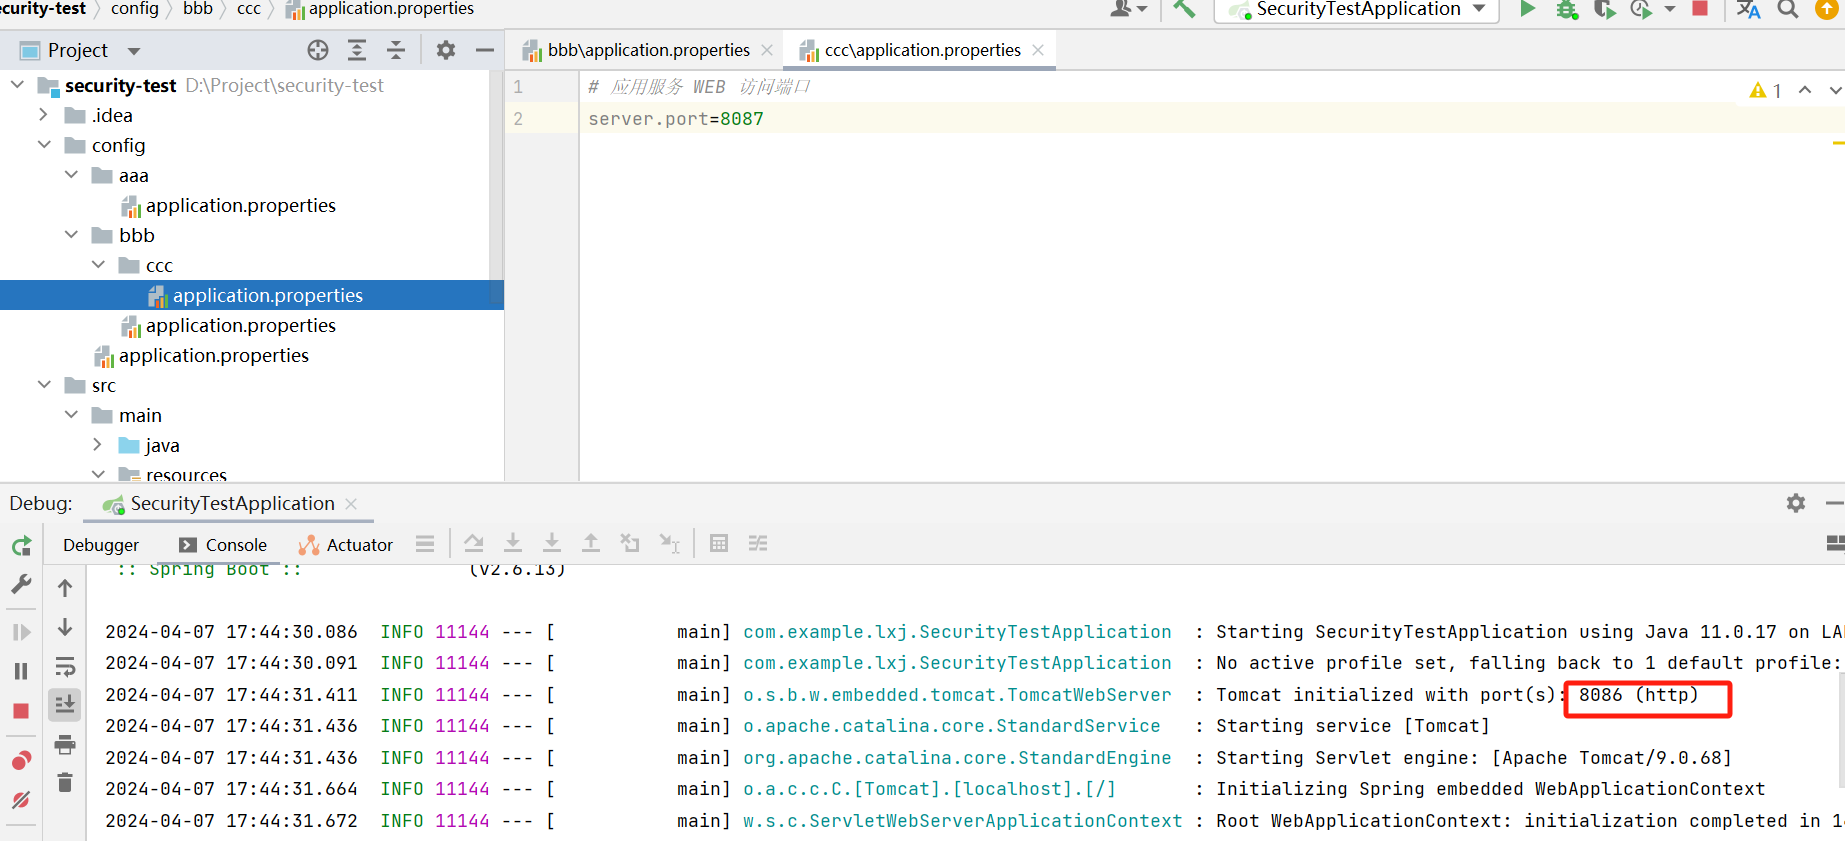
- 但是如果我在二级目录 bbb 下又创建一个目录,则这个目录的配置文件不会被读取到
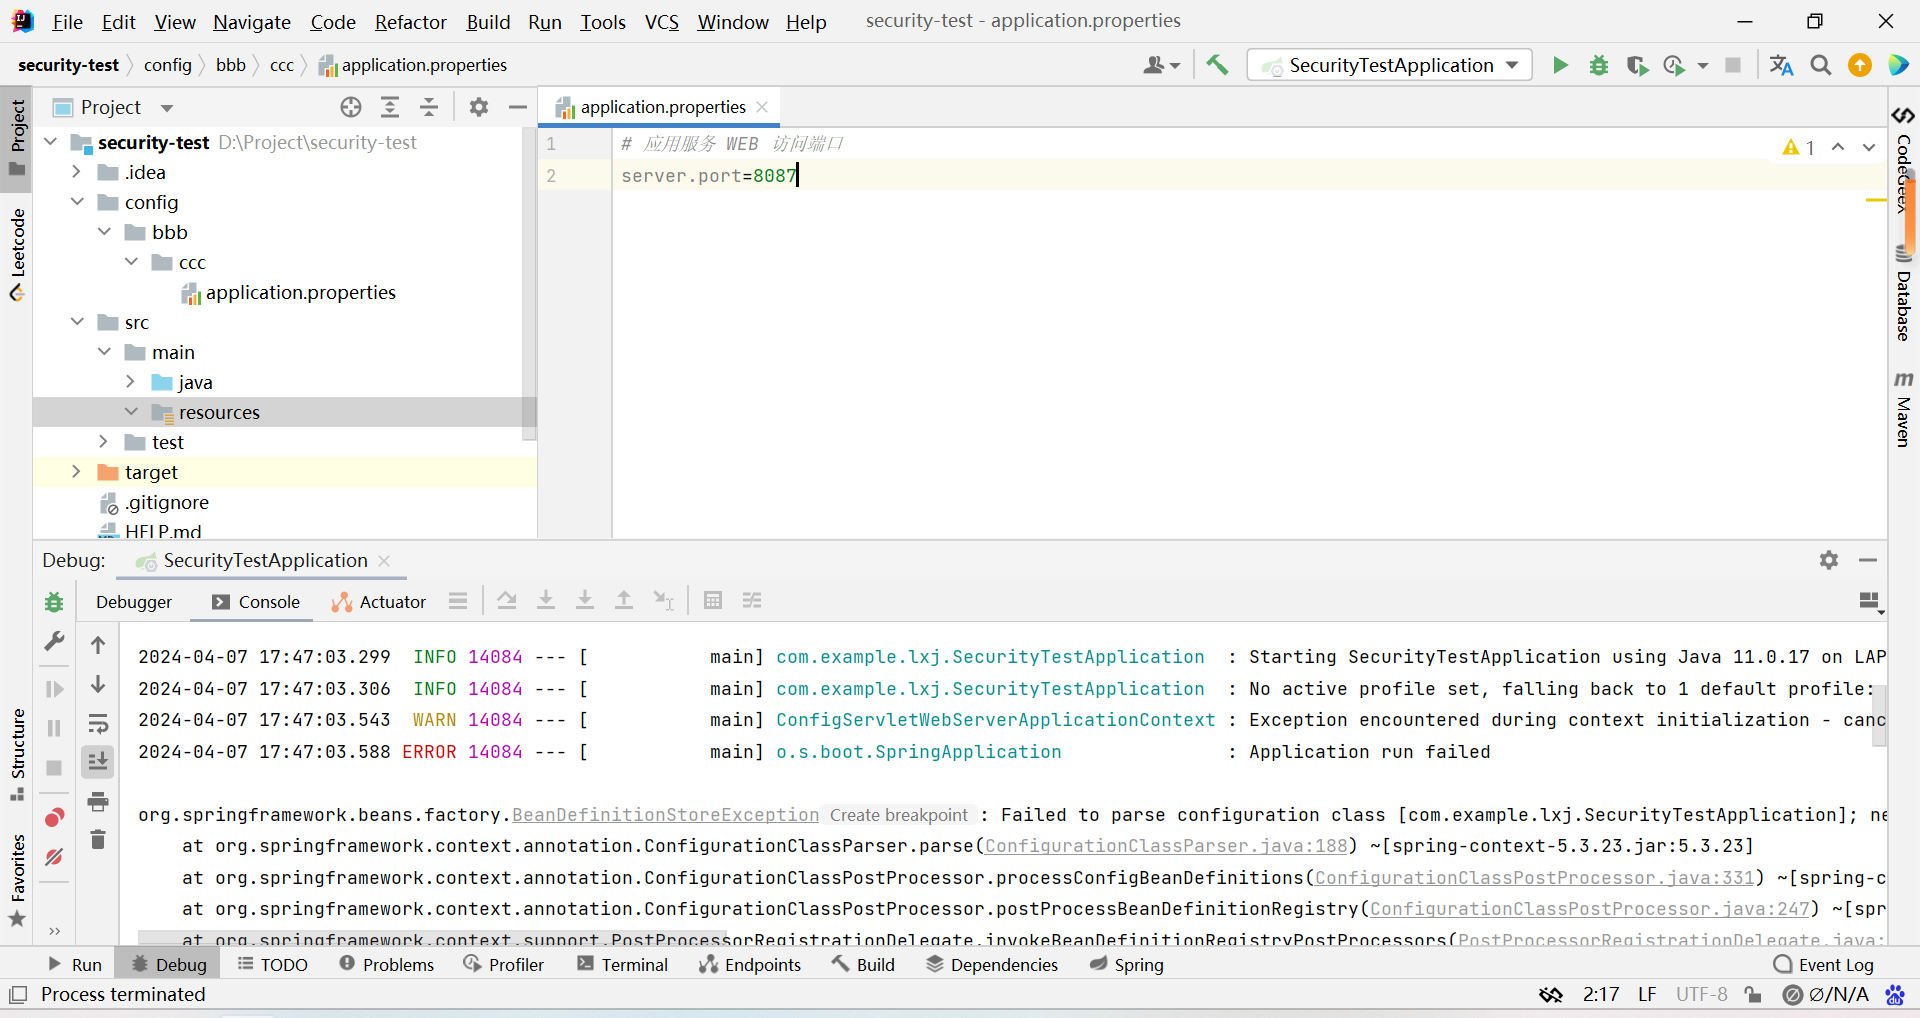
- 最后就是 .properties 配置文件优先级比 .yaml 优先级高
SPI机制

实现原理
1、在 @SpringBootApplication 注解中都会默认导入 @EnableAutoConfiguration 注解表示开启自动配置功能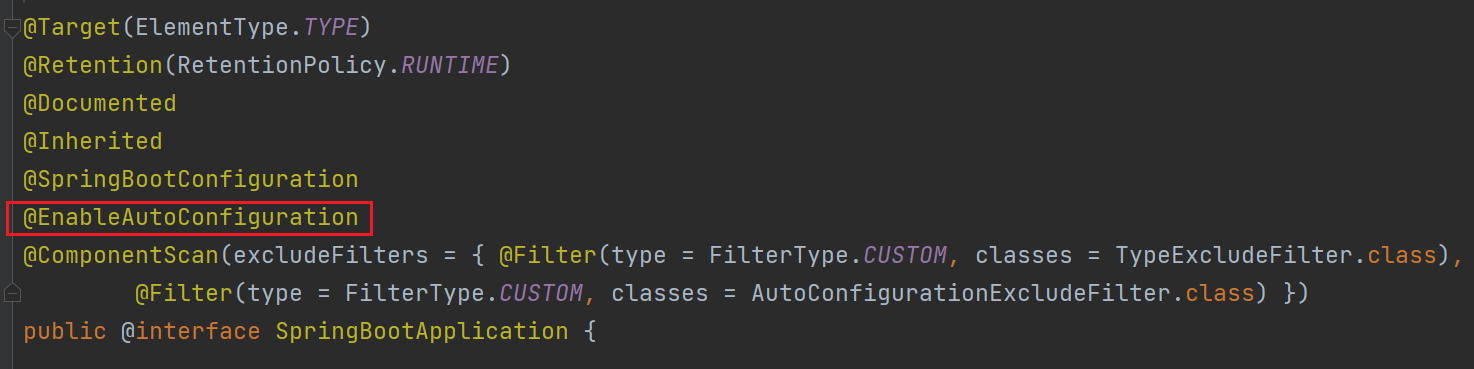
2、查看自动配置类,其中导入了 AutoConfigurationImportSelector 类用于扫描依赖的配置文件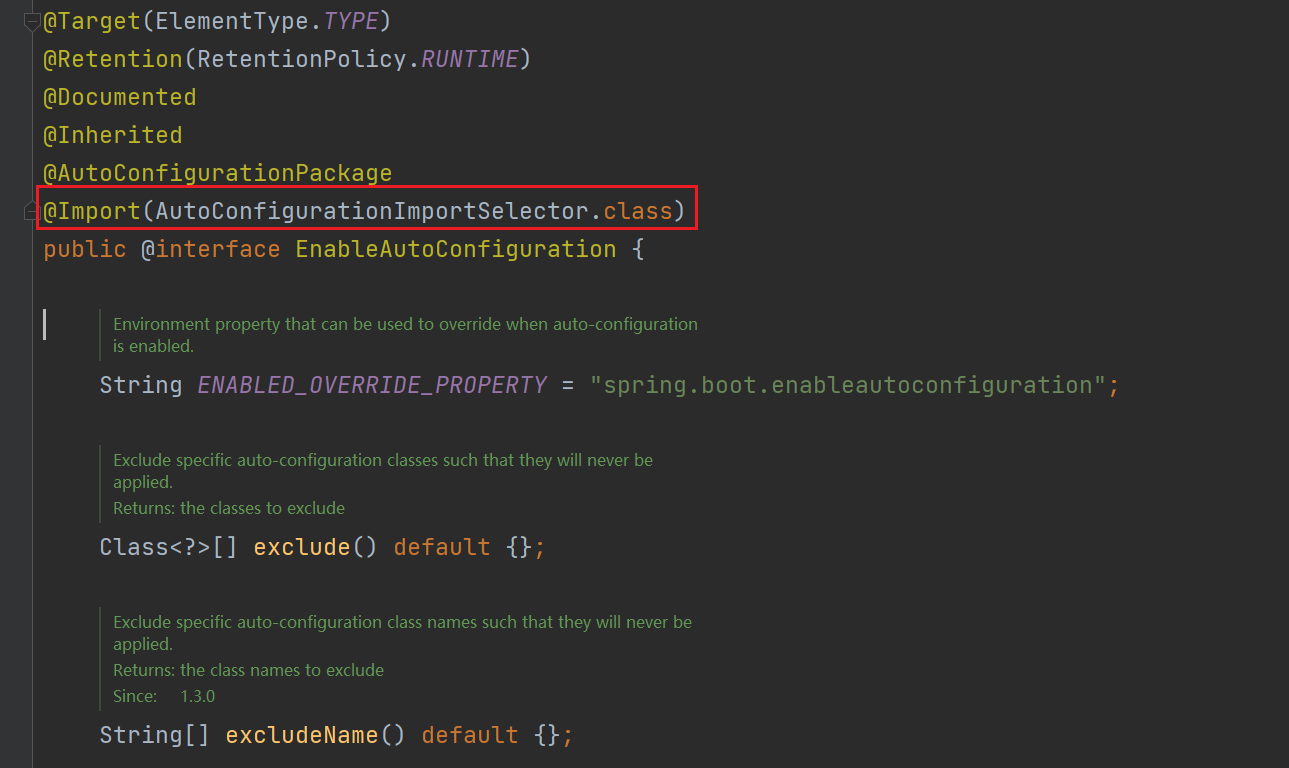
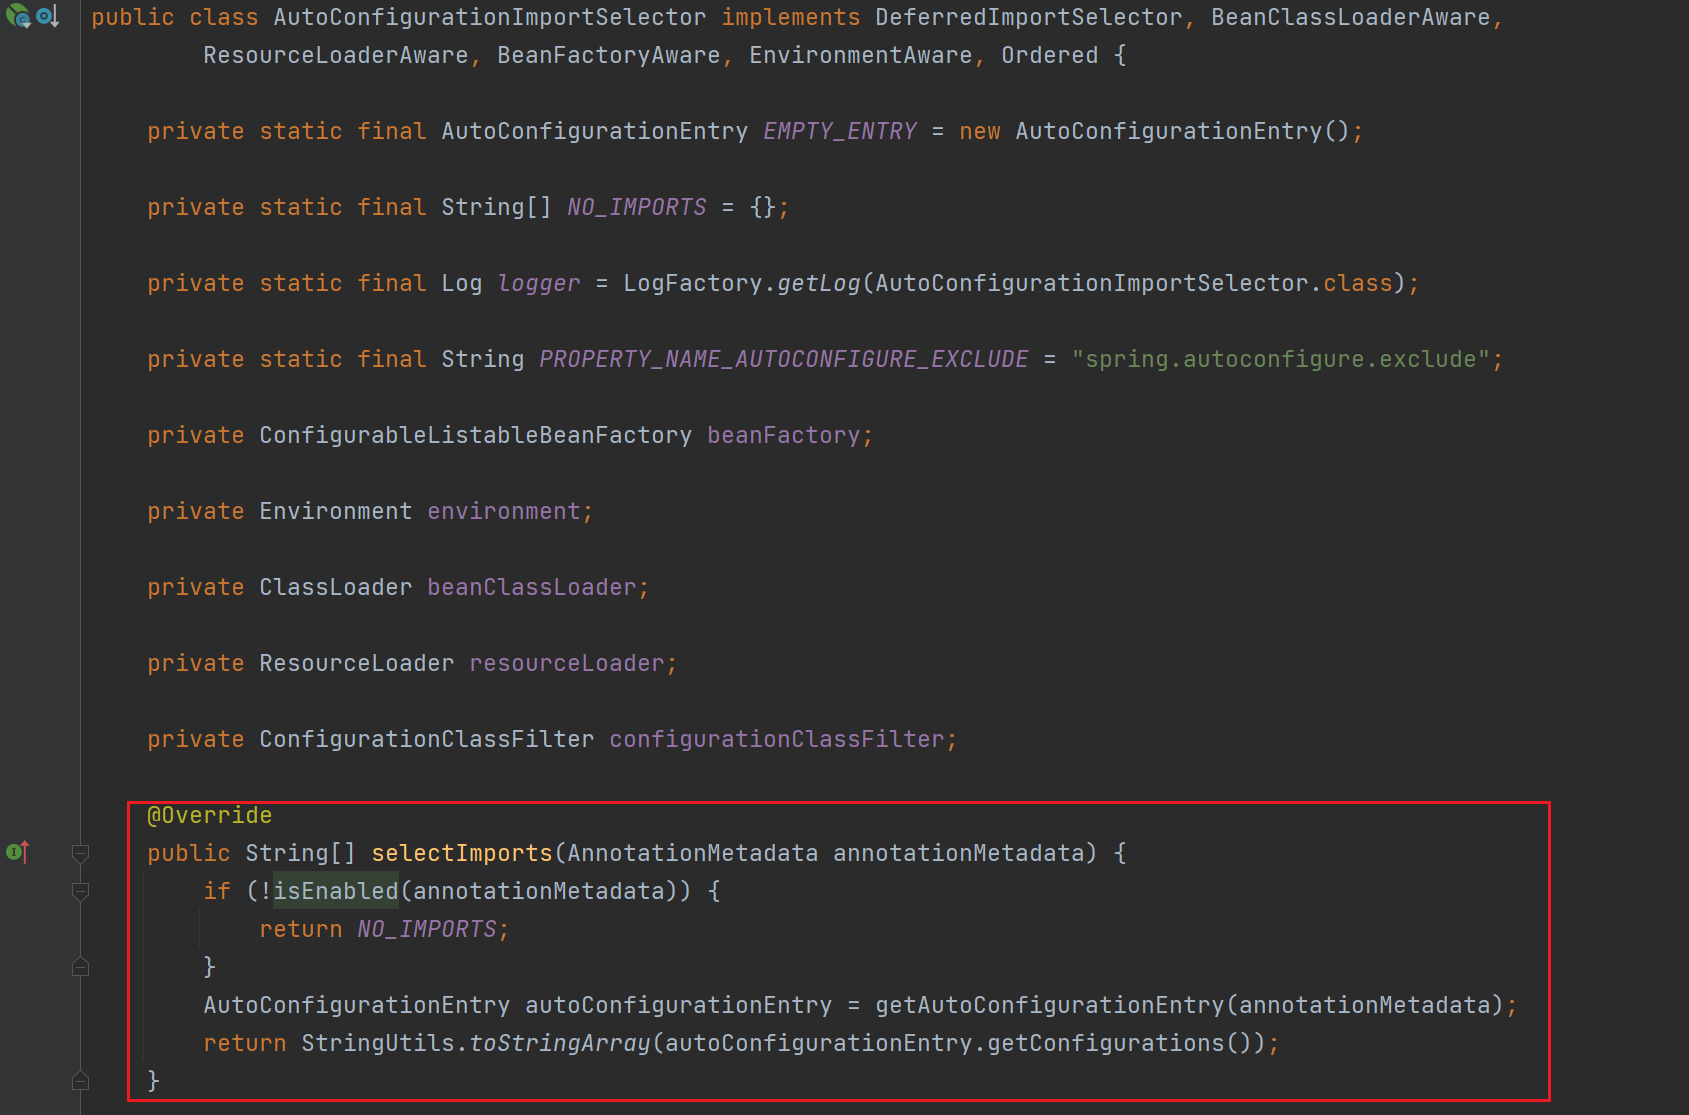
所以我们可以在配置文件中指定 spring.boot.enableautoconfiguration = false 用于关闭自动配置功能
4、而在 getAutoConfigurationEntry 方法中通过 getCandidateConfigurations 方法获取候选的自动配置类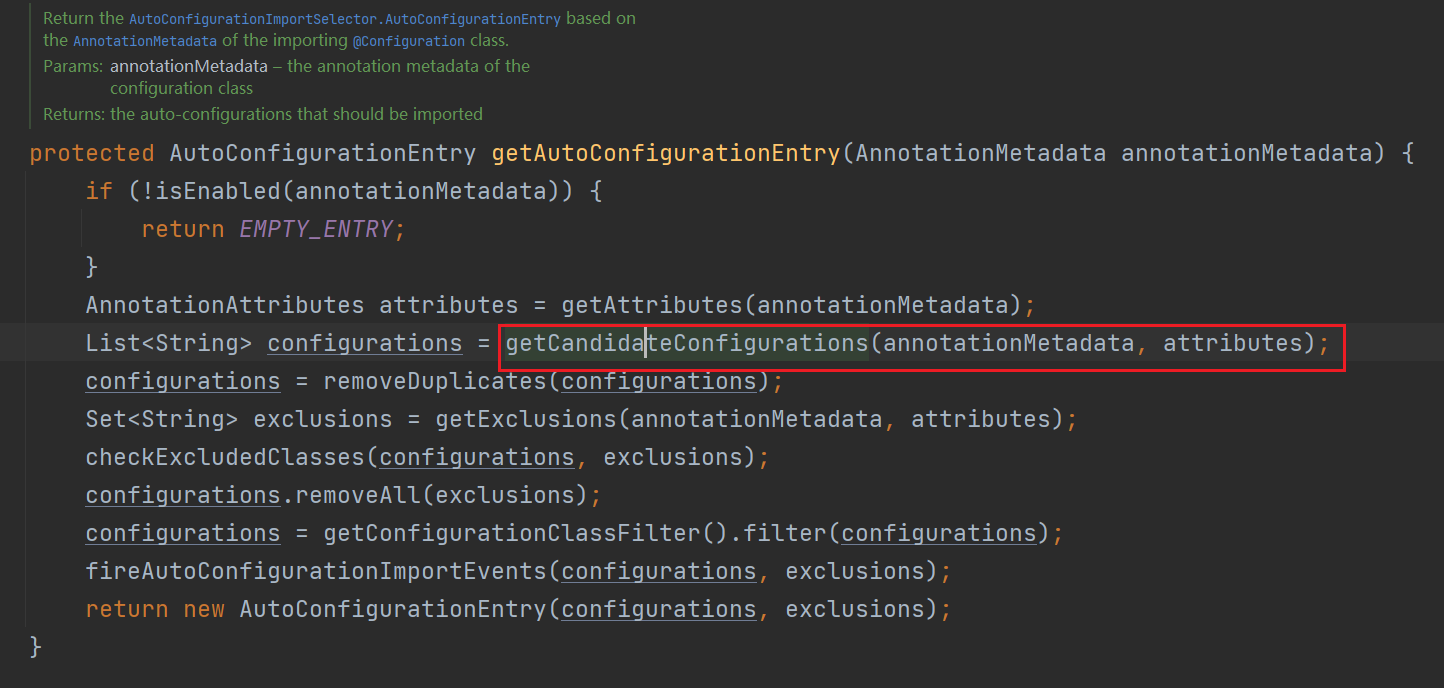
5、getCandidateConfigurations 方法中指定加载 key 的名字为 EnableAutoConfiguration 的配置内容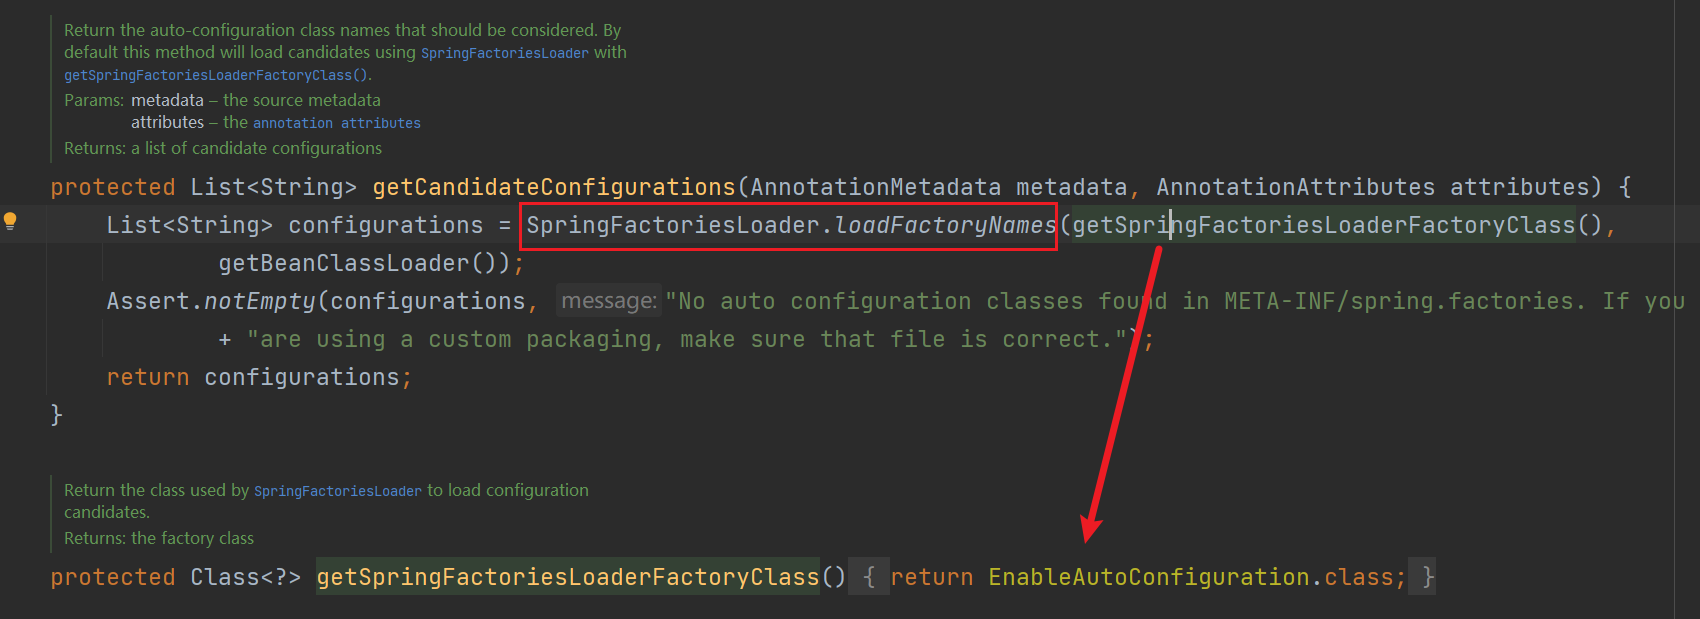
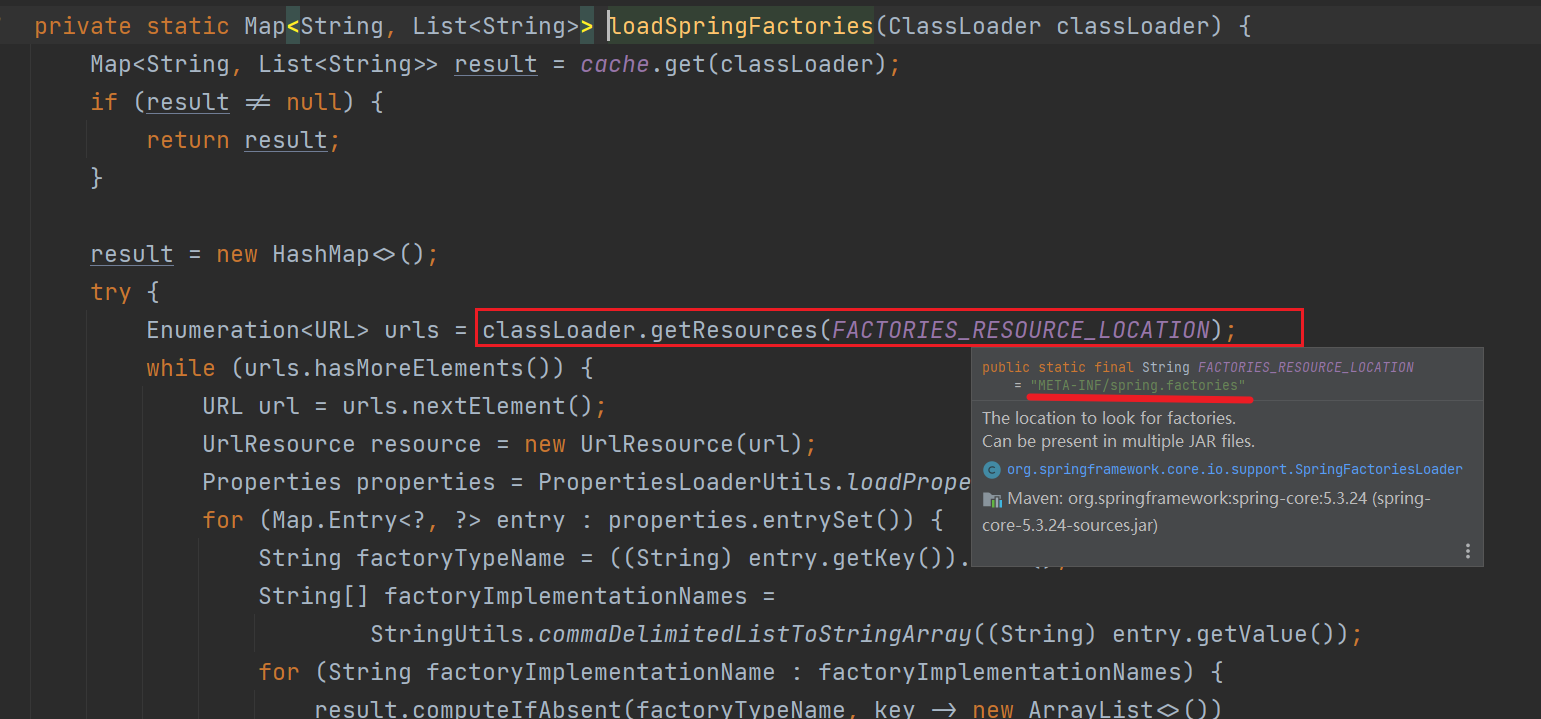
6、在 loadFactoryNames 方法中通过 loadSpringFactories 方法将 META-INF/spring.factories 文件读取为一个 Map 对象,然后读取 key 为 org.springframework.boot.autoconfigure.EnableAutoConfiguration 的内容

启动过程
1. 创建 SpringApplication 对象
2. 运行 run() 方法
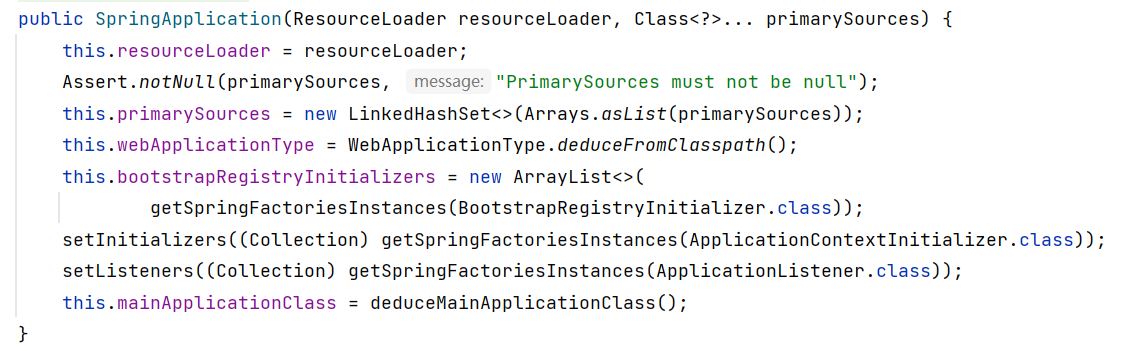
创建 SpringApplication 对象
- 保存配置类 primarySources
- 推断 web 类型(判断是 REACTIVE 还是 SERVLET 或是为 NONE)
- 通过 SPI 获取 BootstrapRegistryInitializer、ApplicationContextInitializer、ApplicationListener 类型的 bean(getSpringFactoriesInstances() 方法同样也是去读取 META-INF/spring.factories 文件的内容)
- 推断主启动类
运行 run() 方法
获取运行监听器,即获取 spi 中的 SpringApplicationRunListener 的 bean,调用 starting() 方法发布 ApplicationStartingEvent 事件
获取运行参数和配置内容
打印 banner 内容
创建 spring 容器
准备容器内容(这一步在下面讲)
启动 spring 容器
循环调用运行监听器的 started() 方法,发布 ApplicationStartedEvent 事件
对运行参数的处理(这一步也在下面讲)
public ConfigurableApplicationContext run(String... args) {
 // 获取开始时间
 long startTime = System.nanoTime();
 DefaultBootstrapContext bootstrapContext = createBootstrapContext();
 ConfigurableApplicationContext context = null;
 configureHeadlessProperty();

 // 获取运行监听器,即获取 spi 中的 SpringApplicationRunListener 的 bean,并循环调用这些监听器的 starting() 方法
 SpringApplicationRunListeners listeners = getRunListeners(args);
 listeners.starting(bootstrapContext, this.mainApplicationClass);
 try {

     // 获取运行参数和配置内容
     ApplicationArguments applicationArguments = new DefaultApplicationArguments(args);
     ConfigurableEnvironment environment = prepareEnvironment(listeners, bootstrapContext, applicationArguments);
     configureIgnoreBeanInfo(environment);

     // 打印 banner 内容
     Banner printedBanner = printBanner(environment);

     // 创建 spring 容器
     context = createApplicationContext();
     context.setApplicationStartup(this.applicationStartup);

     // 准备容器内容(这一步在下面讲)
     prepareContext(bootstrapContext, context, environment, listeners, applicationArguments, printedBanner);
     // 启动 spring 容器
     refreshContext(context);
     // 容器启动后处理,该方法为空,需要继承 SpringApplication 后扩展
     afterRefresh(context, applicationArguments);
     Duration timeTakenToStartup = Duration.ofNanos(System.nanoTime() - startTime);
     if (this.logStartupInfo) {
         new StartupInfoLogger(this.mainApplicationClass).logStarted(getApplicationLog(), timeTakenToStartup);
     }

     // 循环调用运行监听器的 started(),表示启动完成
     listeners.started(context, timeTakenToStartup);

     // 对运行参数的处理(这一步也在下面讲)
     callRunners(context, applicationArguments);
 }
 catch (Throwable ex) {
     handleRunFailure(context, ex, listeners);
     throw new IllegalStateException(ex);
 }
 try {
     Duration timeTakenToReady = Duration.ofNanos(System.nanoTime() - startTime);
     listeners.ready(context, timeTakenToReady);
 }
 catch (Throwable ex) {
     handleRunFailure(context, ex, null);
     throw new IllegalStateException(ex);
 }
 return context;
}
准备容器内容
调用 initialize() 方法
发布初始化事件 ApplicationContextInitializedEvent
获取启动时传入的配置类,并将其注册为 bean
发布初始化容器完成事件 ApplicationPreparedEvent
private void prepareContext(DefaultBootstrapContext bootstrapContext, ConfigurableApplicationContext context,
     ConfigurableEnvironment environment, SpringApplicationRunListeners listeners,
     ApplicationArguments applicationArguments, Banner printedBanner) {
 context.setEnvironment(environment);
 postProcessApplicationContext(context);

 // 调用初始化方法,获取 SPI 中的 ApplicationContextInitializer 的 bean,调用 initialize() 方法
 applyInitializers(context);

 // 发布初始化事件 ApplicationContextInitializedEvent
 listeners.contextPrepared(context);
 bootstrapContext.close(context);
 if (this.logStartupInfo) {
     logStartupInfo(context.getParent() == null);
     logStartupProfileInfo(context);
 }
 ConfigurableListableBeanFactory beanFactory = context.getBeanFactory();
 beanFactory.registerSingleton("springApplicationArguments", applicationArguments);
 if (printedBanner != null) {
     beanFactory.registerSingleton("springBootBanner", printedBanner);
 }
 if (beanFactory instanceof AbstractAutowireCapableBeanFactory) {
     ((AbstractAutowireCapableBeanFactory) beanFactory).setAllowCircularReferences(this.allowCircularReferences);
     if (beanFactory instanceof DefaultListableBeanFactory) {
         ((DefaultListableBeanFactory) beanFactory)
                 .setAllowBeanDefinitionOverriding(this.allowBeanDefinitionOverriding);
     }
 }
 if (this.lazyInitialization) {
     context.addBeanFactoryPostProcessor(new LazyInitializationBeanFactoryPostProcessor());
 }
 context.addBeanFactoryPostProcessor(new PropertySourceOrderingBeanFactoryPostProcessor(context));

 // 获取启动时传入的配置类,并将其注册为 bean
 Set<Object> sources = getAllSources();
 Assert.notEmpty(sources, "Sources must not be empty");
 load(context, sources.toArray(new Object[0]));

 // 发布初始化容器完成事件 ApplicationPreparedEvent
 listeners.contextLoaded(context);
}
调用初始化方法

将传入的配置类注册为 bean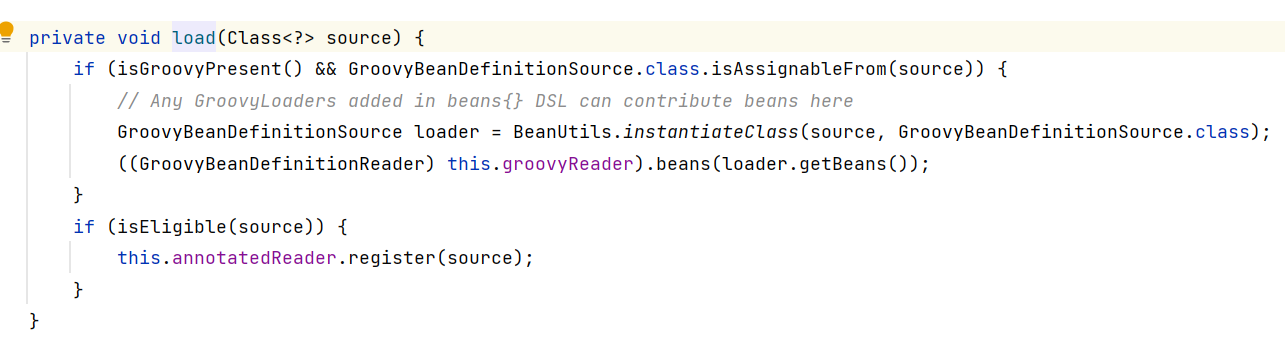
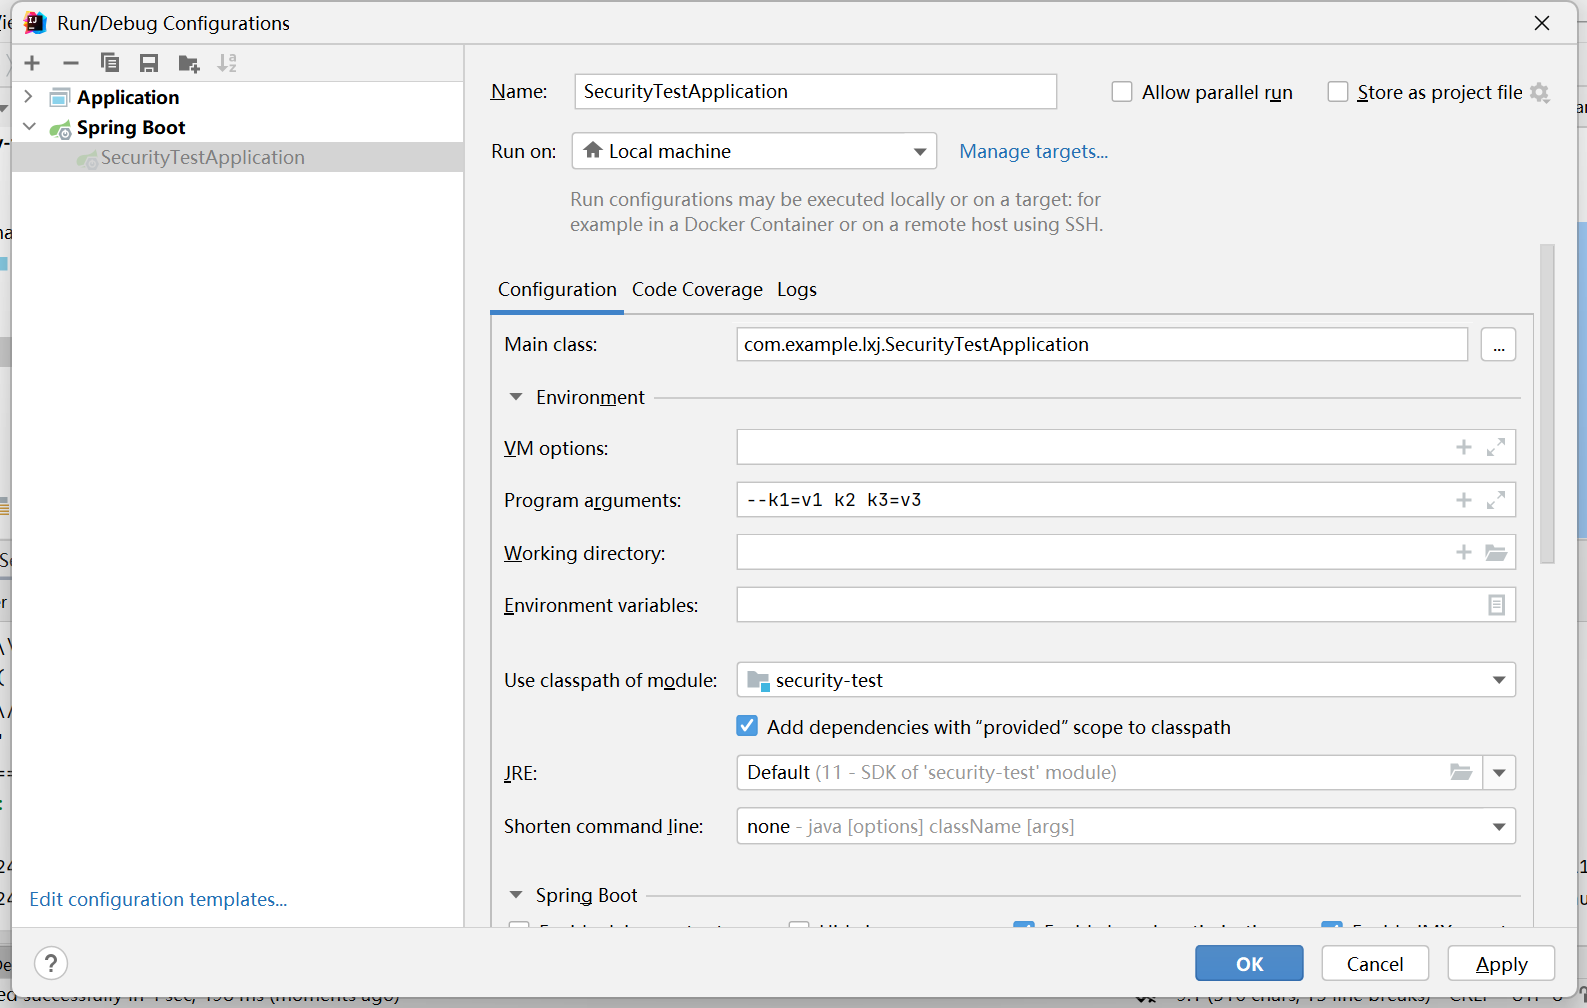
对运行参数的处理
这一步是获取 ApplicationRunner 和 CommandLineRunner 类型的所有 bean,并调用其 run() 方法,默认是不存在这两种类型的 bean 的,但是可以我们自己扩展
private void callRunners(ApplicationContext context, ApplicationArguments args) {
    List<Object> runners = new ArrayList<>();

    // 获取 ApplicationRunner 和 CommandLineRunner 类型的所有 bean,并调用其 run() 方法
    runners.addAll(context.getBeansOfType(ApplicationRunner.class).values());
    runners.addAll(context.getBeansOfType(CommandLineRunner.class).values());
    AnnotationAwareOrderComparator.sort(runners);
    for (Object runner : new LinkedHashSet<>(runners)) {
        if (runner instanceof ApplicationRunner) {
            callRunner((ApplicationRunner) runner, args);
        }
        if (runner instanceof CommandLineRunner) {
            callRunner((CommandLineRunner) runner, args);
        }
    }
}
创建 ApplicationRunner 类型的 bean,并设置启动参数
@Component
public class MyApplicationRunner implements ApplicationRunner {
@Override
public void run(ApplicationArguments args) throws Exception {
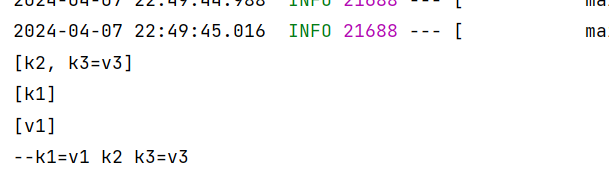
// 获取不符合格式的参数
System.out.println(args.getNonOptionArgs());
// 获取参数 key
System.out.println(args.getOptionNames());
// 获取指定参数的值
System.out.println(args.getOptionValues("k1"));
// 获取参数源内容
for (String sourceArg : args.getSourceArgs()) {
System.out.print(sourceArg + " ");
}
}
} 
创建 CommandLineRunner 类型的 bean
@Component
public class MyCommandLineRunner implements CommandLineRunner {
    @Override
    public void run(String... args) throws Exception {
        for (String arg : args) {
            System.out.print(arg + " ");
        }
    }
} 
容器初始化前配置
通过分析上面的启动过程,可知:
创建容器前:
- 通过监听 ApplicationStartingEvent 事件进行处理,不过通过以下方式并没有监听到(后续再看)

容器启动前:
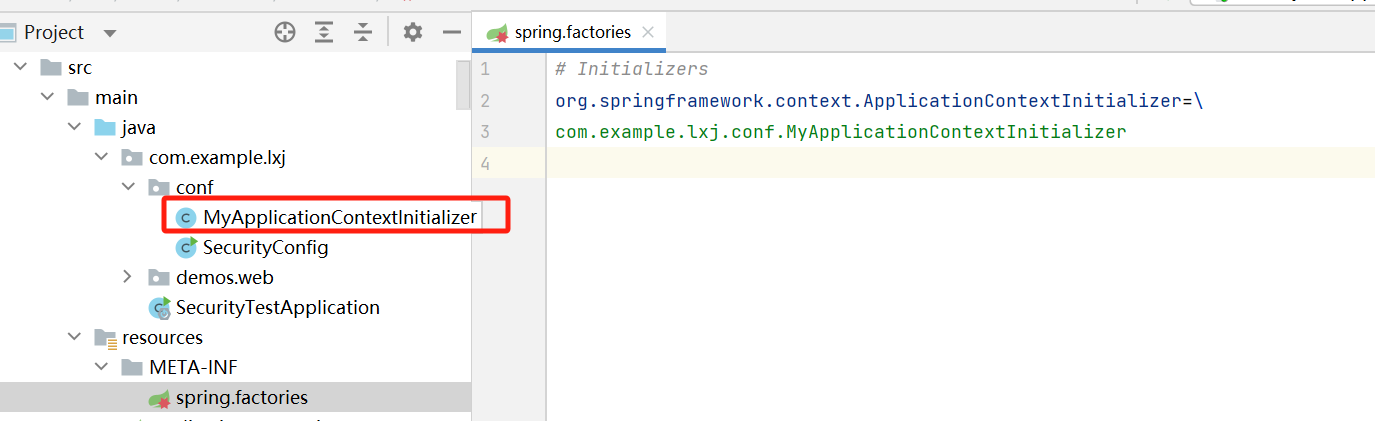
- 可以创建 ApplicationContextInitializer 类型的 bean,会被自动调用 initialize() 方法

- 监听 ApplicationContextInitializedEvent 事件
- 监听 ApplicationPreparedEvent 事件
容器启动完成:
- 监听 ApplicationStartedEvent 事件
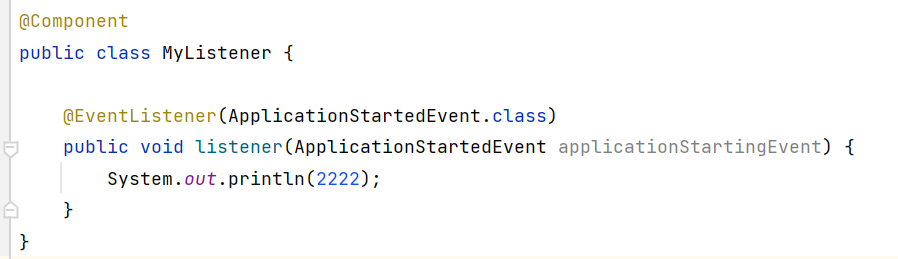
发现只有容器启动完成的 ApplicationStartedEvent 事件是可以监听到的
其他事件是通过 this.initialMulticaster.multicastEvent 发布的,不确定其监听方式,后续再看
后续来啦
其实并不是事件无法监听到,而是通过注解配置的监听器在 spring 容器创建前是不生效的(因为这些监听器还没有被扫描到并注册)
正确的使用方法如下:
创建 META-INF/spring.factories 配置文件,在这里指定监听器
org.springframework.context.ApplicationListener=\
cn.com.config.MyApplicationListener
创建监听器
package cn.com.config;
import org.springframework.boot.context.event.ApplicationStartingEvent;
import org.springframework.context.ApplicationListener;
public class MyApplicationListener
implements ApplicationListener
@Override
public void onApplicationEvent(ApplicationStartingEvent event) {
System.out.println(“spring boot 启动”);
}
}
3. 启动项目,就会发现已经监听到了
- 本文链接:https://lxjblog.gitee.io/2024/07/12/Springboot%E6%BA%90%E7%A0%81/
- 版权声明:本博客所有文章除特别声明外,均默认采用 许可协议。